
Buyer UI: Embedded Mandate Form Implementation Guide
The Mandate Form Component is a user interface feature that enables buyers to select Direct Debit as a payment method and complete the mandate form without navigating away from the current page. This seamless integration enhances the user experience and simplifies the payment process. This document provides a step-by-step guide to implementing and customizing the Mandate Form Component in your platform.
Steps
1. Authorization
In order to load the Mandate Form UI Web-Embeds in your platform, an authorized API call is needed in your backend.
Generate UI components access token
`curl -X POST "https://sandbox.unipaas.com/platform/authorize"
2  -H  "accept: application/json"
3  -H  "Authorization: Bearer <PLATFORM_SECRET_KEY>"
4  -H  "Content-Type: application/json"
5  --data-raw '{
6      "scopes": ["direct_debit_read","direct_debit_write"],
7      "vendorId": "{vendorId}"
8   }'`
const request = require("request");
const url = "https://sandbox.unipaas.com/platform/authorize";
const secretKey = "<PLATFORM_SECRET_KEY>";
const vendorId = "<YOUR_VENDOR_ID>";
const scopes = ["consumer_public_access"]
const options = {
url,
method: "POST",
headers: {
"Accept": "application/json",
"Authorization": `Bearer ${secretKey}`,
"Content-Type": "application/json"
},
body: JSON.stringify({
scopes,
vendorId
})
};
request(options, function (error, response) {
if (error) throw new Error(error);
console.log(response.body);
});| Verb | POST |
| Environment | sandbox |
| URL | https://sandbox.unipaas.com/platform/authorize |
Name | Type | Required | Description |
|---|---|---|---|
| string | YES | The scopes |
| string | YES | A vendor ID is a unique identifier for the vendor requesting API access. Note! If you don't have a vendor ID, do not include the parameter in your API request, then a public access token will be issued |
Response example
{
  "accessToken": "eyJhbGciOiJIUzI1NiIsInR5cCI6IkpXVCJ9.eyJzY29wZXMiOlsib25ib2FyZGluZ193cml0ZSIsInBheW91dF93cml0ZSIsImxpbmtfd3JpdGUiLCJvbmJvYXJkaW5nX3dyaXRlIiwibm90aWZpY2F0aW9uX3dyaXRlIiwiY29uZmlnX3JlYWQiLCJkaXJlY3RfZGViaXRfd3JpdGUiLCJld2FsbGV0X3JlYWQiLCJwdWJsaWNfY29uZmlnX3JlYWQiLCJsaW5rX3JlYWQiLCJvbmJvYXJkaW5nX3JlYWQiLCJub3RpZmljYXRpb25fcmVhZCIsImNvbmZpZ19yZWFkIl0sInZlbmRvcklkIjoiNjNkN2E2Njk4NGFkZDc5YWU2YmFmZDg3IiwibWVyY2hhbnRJZCI6IjYxZTZlOTdmZjEyNDJiODIwYzlkNWM4MSIsImVudiI6ImRldiIsImlhdCI6MTY4MTg1MTQ5MCwiZXhwIjoxNjgxODUzMjkwfQ.q5dCR3zfuEWCTG8HdvfEtlY7BmHxvJL0PFinlJSe8uQ",
  "expiresIn": 86400,
    "scopes": [
    "direct_debit_read","direct_debit_write"
  ],
  "vendorId": "63d7a66984add79ae6bafd87",
  "merchantId": "61e6e97ff1242b820c9d5c81",
  "env": "sandbox"
}| Name | Type | Description |
|---|---|---|
accessToken | string | Access token for the UI Web-Embeds |
expiresIn | string | Time until the access token expires (in seconds) |
scopes | string | List of permissions granted for the access token |
vendorId | string | Unique identifier for the vendor requesting access |
merchantId | string | Unique identifier for the platform associated with the vendor |
env | string | The environment in which the access token was issued |
This access token is valid for one hour, and it will be automatically refreshed whenever a UI Web-Embed communicates with the UNIPaaS servers.
Scopes
| Name | Description |
|---|---|
direct_debit_read | Grants all GET permissions required for the Mandate Form Embedded UI requests |
| direct_debit_write | Grants all POST permissions required for the Mandate Form Embedded UI requests |
2.Implementation Details
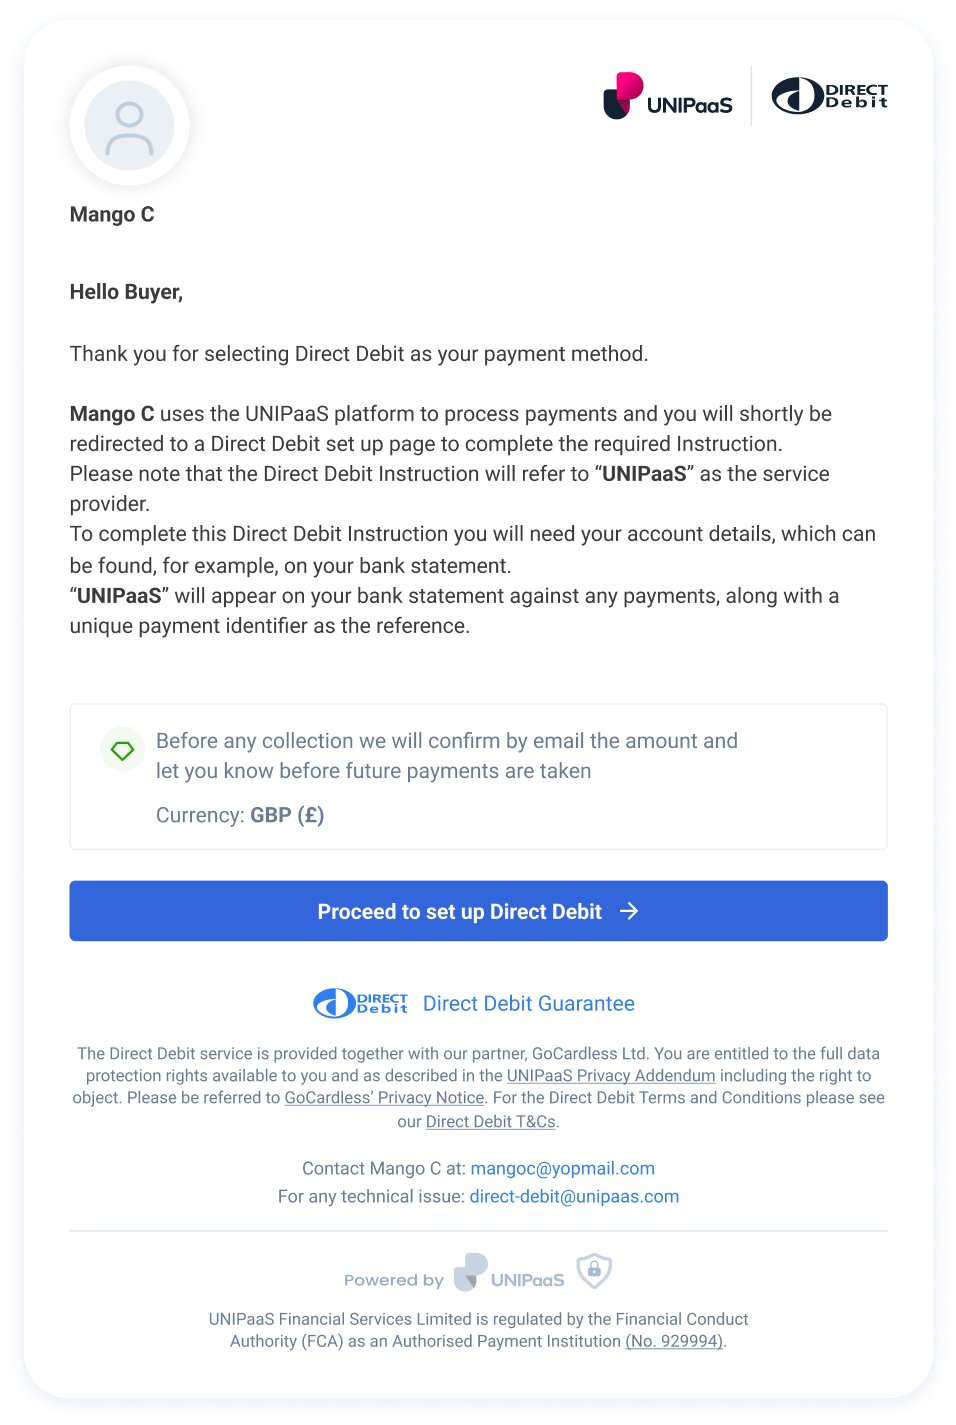
The Mandate Form Component UI Web-Embed should be implemented as part of the buyer's portal. This is typically the page where users can choose to add a payment method and are expected to see the "Set up Direct Debit" call-to-action button.
When a buyer selects Direct Debit, they can complete the mandate form directly within the same interface without requiring any additional action from the platform. This allows users to quickly and easily set up their Direct Debit. After successfully setting up the mandate, the form will provide a confirmation within the same page.
Step 1: Create and send a Mandate Request:
Initiate a direct debit mandate request POST /vendors/{vendorId}/mandates with the key parameter:
consumer.reference: This is a unique reference of the customer on your system.
Payload Example:
{
  "consumer": {
    "name": "Raymond Watsica",
    "email": "[email protected]",
    "reference": "9ee3-b20bec4985f3", //unique reference of the customer on your system
  },
  "createMandateLink": true,
  "requestMandateEmailObject": {
        "subject": "Please Set Up A Direct Debit Mandate",
        "body": "Hi Consumer,\nVendor would like to set up a Direct Debit mandate with you in order to automatically collect payments for future invoices. \nOnce this is set up, you won’t need to manually pay each invoice - Vendor can automatically collect from your bank account."
    }
}
A successful response will return:
url: This is a hosted link for the mandate request flow. This URL is intended for the payer to authorise the direct debit mandate.
consumerId: the unique ID on our system for your customer. Use this ID when you create and mount the instance in the Installation section below.
consumer.reference: Unique reference of the customer on your system (sent in the initial mandate request)
{
    "mandate": {
        "id": "67b761d80aefb5bcb11ae03c",
        "paymentOptionId": "67b761d8b7ce48e53a6e88e4",
        "vendor": {
            "id": "66d87dccdd0d3236ae43c4dd",
            "name": "Lovely Jane",
            "email": "[email protected]"
        },
        "merchant": {
            "id": "66d58bd06098898a5de10bdc",
            "name": "Platform Name"
        },
        "status": "sent",
        "consumer": {
            "id": "67b761d88e4f731d680c9839",
            "name": "Raymond Watsica",
            "reference": "9ee3-b20bec4985f3", //unique ID of customer on your system
            "email": "[email protected]"
        },
        "mandateCreationFormLink": "28JIvD19y4BqDf-Xe1I6v",
        "createdAt": "2025-02-20T17:09:44.144Z",
        "updatedAt": "2025-02-20T17:09:44.144Z",
        "v": 0
    },
    "link": {
        "refreshToken": [],
        "views": [
            "direct_debit"
        ],
        "vendorId": "66d87dccdd0d3236ae43c4dd",
        "merchantId": "66d58bd06098898a5de10bdc",
        "consumerId": "67b761d88e4f731d680c9839", //store and use
        "email": "[email protected]",
        "id": "67b761d88d319d9df60217c6",
        "uniqueId": "28JIvD19y4BqDf-Xe1I6v",
        "expiresAt": "2026-02-20T17:09:44.095Z",
        "status": "created",
        "supportEmail": null,
        "createdAt": "2025-02-20T17:09:44.096Z",
        "updatedAt": "2025-02-20T17:09:44.096Z",
        "v": 0,
        "url": "https://sandbox-hosted.unipaas.com/consumers/67b761d88e4f731d680c9839/28JIvD19y4BqDf-Xe1I6v/mandate"
    }
}
3.Customer Experience
Provide users with a seamless transition from the area hosted by your platform to the mandate setup process within the same page. Customisable themes ensure that the UI Web-Embeds align with your platform's branding, delivering a consistent and smooth user experience.
4.Installation
Scopes
Start with placing the following script tag element inside of the <head> of your HTML page:
<script type="application/javascript" src="https://cdn.unipaas.com/embedded-ui.js"></script>This script tag loads the JavaScript code that provides the functionality for implementing UNIPaaS UI Web-Embeds on a webpage. When the script is loaded and executed, it will create an object in the memory that contains methods for instantiating and interacting with the UI Web-Embeds.
General configuration
Place the following script tag element below the closing </body> tag of your HTML page.
This script is used to initialize and configure UNIPaaS UI Web-Embeds on a web page.
<script type="text/javascript">
  const config_general = {
    paymentsEnabled: true,
    theme: {
        colors: {
            primaryColor: "#2F80ED",
            secondaryColor: "#687B97",
            accentTextColor: "#2F80ED",
            primaryButtonColor: "#2F80ED"
        },
        fontFamily: "inherit",
        boxShadow: "0px 3px 15px rgba(27, 79, 162, 0.11)"
    }
  }
    const components = unipaas.components("<accessToken>", config_general);
</script>
Name | Type | Required | Description |
|---|---|---|---|
| boolean | YES | Indicates whether the UNIPaaS-powered embedded payments are enabled as the default payment provider for the vendor associated with the API request If set to If set to |
Theme
Theme customisation allows to match the visual design of the components with your product.
Name | Type | Description |
|---|---|---|
| string | Represents the primary color used for UI Web-Embeds |
| string | Represents the secondary color used for UI Web-Embeds |
| string | Represents the font color used for headers of UI Web-Embeds |
| string | Represents the font color used for primary buttons of UI Web-Embeds |
| string | Represents the font family used for UI Web-Embeds |
| string | Represents the box shadow applied to UI Web-Embeds, used to create a shadow effect |
Create a container
Place the following script tag element below the closing </body> tag of your HTML page.
Make sure to assign a unique ID to the container so that it can be easily identified and accessed.
<div id="mandateFormContainer"/>Create and mount an instance below the container
Create an instance of the mandate form component and mount it to the container DOM node in your page. This should be done after the previous div has finished loading..
<script type="text/javascript">
  const mandateForm = components.create("mandate", {
   "consumerId": "67b761d88e4f731d680c9839", // replace with actual consumer ID from Step 2
    "theme": {
      "colors": {
        "primaryColor": "#000000" // primary button color
      }
    }
  });
  mandateForm.mount("#mandateFormContainer");
</script>
Example: The embedded mandate form appears in a modal window
Theme
To match the visual design of the UI Web-Embeds with your platform branding, you can customize the primary color.
| Name | Type | Description |
|---|---|---|
colors.primaryColor | string | Represents the primary color used for UI Web-Embeds |
5. DOM Event Listeners
The UI web-embeds generate DOM events to provide real-time updates on user activity and checkout status. These events can be used to trigger custom actions and ensure a seamless user experience on the platform's end.
Create DOM event listeners
Place the following script tag element at the very bottom, below the closing </body> tag of your HTML page.
components.on("mandateSubmit", (e) => {
    console.log("mandateSubmit", e.detail);
});
components.on("mandateSuccess", (e) => {
    console.log("mandateSuccess", e.detail);
});
components.on("mandateError", (e) => {
    console.log("mandateError", e.detail);
});
Handle DOM events
| Event | Description | Action |
|---|---|---|
mandateSubmit | Triggered when the user attempts to make a mandate submission by pressing the "Set up Direct Debit" button. | Custom action on submit |
mandateSuccess | Triggered when a user successfully submits the mandate. Provides real-time information to the platform indicating that the mandate has been successfully processed. | Custom action on success |
mandateError | Triggered when an error occurs during the mandate submission. | Custom action on error |
Updated 7 months ago