This is the full developer documentation for Unipaas Docs
# Overview
> Accept online payments on any device, whatever your business model
## With Unipaas Accept Payments you can
[Section titled “With Unipaas Accept Payments you can”](#with-unipaas-accept-payments-you-can)
* Accept online payments from all over the world.
* Choose the preferred payment methods to accept payment in each country.
* Store card information for later use.
* Accept bank transfers, corporate cards, and recurring payments.
* Include an invoice with the generated checkout.
* Add a due date and a reminder to your checkout.
* Allow buyer to share checkout link with others.
* Get fraud protection with every transaction.
Note
If you send a transaction without any vendor ID - the transaction will be entered to the platform account and will be listed as a platform transaction
## Available Payment Methods
[Section titled “Available Payment Methods”](#available-payment-methods)
**Credit Cards**
We offer support for all major Credit Cards - Visa, Mastercard and AMEX, including strong customer authentication (SCA).
**Pay By Bank**
As open banking is gaining greater traction in checkouts for both B2B and B2C businesses, we are expanding our offering of checkout options.\
Pay by bank allows buyers to pay directly from their bank accounts, in a quick and easy experience.
This payment method is mostly beneficial for businesses, which are looking to eliminate manual work around bank transfers, and transfer funds instantly.
**Direct Debit**
Direct Debit is a widely-used payment method in the UK that allows authorized vendors to collect funds directly from their customers’ bank accounts. It is commonly used for recurring payments such as bills, subscriptions, memberships, and more. However, it can also be used for one-off or ongoing ad hoc payments.
This payment method provides great value in automation, increased control and certainty for vendors when getting paid.
**Alternative Payment Methods**
We are always adding additional payment methods to our checkout. From Apple Pay, Klarna, and PayPal, to any other local payment method you may need.
# Additional webhooks
> The following are additional webhooks that will provide notifications around authorizations,
The following are additional webhooks that will provide notifications around authorizations,
## authorization/update webhook
[Section titled “authorization/update webhook”](#authorizationupdate-webhook)
On every new Authorization or Authorization status change, you will receive a webhook notification to your server.
The body will include the **AuthorizationResult** object:
| Parameter | Always Available | Type | Description |
| --------------------- | ---------------- | ------ | --------------------------------------------------------------------------------------------------------------------------------------------------------------------------------------------------------------------------------------------------------------------------------------------------------------------------------------------------------------------------------------- |
| `authorizationId` | Yes | String | Unique ID of the Object |
| `authorizationStatus` | Yes | Enum | The status of the Authorization. See below detailed information |
| `currency` | Yes | String | The Currency of the payment |
| `amount` | Yes | Number | The Amount of the payment |
| `orderid` | Yes | String | Unique ID from the merchant system |
| `items` | Yes | Object | The items of the order per item per vendor |
| `transactionId` | Yes | String | The transaction ID of the specific payment operation |
| `paymentMethod` | Yes | String | The method of the payment (creditCard, bankTransfer, directDebit, e.t.c) |
| `checkoutId` | Yes | String | Unique ID of the checkout that has been paid |
| `checkoutStatus` | Yes | String | Current status of the Checkout |
| `vendorId` | Yes | String | Unique ID of the vendor |
| `paymentOption` | Yes | Object | Payment Option object that could represent card payment:\\```plaintext
{
cardAccount: {
brand: "VISA"
bin: "476134"
last4Digits: "1390",
issuerCountry: "GB"
}
}
```or bank transfer payment:\\```plaintext
{
bankAccount: {
brand: "Mock Bank"
}
}
``` |
| `planId` | No | String | Unique ID of the recurring payment plan |
| `subscriptionId` | No | String | Unique ID of the recurring subscription |
| `declinedReason` | No | String | The reason why payment has been declined |
| `description` | No | String | Description of payment In most cases value is taken from checkout creation |
| `metadata` | No | Object | The custom data that was used during checkout creation (this field can be used to pass some internal data through payment process) |
| `consumerEmail` | No | String | The email of buyer that made a payment |
| `consumerId` | No | String | Unique ID of the buyer |
| `reference` | Yes | String | Unique ID from the merchant system |
## payout/update webhook
[Section titled “payout/update webhook”](#payoutupdate-webhook)
Payout notifications notify you of every newly created payout and any change in the status of a payout. The webhook notification gets sent to your server.
The body will include the **PayoutResult** object:
| Parameter | Always Available | Type | Description |
| :------------------ | :--------------- | :----- | :---------- |
| `payoutId` | yes | string | |
| `status` | yes | Enum | |
| `amount` | yes | number | |
| `currency` | yes | string | |
| `createdDate` | yes | date | |
| `updatedDate` | yes | date | |
| `targetReferenceId` | no | string | |
| reconciled | yes | string | |
## ewallet/create webhook
[Section titled “ewallet/create webhook”](#ewalletcreate-webhook)
Account notifications are created to notify you when your vendor receives money for the first time - creating an automatic account in the accepted currency. Each time an account balance is created or disabled, you’ll get a webhook notification to your server, indicating its current status.
The body will include the following object:
| Parameter | Always Available | Type | Description |
| ------------ | ---------------- | ------ | -------------------------------------------------------------------------------------------------- |
| `eWalletId` | yes | string | Account unique identifier |
| `vendorId` | no | string | The unique ID of the vendor’s Account. If the Account belongs to the platform, it will return null |
| `platformId` | yes | string | Unique ID of the platform |
| `currency` | yes | enum | USD, GBP, EUR |
| `status` | yes | string | Ewallet Status (“created”) |
# Buyer UI: Embedded Chat Assistant
# GPayT - Embedded Chat Assistant
[Section titled “GPayT - Embedded Chat Assistant”](#gpayt---embedded-chat-assistant)
## Introduction
[Section titled “Introduction”](#introduction)
The GPT Chat Assistant is a conversational AI widget powered by GPT that you can embed into your platform. It provides users with a friendly chat interface to ask questions, get guided assistance, or even complete actions (like making a booking) through natural language conversation. This assistant helps improve user engagement and streamline complex workflows (such as booking a service) by turning them into an interactive chat experience. Since it’s part of the Unipaas UI components library, it’s easy to integrate and fully white-labeled to match your platform’s look and feel.
## Loading the Chat Assistant
[Section titled “Loading the Chat Assistant”](#loading-the-chat-assistant)
To get started, ensure you have included the Unipaas components library in your web page. Then you can create the chat assistant component using the components.create() method. For the Chat Assistant, use the component name “chatWidget”:
* JavaScript
```javascript
// Create a GPT Chat Assistant instance with optional configuration
const chatWidget = components.create("chatWidget", {/* config options */});
```
This creates a chatWidget instance that you can configure and control. You can pass a configuration object (as shown above with {/ *config options*/}) to customize the widget’s content and behavior (see Configuration Options below). If no config is provided, the chat will use default settings (a generic title, no custom logo, etc.).
### Configuration Options
[Section titled “Configuration Options”](#configuration-options)
When creating the Chat Assistant via components.create(“chatWidget”, config), you can supply a config object to tailor its appearance and behavior. The following options are available:
* **title** (string): The title displayed at the top of the chat widget.\
Example: “Help Center Assistant” would show “Help Center Assistant” as the chat header text. If not provided, a default title (e.g. “Chat Assistant”) is used.
* **description** (string): A subtitle or greeting displayed below the title.\
Example: “Ask me anything about our services or bookings” can be shown as a brief description or welcome message to guide the user. This field is optional; if not set, no subtitle is shown.
* **logoUrl** (string): URL of an image to use as the assistant’s logo or avatar in the chat header.\
Example: “[https://yourcdn.com/img/chat-logo.png”](https://yourcdn.com/img/chat-logo.png%22) can be your company or product logo to brand the chat widget. If not provided, a default icon or no logo will appear.
* **theme** (string or object): Customize the chat widget’s theme. This can be a string like “light” or “dark” for preset themes, or an object defining specific style properties (such as colors or fonts) to match your platform’s branding.\
Example: “dark” might enable a dark mode UI for the chat. By default, the assistant uses the Unipaas standard theme if this is not set.
* **contextData** (object): An optional data object providing context to the GPT assistant. Use this to pass in any relevant information or initial context the assistant might need every time it starts.\
Example: You might include { name: “Alice”, memberType: “Gold” } so the assistant can personalize responses (e.g., “Hello Alice, how can I assist you today?”). The exact structure can be designed based on what your GPT backend expects for context.
* **onMessage** (function): Callback function that triggers whenever a message is sent or received in the chat. This allows your platform to intercept or monitor conversations. The function receives the message object, so you can implement custom logic (such as logging, analytics, or modifying the message).
- JavaScript
```javascript
onMessage: (message) => {
console.log("Chat message event:", message);
// You could filter certain queries or trigger other UI actions based on the message content
}
```
* **onBookingComplete** (function): Callback function that triggers when the chat assistant completes a booking flow. If your GPT assistant is designed to help users make a booking (for example, reserving a bus seat or scheduling an appointment), this function will be called at the end of that process. The function receives the booking details or confirmation data
- JavaScript
```javascript
onBookingComplete: (bookingData) => {
// bookingData might include an ID or summary of the completed booking
console.log("Booking completed!", bookingData);
alert("🎉 Your booking is confirmed! Reference: " + bookingData.reference);
// You could also redirect the user or update the UI with the booking info here
}
```
All configuration options are optional, but using them helps provide a better user experience and tighter integration with your platform. For instance, setting a custom title and logo brands the experience, and using the callbacks lets your application respond to user interactions in the chat.
## Mounting the Chat Assistant
[Section titled “Mounting the Chat Assistant”](#mounting-the-chat-assistant)
After creating the chatWidget instance, you need to mount it onto a container in your web page so that it becomes visible to users. First, add a container element in your HTML where the chat widget should render. This is typically a `
` that you’ve reserved for the chat, for example in the bottom-right corner of your page or wherever you want the chat icon/panel to appear:
* HTML
```html
```
Choose an appropriate ID (here we use “chat-assistant”). Next, call the mount() method on your chatWidget instance, and pass the CSS selector or element reference for the container:
* JavaScript
```javascript
// Mount the chat widget into the container with ID "chat-assistant"
chatWidget.mount("#chat-assistant");
```
This will inject the Chat Assistant UI into the `
` you created. Typically, the widget may initially display as a small chat bubble or icon. Ensure the container has enough space or positioning (for example, you might set a fixed position and size for the container in your CSS if needed). Once mounted, the chat interface (either an icon or a chat window) is ready for user interaction.
## Opening the Chat Programmatically
[Section titled “Opening the Chat Programmatically”](#opening-the-chat-programmatically)
By default, the Chat Assistant might appear as a minimized widget (like a chat bubble or button) on your page after mounting. Users can click it to open the full chat window. However, you can also open (or close) the chat programmatically via the widget instance methods:\
• chatWidget.open(): Opens or expands the chat window, as if the user clicked the chat icon. This brings the conversation interface into view.\
• chatWidget.close(): Closes or minimizes the chat window, returning it to the initial icon state.
These methods are useful if you want to control the chat flow via code. For example, you might automatically open the chat to greet the user or direct them through a process, or close it at certain times.
Example – Opening the chat:
* JavaScript
```javascript
// After mounting the widget, open the chat interface immediately
chatWidget.mount("#chat-assistant");
chatWidget.open(); // programmatically open the chat window
```
In this snippet, the chat widget will appear and then automatically pop open (without the user having to click anything). You could call chatWidget.open() based on specific user actions or page events (like if the user has been idle, or if an error occurs and you want to proactively offer help).
Similarly, use chatWidget.close() if you need to hide the chat via script (though users can always close it themselves using the UI’s close button).
## Example Usage Scenarios
[Section titled “Example Usage Scenarios”](#example-usage-scenarios)
To tie everything together, here are a few common use cases (inspired by a Vectare bus services integration) demonstrating how you might use the GPT Chat Assistant in practice:
1. Open Automatically on Page Load
You may want the assistant to greet users as soon as they land on a page (for example, the booking page) to offer help. To do this, create and mount the widget, then call the open() method right away:
* JavaScript
```javascript
const chatWidget = components.create("chatWidget", {
title: "Bus Booking Assistant",
description: "Hi! I can help you book your bus tickets.",
// ...other config like logoUrl, theme, etc.
onBookingComplete: (data) => {
console.log("Booking done via chat:", data);
alert("Your bus booking is confirmed! 🎉");
}
});
chatWidget.mount("#chat-assistant");
chatWidget.open(); // Open chat immediately to greet the user
```
In this example, as soon as the page loads, the chat window pops up with a custom title and greeting. The onBookingComplete callback is set to alert the user when their booking is confirmed (this assumes the AI can guide the booking process and then provide confirmation data to the callback).
2. Open on a Button Click
If you prefer to let the user decide when to chat, you can keep the widget minimized and only open it when a specific button or link on your page is clicked. For instance, you might have a “Chat with us” button in your help section:
* HTML
```html
```
Attach an event listener to your button that calls chatWidget.open():
* JavaScript
```javascript
const chatWidget = components.create("chatWidget", { /* config as needed */ });
chatWidget.mount("#chat-assistant");
document.getElementById("help-btn").addEventListener("click", () => {
chatWidget.open();
});
```
Now, the chat will only expand when the user clicks the Chat with our Assistant button. This gives users the choice to invoke the assistant when they need it. The widget can still display an icon or indicator (from the mount) so users know a chat is available.
3. Handling Booking Completion in Chat
One powerful feature of a GPT-powered assistant is guiding users through transactions like bookings. Suppose the assistant helps a user book a service (e.g., reserving a bus seat). You would use the onBookingComplete callback to react to that event in your webpage. We showed an example of setting this callback above; here’s a bit more detail:
* JavaScript
```javascript
const chatWidget = components.create("chatWidget", {
// ... other config (title, description, etc.)
onBookingComplete: (bookingInfo) => {
// e.g., bookingInfo might contain { reference: "ABC123", details: { ... } }
console.log("Chat assistant completed a booking:", bookingInfo);
// Update the UI or navigate as needed:
// For example, show a confirmation section or redirect to a confirmation page
showConfirmationBanner(bookingInfo.reference);
}
});
chatWidget.mount("#chat-assistant");
```
In this snippet, whenever the chat assistant finalizes a booking, our callback logs the info and calls a hypothetical showConfirmationBanner function with the booking reference. In a real app, you might use this to display a nice confirmation message on the page or even redirect the user to a dedicated confirmation screen with booking details. The key is that your platform is immediately informed of the booking event and can respond accordingly (e.g., update state, inform other parts of the app, etc.).
# All-in-One Flexible Solution
> Our flexible solution enables you to choose from multiple integration options for each one of our products. From an out-of-the-box solution on our portal...
Our flexible solution enables you to choose from multiple integration options for each one of our products. From an **out-of-the-box** solution on our portal (available to you once you open an account) to a **hosted** or **embedded** solution, all the way to our **API** .
All solutions support PSD2 regulations and allow for 3D 1 and 2 transaction protocols. Our non-API solutions are also fully compliant with PCI security requirements.
In this guide, you’ll find a collection of our products that fit specific use cases.

## Managed solution for platforms
[Section titled “Managed solution for platforms”](#managed-solution-for-platforms)
**Platform managed solution - light-speed integration, minimum ongoing management**.\
Our managed solution is integrated at light-speed and uses out-of-the-box products that provide full functionality and the ability to preserve your brand identity. It’s highly suitable for businesses with limited resources and a busy road map. Some of the products in this suite, like the checkout page, are fully customisable to fit your brand.
## Advanced flexible solution for platforms
[Section titled “Advanced flexible solution for platforms”](#advanced-flexible-solution-for-platforms)
Our advanced platform solution is fully flexible and customisable. It’s a simple and easy-to-use API that gives you the most flexibility while keeping you protected from a security and compliance point of view. If your business model and strategy require you to have a fully customisable and white-labelled payments experience, this solution is for you.\\
## Integration effort overview
[Section titled “Integration effort overview”](#integration-effort-overview)
The following table will help you choose the integration type that suits your business model and development capacity, for each of our products.
Please note: Different integration options have different PCI requirements.
| Product | No code | Low effort | Mid effort |
| ------------------ | ------------------------------------------------------------ | ----------------------------- | -------------- |
| Onboarding | Hosted onboarding link | Embedded UI | Onboarding API |
| Accept payments | Payment link | Checkout page Web SDK | Payin API |
| Account management | Portal view | Account component | Account API |
| Payout | Manual payout on demand via portalScheduled Automatic payout | Payout form Account component | Payouts API |
## Vendor Onboarding
[Section titled “Vendor Onboarding”](#vendor-onboarding)
You can use our onboarding component to onboard vendors and get them to accept payments in just a few minutes.\\\
\
**We provide 3 options for onboarding integration:**
Hosted Onboarding Link
No code required.
[Learn more](/docs/onboarding-link/)
Embedded UI
Low integration effort required.
[Learn more](/docs/onboarding-ui/)
Onboarding API
Mid integration effort required.
[Learn more](/docs/onboarding-api/)
## Accept Payments
[Section titled “Accept Payments”](#accept-payments)
Unipaas payin API allows you to collect payments using various methods: Credit and debit cards, bank transfers, and a selection of APMs.
Credit and debit cards give end-users the option to use personal and corporate credit card brands such as Mastercard, Visa, and Amex.
Bank transfers enable both consumers and businesses to pay directly from their bank account by offering a bank transfer option in your checkout.
Alternative Payment Methods (APMs) such as Apple Pay, Google Pay, and other local Accounts can be integrated into your checkout to increase conversion rates.
**According to your technological capabilities and PCI compliance level, you can integrate with our online payments solution in one of four ways.**
Payment Link
No code required.
[Learn more](/docs/payment-link-1/)
Checkout Page
Low integration effort required.
[Learn more](/docs/checkout-page/)
Web SDK
Low integration effort required.
[Learn more](/docs/web-sdk-old/)
PayIn API
Mid integration effort required.
[Learn more](/docs/api-only-server-to-server/)
## Account management
[Section titled “Account management”](#account-management)
Managing an account is easy with Unipaas. You can choose an integration that’s right for you, according to your specific needs.
If you wish to focus your efforts on payment acceptance capabilities, you can use our portal. If a more comprehensive white labelled solution is necessary, you can use our API and host reports within your current platform or admin panel.\\
Managed
No code required.
[Learn more](/docs/ewallet-in-unipaas-portal/)
Account API
Mid integration effort required.
[Learn more](/docs/get-merchant-ewallet-1/)
## Pay funds out
[Section titled “Pay funds out”](#pay-funds-out)
As a modern digital platform, you will need to send payouts to your vendors and suppliers. You can do this once you’ve opened a merchant account in the Unipaas panel. We offer three different solutions for you to choose from:\\
Payout On-demand
Via portal. No code required.
[Learn more](/docs/payouts-from-unipaas-portal/)
Scheduled Payout
Automatic via portal. No code required.
[Learn more](/docs/payouts-from-unipaas-portal/)
Payout API
Mid integration effort required.
[Learn more](/docs/edit-vendor-payment-option-1/)
Go Next[Use Cases](/docs/use-cases/)
# API Endpoints
> Description: Retrieves the details of a specific mandate for a customer.\ HTTP Method: GET\ Endpoint:...
# Get mandate
[Section titled “Get mandate”](#get-mandate)
**Description**: Retrieves the details of a specific mandate for a customer.\
**HTTP Method**: GET\
**Endpoint**: /platform/vendors/:vendorId/consumers/reference/:consumerReference/mandates\
**Parameters**:
* ConsumerReference (required): The Reference of the consumer
# Request mandate from customer
[Section titled “Request mandate from customer”](#request-mandate-from-customer)
**Description**: Initiates the process of requesting a Direct Debit mandate from a customer.\
**HTTP Method**: POST\
**Endpoint**: /platform/vendors/vendorId/mandates\
**Parameters**:
* Vendor ID (required): The unique identifier of the vendor
* Customer ID (required): The unique identifier of the customer.
* Additional parameters for customer information, such as name, email, and address.
# Resend mandate request
[Section titled “Resend mandate request”](#resend-mandate-request)
**Description**: Resends the mandate request to a customer who has not yet responded or approved the mandate.\
**HTTP Method**: POST\
**Endpoint**: /platform/vendors/{{vendor\_id}}/mandates/{{mandate\_id}}/send\
**Parameters**:
* Vendor ID (required): The unique identifier of the vendor
* Mandate ID (required): The unique identifier of the mandate.
# Collect with Direct Debit
[Section titled “Collect with Direct Debit”](#collect-with-direct-debit)
Note
Within the Direct Debit context, “Collect”, “Collection” or “Collecting” refer to a Direct Debit payment (authorization).
**Description**: Creates a collection for a Direct Debit payment.\
**HTTP Method**: POST\
**Endpoint**: /pay-ins/checkout\
**Parameters**:
* Payment method (required)
* Amount (required)
* Due date (required)
* Reference (required)
# Cancel collection
[Section titled “Cancel collection”](#cancel-collection)
**Description**: Cancels a specific collection made through the Direct Debit service.\
**HTTP Method**: DELETE\
**Endpoint**: platform/pay-ins/:authorizationId/void\
**Parameters**:
* Collection ID (required): The unique identifier of the collection.
# Get all mandates
[Section titled “Get all mandates”](#get-all-mandates)
**Description**: Retrieves a list of all mandates associated with the Direct Debit service.\
**HTTP Method**: GET\
**Endpoint**: TBD
# Get all collections
[Section titled “Get all collections”](#get-all-collections)
**Description**: Retrieves a list of all collections made through the Direct Debit service.\
**HTTP Method**: GET\
**Endpoint**: TBD
# Get collection
[Section titled “Get collection”](#get-collection)
**Description**: Retrieves the details of a specific collection.\
**HTTP Method**: GET\
**Endpoint**: TBD\
**Parameters**:
* Collection ID (required): The unique identifier of the collection.
# Cancel mandate
[Section titled “Cancel mandate”](#cancel-mandate)
**Description**: Cancels a Direct Debit mandate for a customer.\
**HTTP Method**: DELETE\
**Endpoint**: /platform/vendors/:vendorId/mandates/:mandateId/cancel\
**Parameters**:
* Mandate ID (required): The unique identifier of the mandate.
***
*ADD PAYLOADS + INPUT + RESPONSE EXAMPLES*
# API Only (Server to Server)
> With API Only, platforms/merchants can access the Unipaas Pay-in functionalities to enable single payments, create tokens, create 3DS payments, recurring...
With API Only, platforms/merchants can access the Unipaas Pay-in functionalities to enable single payments, create tokens, create 3DS payments, recurring payments, and more. All these calls require the caller to have a secret key (Private\_Key).
You can find instructions on how to get the private key [here](/docs/getting-started/).
Use this API to build your own payment form and have complete control over your checkout page’s look and feel.
Caution
In the API Only implementation you **collect and pass raw card data**.\
This requires you to assess your PCI compliance according to SAQ D, the most extensive form of self-certification.
## Before you begin
[Section titled “Before you begin”](#before-you-begin)
Please note: If you send a transaction without any vendor ID - the transaction will be entered to the platform e-wallet and will be listed as a platform transaction
## Create a simple payment
[Section titled “Create a simple payment”](#create-a-simple-payment)
To create a simple payment you need the card and the shopper’s information (email and country). After the shopper submits their payment details on your checkout page, you need to make a payment request to Unipaas.
From your server make an **POST /pay-ins** request specifying:
| Parameter name | Required | Description | Type |
| ------------------ | -------- | ----------------------------------------------------------------------------------------------------------------------------------------------------------------------------------- | ------ |
| `amount` | Yes | The value of the payment | Number |
| `currency` | Yes | The currency of the payment | String |
| `orderId` | Yes | Your unique reference for this payment | String |
| `paymentOption` | Yes | Buyer’s payment option details (Object) | Object |
| `consumer.email` | Yes | Buyer’s email address | String |
| `consumer.country` | Yes | Buyer’s country code, ISO 2 letters | String |
| `transactionType` | No | Values: `Auth` or `Sale`. The default is `Sale`. Use `Auth` in cases where you want to separate between the Authorization step and capture (read more [here](/docs/main-entities/)) | String |
* cURL
```curl
curl --location --request POST 'https://sandbox.unipaas.com/platform/pay-ins' \
--header 'Content-Type: application/json' \
--header 'Authorization: Bearer --YOUR_PRIVATE_KEY--' \
--data-raw '{
"amount": 50,
"currency": "EUR",
"platformOrderId": "13323",
"paymentOption": {
"paymentOptionType": "Card",
"cardAccount": {
"nameOnCard": "test shopper",
"expYear": "23",
"expMonth": "10",
"number": "4000023104662535",
"securityCode": "132",
"externalMpi": {
"eci": "2",
"cavv": "ejJRWG9SWWRpU2I1M21DelozSXU="
}
}
},
"consumer": {
"email": "david@unipaas.com",
"country": "GB"
},
"metadata": {
"CustomerID": "457349"
}
}'
```
The following example shows the **POST /pay-ins** response:
* JSON
```json
{
"status": "Approved",
"authorizationId": "608682347e445aaa7ccd7a61",
"authorizationStatus": "Captured",
"transactionId": "608682347e445aaa7ccd7a64",
"paymentOption": {
"paymentOptionId": "608682367e445aaa7ccd7a65",
"bin": "400002",
"brand": "VISA",
"last4digits": "2535",
"cardType": "Credit",
"expMonth": "10",
"expYear": "23"
},
"sellerIdentity": "6076ebff0f11f7d98514c4da",
"currency": "EUR",
"transactionAmount": 50,
"declineCode": "0",
"threeD": {
"result": "",
"challengePreferenceReason": "12",
"whiteListStatus": "",
"threeDreasonId": "",
"eci": "2",
"xid": ""
},
"processor": {
"processorAuthCode": "111216",
"processorTransactionId": "1110000000013512555",
"processorErrorCode": 0
},
"items": [],
"orderId": "13323",
"metadata": {
"CustomerID": "457349"
}
}
```
| Parameter name | Description |
| --------------------- | ----------------------------------------------------------------------------------------------------- |
| `authorizationStatus` | The status of the Authorization. [Learn more](/docs/main-entities/) about Authorization Object |
| `authorizationId` | The Authorization ID |
| `transactionId` | The Transaction ID |
| `paymentOption` | Payment option Object (which contain mask card data) |
| `sellerIdentity` | The Vendor ID |
| `orderId` | Your Reference ID |
| `amount` | The amount of the payment |
| `currency` | The currency of the payment |
| `processor` | The processor Object. This Object contains the information from the acquirer for the specific payment |
## Store credit card details
[Section titled “Store credit card details”](#store-credit-card-details)
You can use this functionality when you want to store the shopper’s card details for future use or as part of a Recurring Payment flow.
Card schemes often insist on sending a zero-authorization transaction (amount=0) before allowing card credentials to be stored for future use.
In Europe the card schemes require the completion of Strong Authentication Validation (3D SECURE 2) for each zero-authorization request. As 3D secure flow implementation involves both client, and server side, we thoroughly recommend you to use our Web SDK Store Card flow [Store Card](/docs/store-card-tokenization-_-new/) instead of implementing it on your own.
If you still want to use the API Only flow, you should follow the 3D Secure guide with the following changes in the request:
| Field | Value | Type |
| ----------------- | ----- | ------ |
| `amount` | 0 | Number |
| `currency` | EUR | String |
| `transactionType` | Auth | String |
The response includes the **PaymentOptionId** field - this is the token of the card and you should keep it for future use.
## Create a simple payment with token
[Section titled “Create a simple payment with token”](#create-a-simple-payment-with-token)
As described in the previous section, the `paymentOptionId` is the token of the card. You should send it instead of the paymentOption object.
| Parameter name | Required | Description | Type |
| ------------------ | -------- | ----------------------------------------------------------------------------------------------------------------------------------------------------------------------------------- | ------ |
| `amount` | Yes | The value of the payment | Number |
| `currency` | Yes | The currency of the payment | String |
| `orderId` | Yes | Your unique reference for this payment | String |
| `paymentOptionId` | Yes | The token of the card | String |
| `consumer.email` | Yes | The shopper email address | String |
| `consumer.country` | Yes | The shopper’s country code. ISO 2 letters | String |
| `transactionType` | No | Values: `Auth` or `Sale`. The default is `Sale`. Use `Auth` in cases where you want to separate between the Authorization step and capture (read more [here](/docs/main-entities/)) | String |
## Create card present payment
[Section titled “Create card present payment”](#create-card-present-payment)
This section explains how to integrate credit card processing with card-present data, and describes the additional parameters you should send and receive from the API.
The main object is the ‘pos’ which includes all the relevant data. you should add the pos object to simple payment creation call in order to send card present transaction.
## The POS object description
[Section titled “The POS object description”](#the-pos-object-description)
| Parameter name | Required | Description | Type |
| -------------------- | -------- | ---------------------------------------------------------------------------------------------------------------------------------------------------------------------------------------------------------------------------------------------------------------------------- | ------- |
| terminalId | | Identifier for the terminal. minLength: 1 maxLength: 8 | string |
| trackData | | Information encoded on the magnetic stripe according to ISO 7813 standards or retrieved from the chip card. | string |
| trackType | | Indicates which track was recorded in the transaction. 1 -Track 1 2- Track 2 Mandatory when POSEntryMode = 3 or 5 and tags 56 and 57 are present. | integer |
| icc | | The value of this field is the chip data taken directly from an EMV chip in encoded in Base64. | string |
| pinData | | The PIN data provided by the cardholder encrypted according to the key received by TMS. | string |
| entryMode | | Indicates the point of sale entry mode. 1: Manually entered 2: Magnetic stripe swiped 3: ICC Read (chip) 5: Contactless ICC 6: Contactless magstripe | integer |
| terminalCapability | | A bitmap that indicates the supported capabilities of the terminal. | string |
| terminalAttendance | | Indicates if the terminal is represented by the merchant. 0: Unattended 1: Attended | integer |
| cardSequenceNum | | Number assigned to a specific card to distinguish between multiple cards linked to the same account. | integer |
| offlineResCode | | A response code generated by the terminal for offline transactions. | string |
| localTime | | The time that the transaction occurred. HHmmss format | string |
| localDate | | The date that the transaction occurred. YYMMDD format | string |
| cvMethod | | How the customer was authenticated for a card-present transaction. Mandatory when channel=3. The possible values are: 0: Not authenticated 1: PIN 2: Electronic signature 5: Manual signature verification 6: Other verification 9: Unknown S: Other systematic verification | integer |
| cvEntity | | The type of authentication entity The possible values are: 0: Not authenticated 1: Offline chip 2: Card acceptance device 3: Authorizing agent Online PIN 4: Merchant/card acceptor—signature 5: Other 9: Unknown | integer |
| outputCapability | | How the response of the transaction is to be returned to the customer: 0: Unknown 1: None 2: Printing capability only 3: Display capability 4: Printing and display capability | integer |
| suppressAuth | | Determines if the transaction should be authorized or settled. The possible values include: 0: Sent online for an authorization and then settled offline. 1: Settle without authorization. | integer |
| terminalCity | | The city where the terminal is located. minLength: 2 maxLength: 13 | string |
| terminalAddress | | The address where the terminal is located. minLength: 3 maxLength: 20 | string |
| terminalCountry | | The country where the terminal is located.ISO code. minLength: 2 maxLength: 2 | string |
| terminalZip | | The Zip code where the terminal is located. minLength: 1 maxLength: 6 | string |
| terminalState | | This field must contain a valid U.S. state code. minLength: 3 maxLength: 3 | string |
| terminalModel | | The POS terminal model number. | string |
| terminalManufacturer | | The name of the POS terminal manufacture. | string |
| terminalMacAddress | | The POS terminal MAC address. | string |
| terminalKernel | | | string |
| terminalImei | | A 15-digit number assigned to a mobile phone during production under international standards. minLength: 15 maxLength: 15 | string |
| mobileTerminal | | This parameter shows whether or not the POS is a mobile POS terminal. ‘1’ indicates that it is mobile. In the event that the POS is not mobile, there is no need to send any value. | integer |
* JavaScript
```javascript
curl --location --request POST 'https://sandbox.unipaas.com/platform/pay-ins' \
--header 'Content-Type: application/json' \
--header 'Authorization: Bearer --YOUR_PRIVATE_KEY--' \
--data-raw '{
"amount": 50,
"currency": "EUR",
"platformOrderId": "13323",
"paymentOption": {
"cardAccount": {
"nameOnCard": "test shopper",
"expYear": "23",
"expMonth": "10",
"number": "4000023104662535",
"securityCode": "132",
}
},
"consumer": {
"email": "testuser@unipaas.com",
"country": "GB"
},
"pos":
{
"terminalId": "3",
"trackData": "4300040000701248D221210100000887",
"entryMode": "2",
"trackType" : "2",
"terminalCapability": "11111",
"terminalAttendance": 1,
"suppressAuth": 0,
"localTime": "103000",
"localDate": "190224",
"cvMethod": 5,
"cvEntity": 4,
"outputCapability": 0,
"terminalCity": "New York",
"terminalAddress": "100 Main St.",
"terminalCountry": "se",
"terminalZip": "123",
"posCardSequenceNum" : "00",
"posTerminalManufacture" : "LVNX LTD",
"posTerminalModel" : "VPOS V1.4"
}
}'
```
# Payment Methods
> \\\ CONTENT WAS ADDED TO OVERVIEW \
****\*\*\***** CONTENT WAS ADDED TO OVERVIEW ********\*********
## Credit Cards
[Section titled “Credit Cards”](#credit-cards)
We offer support for all major Credit Cards - Visa, Mastercard and AMEX.
## Pay by Bank
[Section titled “Pay by Bank”](#pay-by-bank)
As open banking is gaining greater traction in checkouts for both B2B and B2C businesses, we are expanding our offering of checkout options.\
Pay by bank allows buyers to pay directly from their bank accounts, in a quick and easy experience.
This payment method is mostly beneficial for businesses, which are looking to eliminate manual work around bank transfers, and transfer funds instantly.
## Alternative Payment Methods
[Section titled “Alternative Payment Methods”](#alternative-payment-methods)
We are adding more and more payment methods to our checkout. From Apple Pay, Klarna, and PayPal, to any other local payment method you may need.
# Apple Pay
> Add Apple Pay payment method to your checkout page by using the Unipaas Web SDK. Apple Pay payment method consists of a single button component, that...
## Apple Pay
[Section titled “Apple Pay”](#apple-pay)
Add Apple Pay payment method to your checkout page by using the Unipaas Web SDK. Apple Pay payment method consists of a single button component, that triggers the built-in Apple checkout experience.
Apple Pay is available to cardholders exclusively at [supported banks](https://support.apple.com/en-us/HT204916). The Apple Pay button will only be visible to buyers with [supported browser and device combination](https://support.apple.com/en-gb/HT208531)
## Prerequisites
[Section titled “Prerequisites”](#prerequisites)
1. Set up the [Unipaas Web SDK](/docs/web-sdk-old/)
2. Make sure you serve your application over HTTPS in all environments
3. Register your domain(s) by sending a request to .
4. Use a [supported browser and device](https://support.apple.com/en-gb/HT208531) combination for testing
**Apple Pay and SCA**\
The Payment Services Directive 2 (PSD2) requires Strong Customer Authentication (SCA) for some online purchases in the EU, in order to verify the card holder identity.
Buyers that make purchases with Apple Pay are identified with a fingerprint or FaceID and therefore will not require additional identification.
**Apple guidelines**\
While our Web SDK provides significant flexibility for checkout page design, there are some UI guidelines that should be followed when implementing Apple Pay.
In order to stay compliant with Apple Pay and maximize your checkout page’s conversion rate, you must make sure Apple Pay is the main payment method on your checkout page (e.g. shown first or pre-selected), and that you follow all [Apple human interface guidelines](https://developer.apple.com/design/human-interface-guidelines/apple-pay/overview/introduction/).
## Registering your domain with Unipaas
[Section titled “Registering your domain with Unipaas”](#registering-your-domain-with-unipaas)
Apple play implementation requires your domain to be registered under the UNPIaaS certificate.\
To register your domain with Unipaas’s certificate, please contact [Unipaas support team](mailto:support@unipaas.com).
Make sure you include your domain and all subdomains that are used to host you payment experiences.
## Integration
[Section titled “Integration”](#integration)
Before you begin the Apple Pay integration, you should implement the Unipaas Web SDK. This includes the following steps:
1. [Create Checkout request and get the Session token](/docs/web-sdk-old/#create-checkout-request-and-get-the-session-token)
2. [Embed the Web SDK script](/docs/web-sdk-old/#embed-the-web-sdk-script) into your web page
Once the Unipaas Web SDK is is ready, you can begin integrating Apple Pay.
**Embed the Apple Pay button**\
Add an HTML element with a selector of choice,.\
For example `apple-pay` as shown in the example below:
* HTML
```html
```
**Initialize the Web SDK**
* JavaScript
```javascript
```
**Authorization**
Forward the details of the Authorization to your server.\
This step is required to confirm the Authorization status.
* JavaScript
```javascript
// on form submit
unipaas.on("onSubmission", () => {
});
// after token succeed
unipaas.on("OnTokenSuccess", (token) => {
// You can keep the paymentOptionId for later use
});
// on any status except to success
unipaas.on("onError", (err) => {
//Do something if the user cancelled the form
});
// the payment was successful
unipaas.on("onSuccess", (data) => {
// take the data response and forward it to your server for additional checks
});
```
**Verification**
Verify the Authorization status from your server side.\
Authorization verification is essential to ensure no manipulation occurred on the client-side.\
Make a [`GET /pay-ins/{authorizationId}`](/reference/) request:
* cURL
```curl
curl --location --request GET 'https://sandbox.unipaas.com/platform/pay-ins/{authorizationId}' \
--header 'Content-Type: application/json' \
--header 'Authorization: Bearer {{PRIVATE_KEY}}'
```
## Test your Apple pay integration in sandbox
[Section titled “Test your Apple pay integration in sandbox”](#test-your-apple-pay-integration-in-sandbox)
Create a Sandbox Tester Account
Please make sure you have an Apple Sandbox Tester Account on your iPhone / macOS device before the testing, as described [here](https://developer.apple.com/apple-pay/sandbox-testing/).
Please use the following cards to test your Apple Pay Integration on sandbox:
Apple Pay I\
\
4180620070230189\
Name: Any name\
Expiry Date: 11/22\
CVV: 112
Apple Pay II\
\
4123400073320224\
Name: Any name\
Expiry Date: 11/22\
CVV: 989
# Apple Pay and Google Pay™
Provide your customers with the convenience of using Apple Pay and Google Pay™ as payment methods on your Checkout Page. This allows buyers, who have saved their card information in their Apple or Google digital wallets, to enjoy a smooth and effortless payment process.

**Benefits**
* **Enhanced customer satisfaction:** Offer Google Pay and Apple Pay for a one-click checkout experience, increasing customer satisfaction and loyalty.
* **Increased conversion rates:** Simplify the payment process, reducing friction and improving conversion rates.
* **Heightened security:** The Payment Services Directive 2 (PSD2) mandates Strong Customer Authentication (SCA) for high-value online purchases within the EU to verify the cardholder’s identity. Buyers using Apple Pay and Google Pay are identified biometrically, eliminating the need for additional identification.
* **Reduced chargeback rates:** Apple Pay and Google Pay transactions boast high levels of security, resulting in lower chargeback rates. This reduces the financial risks for merchants, providing added peace of mind when accepting payments.
* **Future-proof your platform:** Stay ahead of emerging payment trends and demonstrate your commitment to modern and convenient solutions.
# How to accept payments with Apple Pay and Google Pay™
[Section titled “How to accept payments with Apple Pay and Google Pay™”](#how-to-accept-payments-with-apple-pay-and-google-pay)
Note
**Activate Apple Pay and/or Google Pay**
To activate Apple Pay and Google Pay payment options for your platform account — whether you use a [hosted checkout page](/docs/checkout-page/) or [embedded components](/docs/mandate-form-implementation-guide/) — please reach out to us at .
Once enabled, Apple Pay and Google Pay will automatically be available for your buyers who use Apple or Google digital wallets. [Learn how to create a checkout](/docs/create-payment/)
# Hosted checkout page
[Section titled “Hosted checkout page”](#hosted-checkout-page)
The Unipaas hosted checkout page automatically presents a digital wallet option based on buyer’s preferences and browser compatibility. If buyers have enabled Apple Pay or Google Pay on their devices, they can effortlessly use these payment methods.
> **Google Pay™ policies:** Use of Google Pay™ is subject to the [Google Pay APIs Acceptable Use Policy](https://payments.developers.google.com/terms/aup) and the [Google Pay API Terms of Service](https://payments.developers.google.com/terms/sellertos). By offering Google Pay™ through the Unipaas hosted checkout page, you agree to comply with both.
Apple Pay and Google Pay are never displayed together due to OS restrictions. Apple Pay is exclusive to Apple devices with Apple Wallet installed, while Google Pay is available on Android devices and in Chromium-based browsers (such as Chrome) across platforms when a Google Pay wallet is signed in.
| Environment and wallet | Button displayed |
| :-------------------------------------------------------- | :--------------- |
| Safari + Apple Pay enabled | Apple Pay |
| Chrome on iOS 16 + Apple Pay enabled | Apple Pay |
| iOS app + Apple Pay enabled | Apple Pay |
| Chromium-based browser (e.g. Chrome) + Google Pay enabled | Google Pay |
| Android app + Google Pay enabled | Google Pay |
| No active Apple Pay or Google Pay | No button |
# Embedded Components
[Section titled “Embedded Components”](#embedded-components)
By integrating Google Pay and Apple Pay into your platform using Unipaas embedded components, you can simplify PCI compliance requirements while retaining full control over your checkout page’s styling. Both Google Pay and Apple Pay provide secure handling of sensitive credit card information, since they fully support Strong Customer Authentication (3DSecure 2) for enhanced security.
> **Google Pay™ policies:** Use of Google Pay™ is subject to the [Google Pay APIs Acceptable Use Policy](https://payments.developers.google.com/terms/aup) and the [Google Pay API Terms of Service](https://payments.developers.google.com/terms/sellertos). By offering Google Pay™ through Unipaas embedded components, you agree to comply with both.
## Prerequisites
[Section titled “Prerequisites”](#prerequisites)
1. Set up the [Unipaas embedded components](/docs/mandate-form-implementation-guide/)
2. Serve your application securely: ensure HTTPS usage across all environments
3. Contact us at [support@unipaas.com](mailto:Support@unipaas.com) in order to register your domain(s) with Apple Pay and/or Google Pay
4. Use supported browsers and enabled digital wallets for testing
***
# Apple Pay
[Section titled “Apple Pay”](#apple-pay)
Add Apple Pay payment method to your checkout page by using Unipaas embedded components. Apple Pay payment method consists of a single button component, that triggers the built-in Apple checkout experience.
Apple Pay is available to cardholders exclusively at [supported banks](https://support.apple.com/en-us/HT204916). The Apple Pay button will only be visible to buyers with [supported browser and device combination](https://support.apple.com/en-gb/HT208531)
**Apple Pay and SCA**\
Online payment transactions processed in European Economic Area (EEA) countries must comply with Strong Customer Authentication (SCA) requirements under the second Payment Services Directive (PSD2).
Apple Pay utilizes biometric authentication methods such as fingerprint or facial recognition on supported devices. This enables customers to easily authenticate themselves during the payment process, meeting the SCA requirements for multi-factor authentication.
**Apple guidelines**\
While our embedded components provide significant flexibility for checkout page design, it’s important to adhere to specific UI guidelines when implementing Apple Pay.
To ensure compliance with Apple Pay and maximize your checkout page’s conversion rate, it is crucial to prioritize Apple Pay as the primary payment method. This can be achieved by featuring Apple Pay prominently, such as displaying it first or pre-selecting it. Additionally, it is essential to adhere to all Apple human interface guidelines, which can be found at [Apple human interface guidelines](https://developer.apple.com/design/human-interface-guidelines/apple-pay/overview/introduction/). By following these guidelines, you can create a seamless and user-friendly payment experience for your customers while meeting Apple’s requirements.
Note
**When using embedded**
To process Apple Pay payments, you need to use Unipaas Apple Pay certificate. You will need to host a domain association file when using the embedded checkout.
Please provide the domain(s) where you will host the checkout and once we create the files, you can host the domain association file using the exact file name under path:
*/.well-known/apple-developer-merchantid-domain-association*
**The file must:**
* Have Content-Type: text/plain in the header.
* Be externally accessible.
* Not be password protected.
* Not be behind a proxy or redirect.
e.g. This is an example from our hosted page:
**Ensure to include all relevant domains and subdomains used to host your payment experiences.**
# Google Pay™
[Section titled “Google Pay™”](#google-pay)
Unipaas is a Google Pay supported payment processor. Unipaas processes Google Pay transactions on your behalf — no Google Pay API integration, certification, or Google console setup is required on your side. All wallet configuration, token handling, and processing is managed end to end by Unipaas.
**How it works**
When a buyer pays with Google Pay, Unipaas receives and processes the encrypted Google Pay payment token on your behalf. All Google Pay configuration is managed by Unipaas — no Google Pay API integration, certification, or console setup is required on your side.
**Domain registration**
> Google Pay domain registration is handled by Unipaas on your behalf. To register them, send Unipaas the domain(s) for **all environments** of your platform integration (e.g. sandbox and production). On unregistered domains the Google Pay button still renders, but the payment will throw an error.
**Using your own Google Pay account**
> You only need your own Google Pay account if your platform integrates Google Pay inside a **native app**. If you are not using a native app, do **not** set up your own Google Pay account — Unipaas manages everything for you.
>
> If you do use a native app: manage your own Google Pay account, select **Gateway** (not direct) when configuring Google Pay — with Unipaas as the gateway — and approve **both the domain and the app** (not the app alone) in your Google Pay account. Notify Unipaas once you have done so for **all of your environments**.
**Testing in sandbox**
No setup is required to test. The environment is selected automatically based on which Unipaas environment you use:
* When you use the Unipaas **sandbox**, Google Pay automatically runs against Google’s **TEST** environment — no real charge is ever made, and the payment sheet displays a “test card” indicator.
* When you use Unipaas **production**, Google Pay runs against Google’s **PRODUCTION** environment.
**Going live**
No code changes are required to go live. When your account is enabled for production, the checkout automatically uses Google Pay’s PRODUCTION environment. Contact Unipaas support to enable Google Pay on your production account.
**Branding**
The Google Pay™ button rendered by Unipaas follows the official [Google Pay brand guidelines](https://developers.google.com/pay/api/web/guides/brand-guidelines). When referring to Google Pay™ in your own UI, marketing materials, or documentation, always use the full name “Google Pay” as described in the brand guidelines.
# Authentication
> Regardless of how you choose to implement the Unipaas solution, you will need to perform one server-to-server call to initiate your connection with Unipaas.
## Introduction
[Section titled “Introduction”](#introduction)
Regardless of how you choose to implement the Unipaas solution, you will need to perform one server-to-server call to initiate your connection with Unipaas.
## Server to server
[Section titled “Server to server”](#server-to-server)
**When it’s used:**
* Hosted onboarding link
* Checkout page
* Pay-in API
* Account API
* Payout API
A basic authentication is enforced when performing an API request from your server to Unipaas. An authorization bearer header must be sent along with the `private_key,` provided to you in your portal account settings to access restricted API endpoints.
**Example of a checkout create API request:**
* cURL
```curl
curl --location --request POST 'https://sandbox.unipaas.com/platform/pay-ins/checkout' \
--header 'Content-Type: application/json' \
--header 'Authorization: Bearer {{PRIVATE_KEY}}' \
--data-raw '{
"amount": 10,
"currency": "GBP",
"orderId": "1000456",
"description": "Iphone case",
"email": "test@test.com",
"country": "GB",
"items": [
{
"itemName": "Iphone case",
"itemAmount" : 10,
"vendorId" :"5ee8e655a65f08fcd71fe4d9",
"platformFee" : "15"
}
]
}'
```
## Client to server
[Section titled “Client to server”](#client-to-server)
**When it’s used:** Onboarding Embedded UI
An OAuth 2.0 authorization is enforced when performing an API request from a client application such as a drop-in UI to Unipaas. For a client application to communicate with Unipaas without compromising your `private_key,` an OAuth 2.0 mechanism is used. This means before any API request from a client application; a temporary `accessToken` must be granted using the authorization API endpoint:
* cURL
```curl
curl --request POST \
--url https://sandbox.unipaas.com/platform/authorize \
--header 'Accept: application/json' \
--header 'Content-Type: application/json' \
--header 'Authorization: Bearer {{private_key}}' \
--data-raw '{
"vendorId": "5140332a9d0ca8037a72c1812",
"scopes": ["onboarding_write"]
}'
```
Go Next[Platforms Overview](/docs/platform-overview/)
# Buyer UI: Embedded Checkout Implementation Guide
> Unipaas offers a robust suite of white-labeled Checkout UI Web-Embeds that are ready for immediate integration into your platform. These components are...
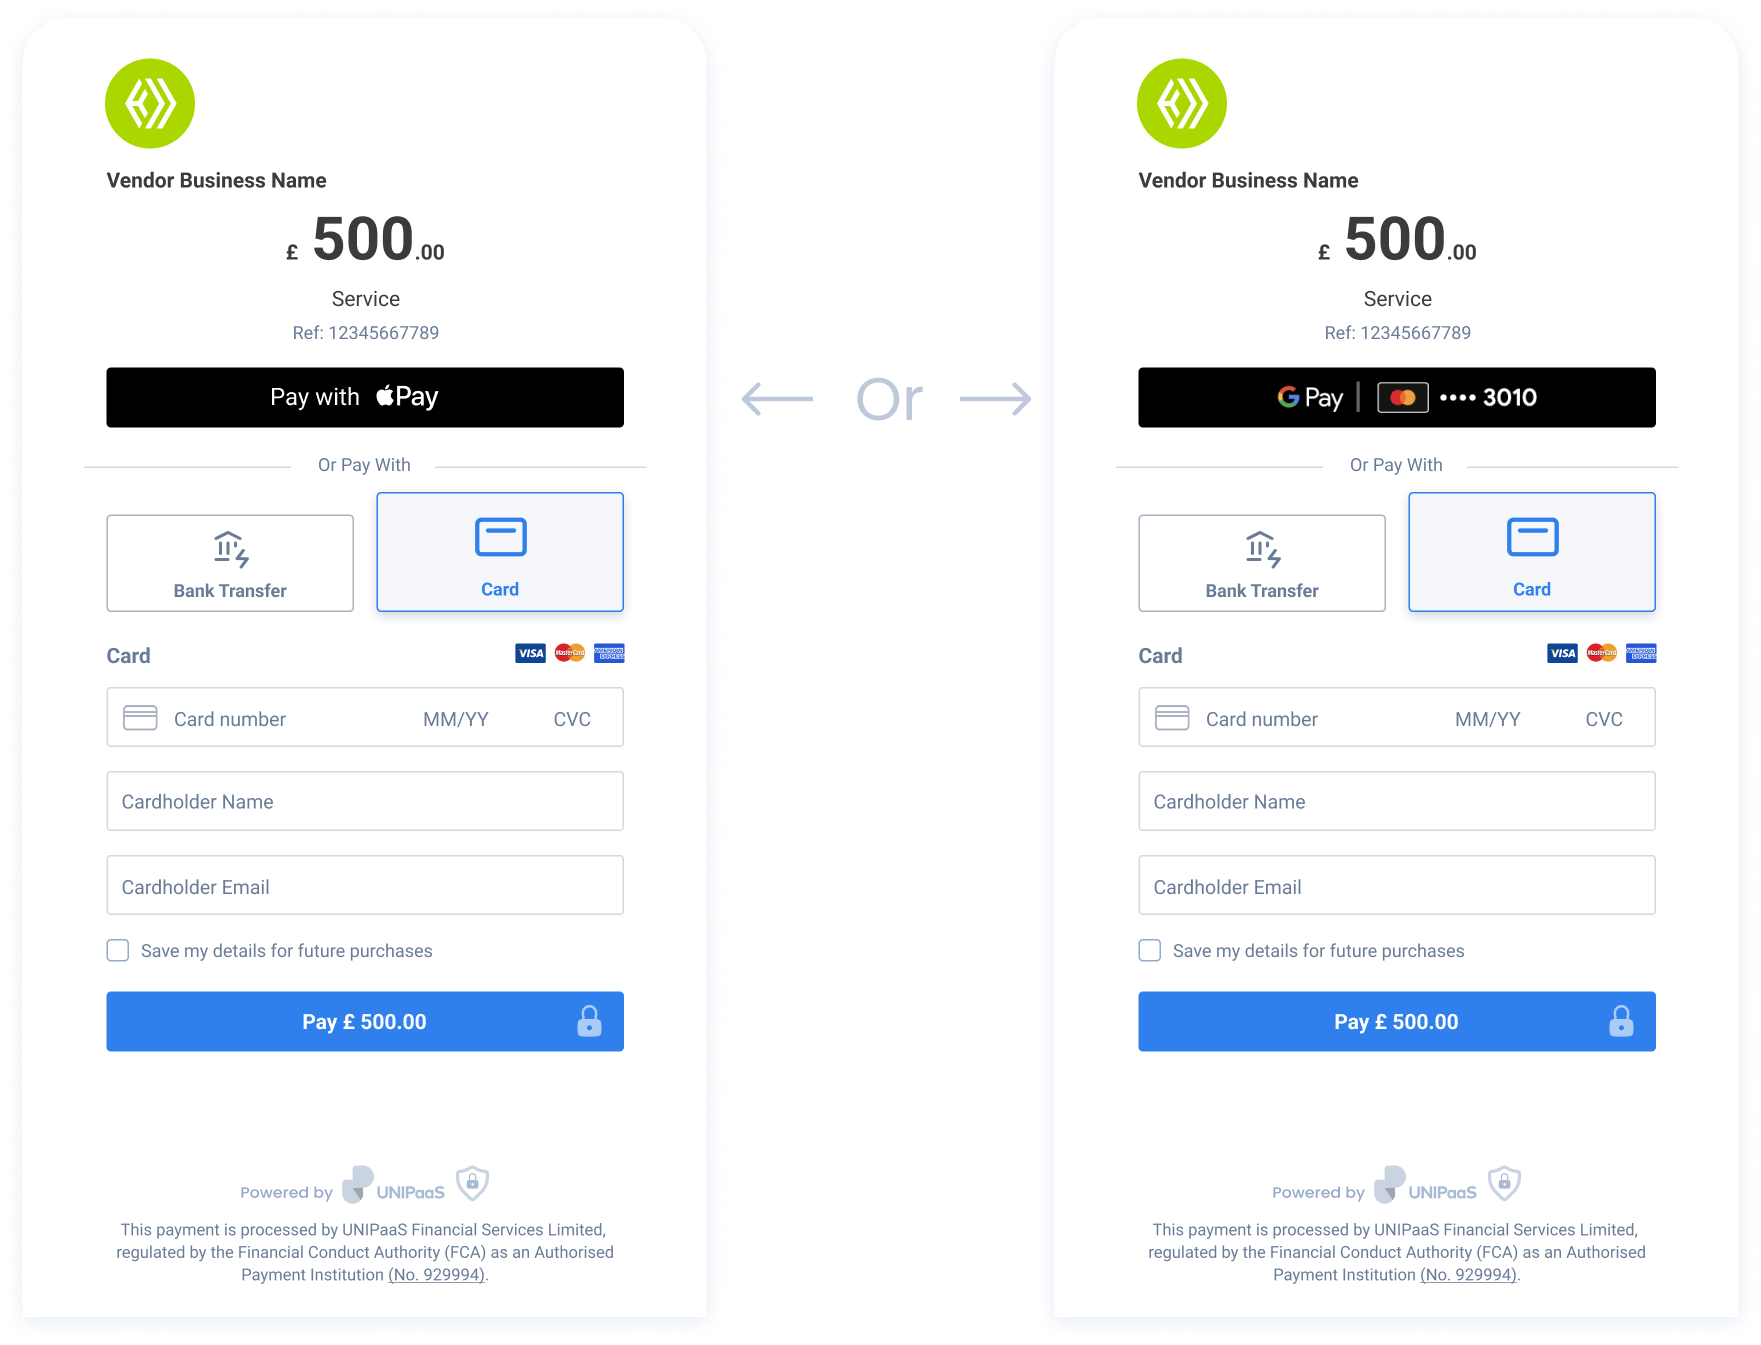
# Meet the Checkout UI Web-Embeds
[Section titled “Meet the Checkout UI Web-Embeds”](#meet-the-checkout-ui-web-embeds)
Unipaas offers a robust suite of white-labeled Checkout UI Web-Embeds that are ready for immediate integration into your platform. These components are designed to streamline your development process, accelerate your launch, and enhance your customers’ payment flow.
### Explore our Embedded Checkout Components
[Section titled “Explore our Embedded Checkout Components”](#explore-our-embedded-checkout-components)
[Embedded example](https://www.figma.com/embed?embed_host=share\&url=https%3A%2F%2Fwww.figma.com%2Fproto%2FEl6YwA7IGoGj4PCpmTy7iI%2FCheckout-Docs%3Fpage-id%3D0%253A1%26node-id%3D544-22407%26viewport%3D840%252C-10546%252C0.34%26t%3DRBgwEnt7EfAMLDOB-1%26scaling%3Dscale-down-width%26content-scaling%3Dfixed%26starting-point-node-id%3D544%253A22407%26hide-ui%3D1)
[Open in Figma](https://www.figma.com/embed?embed_host=share\&url=https%3A%2F%2Fwww.figma.com%2Fproto%2FEl6YwA7IGoGj4PCpmTy7iI%2FCheckout-Docs%3Fpage-id%3D0%253A1%26node-id%3D544-22407%26viewport%3D840%252C-10546%252C0.34%26t%3DRBgwEnt7EfAMLDOB-1%26scaling%3Dmin-zoom%26content-scaling%3Dfixed%26starting-point-node-id%3D544%253A22407%26hide-ui%3D1)
***
### Benefits
[Section titled “Benefits”](#benefits)
Unipaas UI Web-Embeds provide significant advantages for platforms aiming to integrate payment functionalities:
* **Simplified development**: With pre-built, white-labeled components, your development team can rapidly deploy a comprehensive payment solution, saving valuable time and resources.
* **Streamlined user experience**: Implementing Unipaas Web-Embeds directly into your platform’s UI creates a seamless payment process for users, eliminating the need to navigate away to external payment portals.
* **Save Card for Future Payments**: Securely store card details, enabling users to quickly pay in the future without re-entering their information, enhancing convenience and speed.
* **White-labeled UI**: The highly customizable nature of these Web-Embeds allows you to tailor their appearance to match your platform’s branding and design, providing a consistent and professional user interface.
* **Security and compliance**: Built with security and compliance in mind, these Web-Embeds adhere to industry standards for transaction security and fraud prevention, giving your users peace of mind during payments.
***
# Implementation Steps
[Section titled “Implementation Steps”](#implementation-steps)
1. [Authorization](/docs/buyer-ui-embedded-checkout-implementation-guide/#1-authorization)
2. [Installation](/docs/buyer-ui-embedded-checkout-implementation-guide/#2-installation)
3. [Implementation](/docs/buyer-ui-embedded-checkout-implementation-guide/#3-implementation-of-the-embedded-checkout)
1. [Checkout Page UI Web-Embed](/docs/buyer-ui-embedded-checkout-implementation-guide/#checkout-page-ui-web-embed)
2. [Digital Wallet (Apple Pay / Google Pay) UI Web-Embed](/docs/buyer-ui-embedded-checkout-implementation-guide/#digital-wallet-apple-pay--google-pay-ui-web-embed)
3. [Card UI Web-Embed](/docs/buyer-ui-embedded-checkout-implementation-guide/#card-ui-web-embed)
4. [Payment Method Selection UI Web-Embed](/docs/buyer-ui-embedded-checkout-implementation-guide/#payment-method-selection-ui-web-embed)
4. [DOM EventListeners](/docs/buyer-ui-embedded-checkout-implementation-guide/)
***
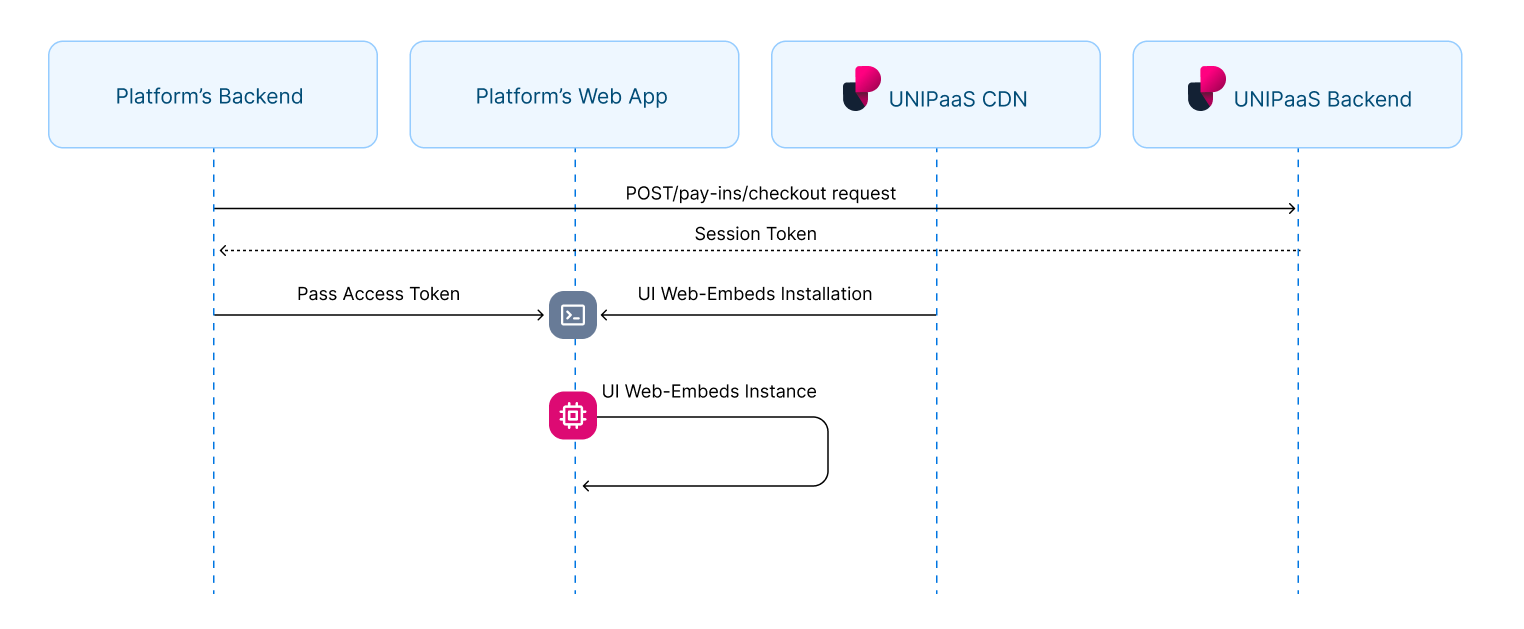
# 1. Authorization
[Section titled “1. Authorization”](#1-authorization)
In order to load the checkout UI Web-Embeds in your platform, an authorized API call is needed in your backend.
## Generate an access token
[Section titled “Generate an access token”](#generate-an-access-token)
To obtain an access token, you need first create a checkout using [POST/pay-ins/checkout](/reference/#tag/payin/POST/pay-ins/checkout) endpoint.
[Learn more about payment creation](/docs/create-payment/)
Below is an example of the JSON payload for creating a payment:
* JSON
```json
{
"amount": 100,
"currency": "GBP",
"country": "GB",
"vendorId": "66532df5d55926b2b12a874a",
"email": "consumer_name@example.com",
"reference": "Payment123",
"description": "Payment for service",
"consumer": {
"name": "consumer.name",
"reference": "CON-REF-123"
}
}
```
In response to this API call, you will receive a session token along with other parameters:
* JSON
```json
"sessionToken": "eyJhbGciOiJIUzI1NiIsInR5cCI6IkpXVCJ9.eyJtZXJjaGFudElkIjoiNjEwNjZkYjA2MzBmNGUzNTlkYzA4NGU5IiwibWVyY2hhbnROYW1lIjoiQWxpY2UiLCJhbW91bnQiOjEwMCwiY3VycmVuY3kiOiJHQlAiLCJlbWFpbCI6InVzZXJAZXhhbXBsZS5jb20iLCJjb3VudHJ5IjoiR0IiLCJzZWxsZXJJZCI6IjY2NWVkMjEyZmNkZjBjZmVjM2M4N2UwMiIsInZlbmRvcklkIjoiNjY1ZWQyMTJmY2RmMGNmZWMzYzg3ZTAyIiwic2NvcGVzIjpbIndlYnNka19hY2Nlc3MiLCJkaXJlY3RfZGViaXRfcmVhZCJdLCJpc1JlY3VycmluZyI6ZmFsc2UsInBheW1lbnRMaW5rSWQiOiJMa1FUMTJnTC1VIiwiaWF0IjoxNzE4NjA0ODk3LCJleHAiOjE3MTg2MDY2OTd9.tfW5IUKOdes4Lb0g5laFCyFZzySzfwe0gHo6Ohi2pqI"
```
This session token is necessary for loading the Checkout Page UI Web-Embed.
# 2. Installation
[Section titled “2. Installation”](#2-installation)
**Script tag**
Start with placing the following script tag element inside of the ``of your HTML page:
* HTML
```html
```
This script tag loads the JavaScript code that provides the functionality for implementing Unipaas UI Web-Embeds on a webpage. When the script is loaded and executed, it will create an object in the memory that contains methods for instantiating and interacting with the UI Web-Embeds.
**General configuration**
Place the following script tag element below the closing `` tag of your HTML page.\
This script is used to initialize and configure Unipaas UI Web-Embeds on a web page.
* HTML
```html
```
### Theme
[Section titled “Theme”](#theme)
The theme configuration allows you to customize the visual design of Unipaas UI Web-Embeds to match your product’s branding. The theme comes with a set of pre-defined variables that are automatically applied based on the selected theme type, such as “dark” or “default”. However, if you need to modify specific aspects of the theme, you can easily adjust these variables to suit your requirements. The variables can be used to override the aspects of the theme.
Below is a table that explains each variable available for customization:
| Name | Type | Description |
| ------------------------- | ------ | -------------------------------------------------------------------------------------------------------------------- |
| `theme.type` | string | Specifies the theme type, such as “light” or “dark”. |
| `BackgroundColor` | string | Defines the primary background color for the UI Web-Embeds. |
| `primaryTextColor` | string | Determines the color for primary text elements, including the checkout amount, vendor name, and payment method name. |
| `secondaryTextColor` | string | Specifies the color for secondary text elements, including the reference number and save card for future payments. |
| `primaryColor` | string | Defines the color of the Pay button and other significant elements |
| `primaryInputTextColor` | string | Defines the text color of the input values (i.e. card number) |
| `digitalWalletButtonMode` | string | Determines the display mode for digital wallet buttons, such as “white” or “black”. |
# 3. Implementation of the Embedded Checkout
[Section titled “3. Implementation of the Embedded Checkout”](#3-implementation-of-the-embedded-checkout)
Note!
Please note that when mounting a component using a selector, the component should not be mounted more than once per selector. Mounting a component more than once can lead to unexpected behavior and issues.
To avoid this, make sure to check whether the component has already been mounted before calling the mount method.
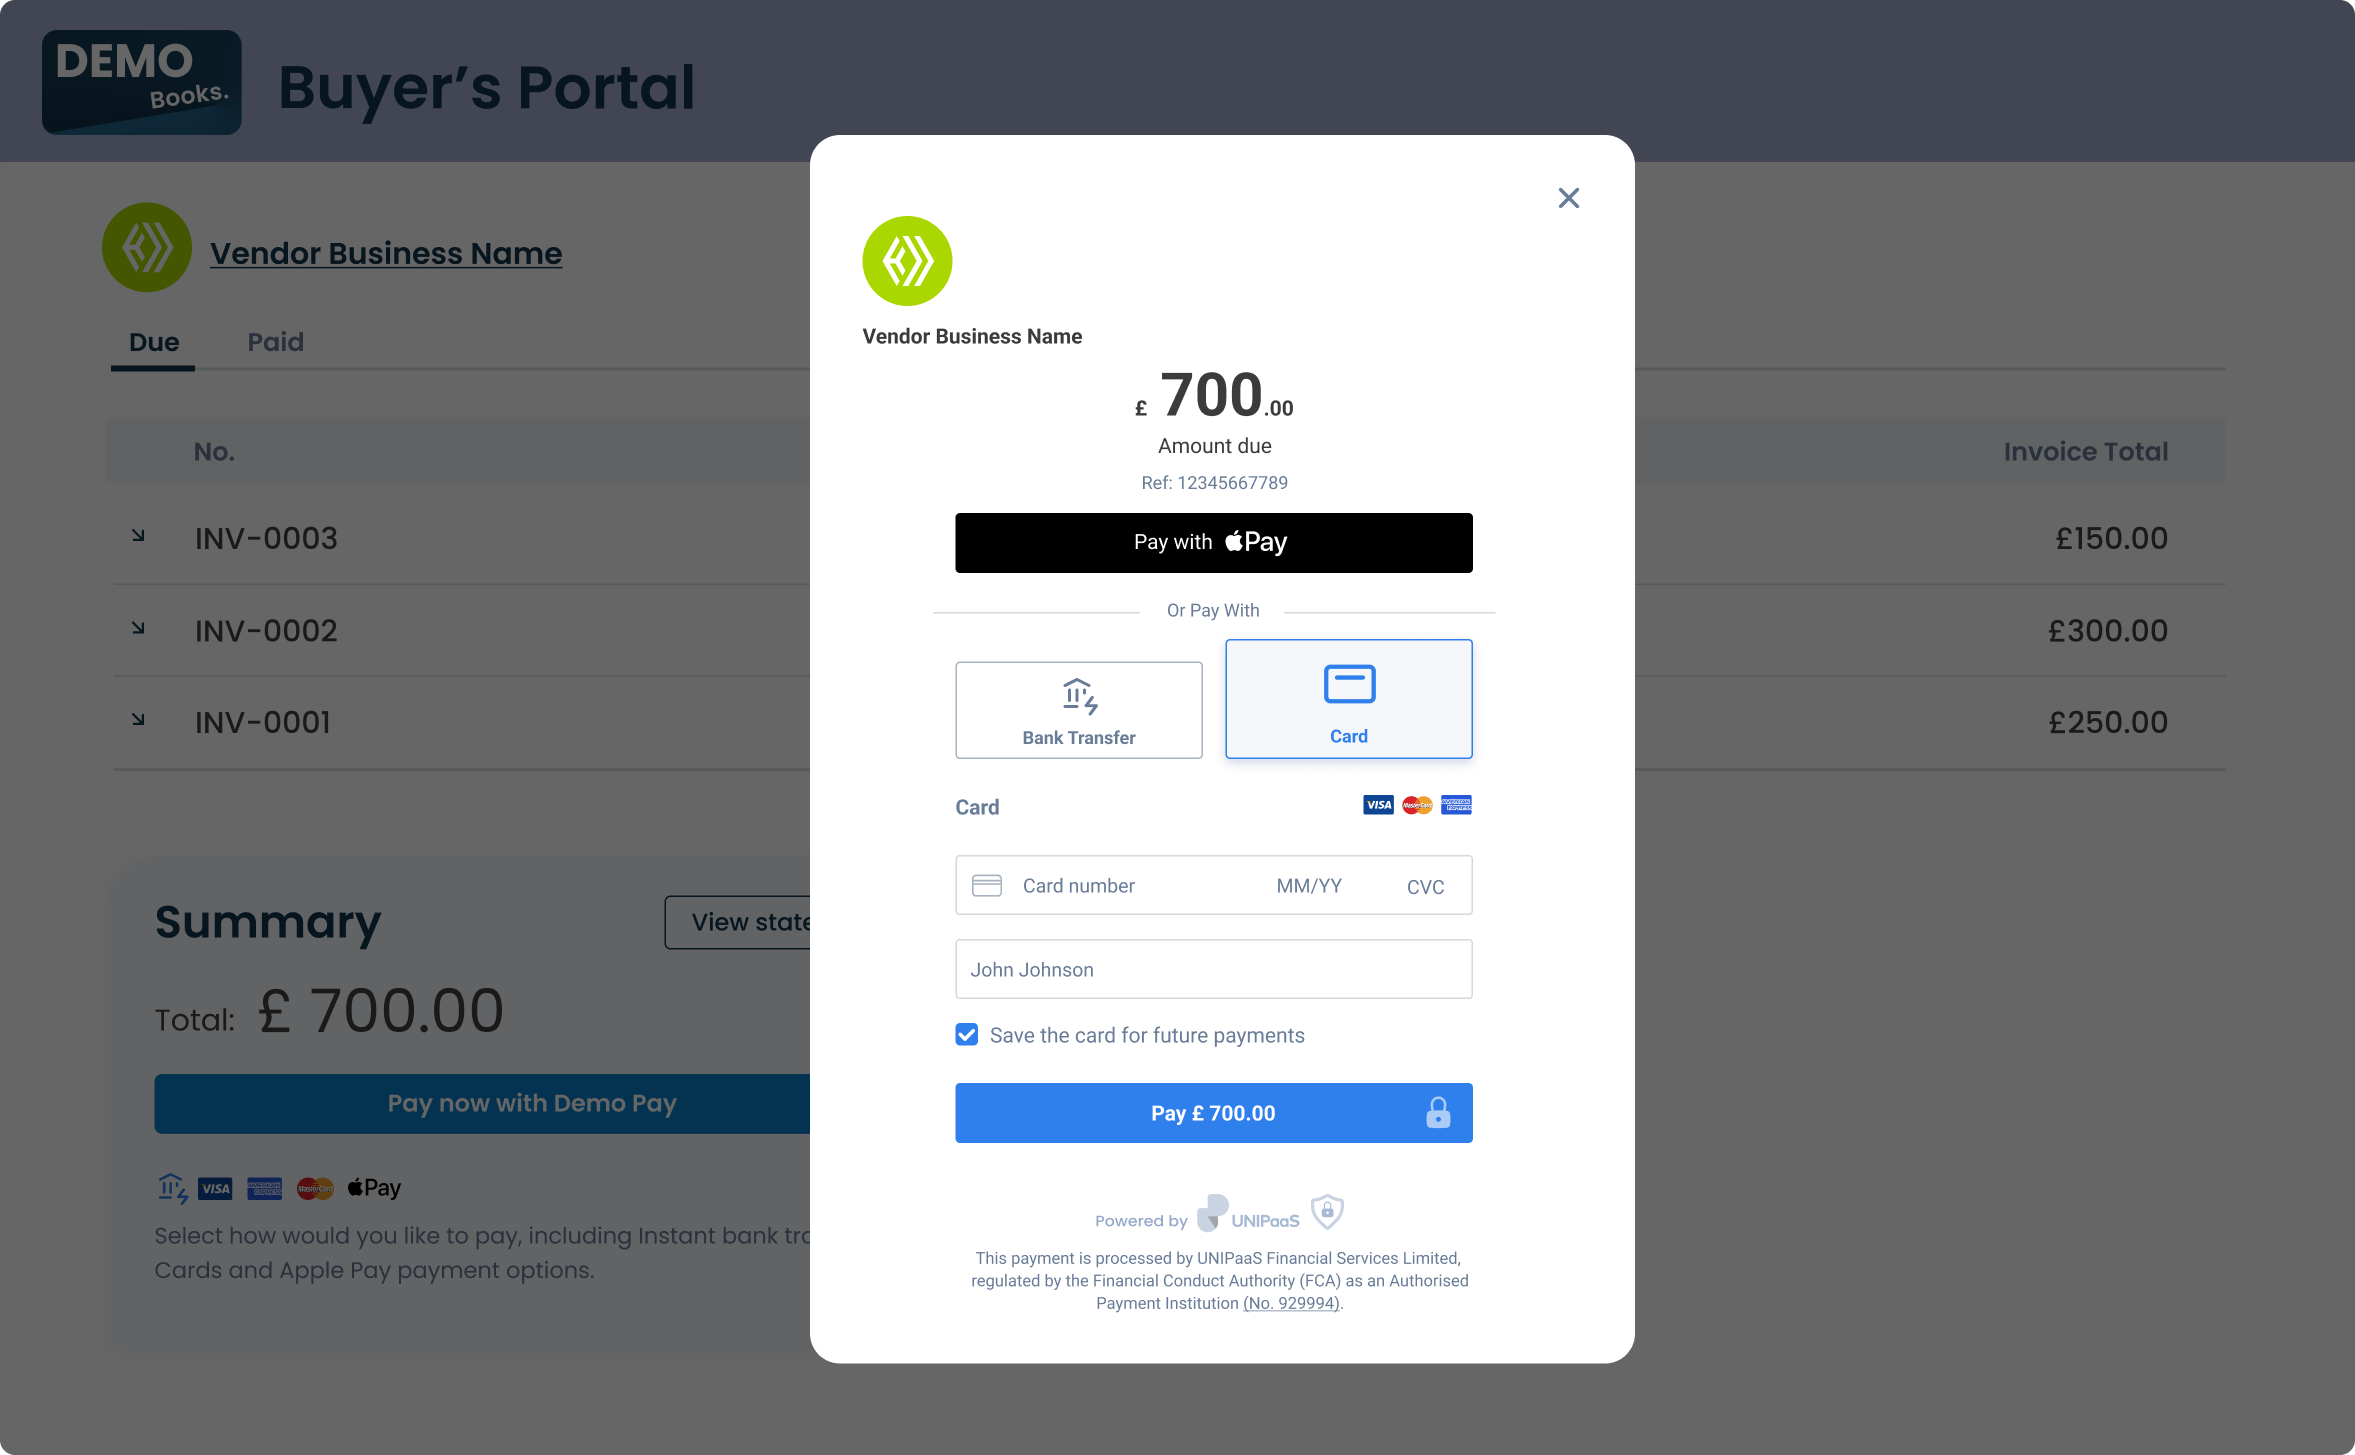
## Checkout Page UI Web-Embed
[Section titled “Checkout Page UI Web-Embed”](#checkout-page-ui-web-embed)
The Checkout Page will load with the payment methods configured for your platform and following your checkout creation process.
Note
Allocate the minimal space for the Checkout Page UI Web Embed as follows:\
Width - 360 pixels
**Create a container**
Place the following script tag element below the closing `` tag of your HTML page.\
Make sure to assign a unique ID to the container so that it can be easily identified and accessed.
* HTML
```html
```
**Create and mount an instance below the container**
Create an instance of it and mount it to the container DOM node in your page. This should be done after the previous div has finished loading.
* JavaScript
```javascript
const checkout = components.create("checkout");
checkout.mount("#checkout");
```
***Disable specific payment methods (optional)***
You can optionally disable GooglePay when creating the embedded checkout component. To disable Google Pay:
* JavaScript
```javascript
const checkout = components.create("checkout", {
disableGooglePay: true
});
```
This can be useful if Google Pay is not supported in your use case, market, in-app or desired payment configuration. When disabled, Google Pay will not be displayed to buyers in the checkout UI.
Note!
**Loading Unipaas Checkout inside an iframe is not recommended**
Some checkout flows depend on top-level browser navigation and cannot be completed from within an iframe. *For example, Open Banking redirect flows require top-level navigation to function correctly.*
Modern browsers, payment providers, and third-party services enforce these restrictions through security and permissions policies (such as X-Frame-Options, Content-Security-Policy, and Permissions Policy), and they cannot be bypassed.
## Digital Wallet (Apple Pay / Google Pay) UI Web-Embed
[Section titled “Digital Wallet (Apple Pay / Google Pay) UI Web-Embed”](#digital-wallet-apple-pay--google-pay-ui-web-embed)
The Digital Wallet UI Web Embed will intelligently load the appropriate payment method, either Apple Pay or Google Pay, or none of them.

Apple Pay and Google Pay are never displayed together due to OS restrictions. Apple Pay is exclusive to Apple devices with Apple Wallet installed, while Google Pay is designed for Android devices and operates through the Google Pay app.
| Browser and wallet | Button displayed |
| :---------------------------------------------- | :------------------ |
| Safari + Apple Pay enabled | Apple Pay |
| Chrome on iOS 16 + Apple Pay enabled | Apple Pay |
| Any browser on Android + Google Pay enabled | Google Pay |
| Any browser + No active Apple Pay or Google Pay | No button displayed |
Note
Allocate the minimal space for the Digital Wallet UI Web-Embed as follows:\
Width - 150 pixels
**Create a container**
Place the following script tag element below the closing `` tag of your HTML page.\
Make sure to assign a unique ID to the container so that it can be easily identified and accessed.
* HTML
```html
```
**Create and mount an instance below the container**
Create an instance of it and mount it to the container DOM node in your page. This should be done after the previous div has finished loading.
* JavaScript
```javascript
const digitalWallet = components.create("digitalWallet");
digitalWallet.mount("#digital_wallet");
```

## Card UI Web-Embed
[Section titled “Card UI Web-Embed”](#card-ui-web-embed)
The Card UI Web-Embed includes two input fields for entering card details and cardholder name, a checkbox for saving the card (supporting card tokenization for returning customers), and a payment button to complete the transaction.
Note
Allocate the minimal space for the Card UI Web Embed as follows:\
Width - 340 pixels
**Create a container**
Place the following script tag element below the closing `
` tag of your HTML page.\
This script is used to initialise and configure Unipaas UI Web-Embeds on a web page.
* HTML
```html
```
### Theme
[Section titled “Theme”](#theme)
The theme configuration allows you to customise the visual design of Unipaas UI Web-Embeds to match your product’s branding. The theme comes with a set of pre-defined variables that are automatically applied based on the selected theme type, such as “dark” or “default”. However, if you need to modify specific aspects of the theme, you can easily adjust these variables to suit your requirements. The variables can be used to override the aspects of the theme.
Below is a table that explains each variable available for customization:
| Name | Type | Description |
| ----------------------------- | ------ | -------------------------------------------------------------------------------------------------------------------- |
| `theme.type` | string | Specifies the theme type, such as “dark” or “default”. |
| `primaryBackgroundColor` | string | Defines the primary background color for the UI Web-Embeds. |
| `secondaryBackgroundColor` | string | Sets the secondary background color for the UI Web-Embeds. |
| `primaryTextColor` | string | Determines the color for primary text elements, including the checkout amount, vendor name, and payment method name. |
| `secondaryTextColor` | string | Specifies the color for secondary text elements, including the reference number and save card for future payments. |
| `primaryButtonColor` | string | Defines the color of the Pay button. |
| `primaryButtonLabelColor` | string | Sets the label color on the Pay button. |
| `secondaryButtonColor` | string | Determines the color of the Chevron for selecting the checkout language. |
| `buttonBorderRadius` | string | Specifies the border radius of the payment button, influencing its roundness. |
| `primaryInputBackgroundColor` | string | Defines the background color for input fields. |
| `primaryInputBorderColor` | string | Specifies the border color for input fields. |
| `primaryInputLabelColor` | string | Sets the label color for input fields. |
| `inputBorderRadius` | string | Specifies the border radius for input fields, affecting their roundness. |
| `digitalWalletButtonMode` | string | Determines the display mode for digital wallet buttons, such as “white” or “black”. |
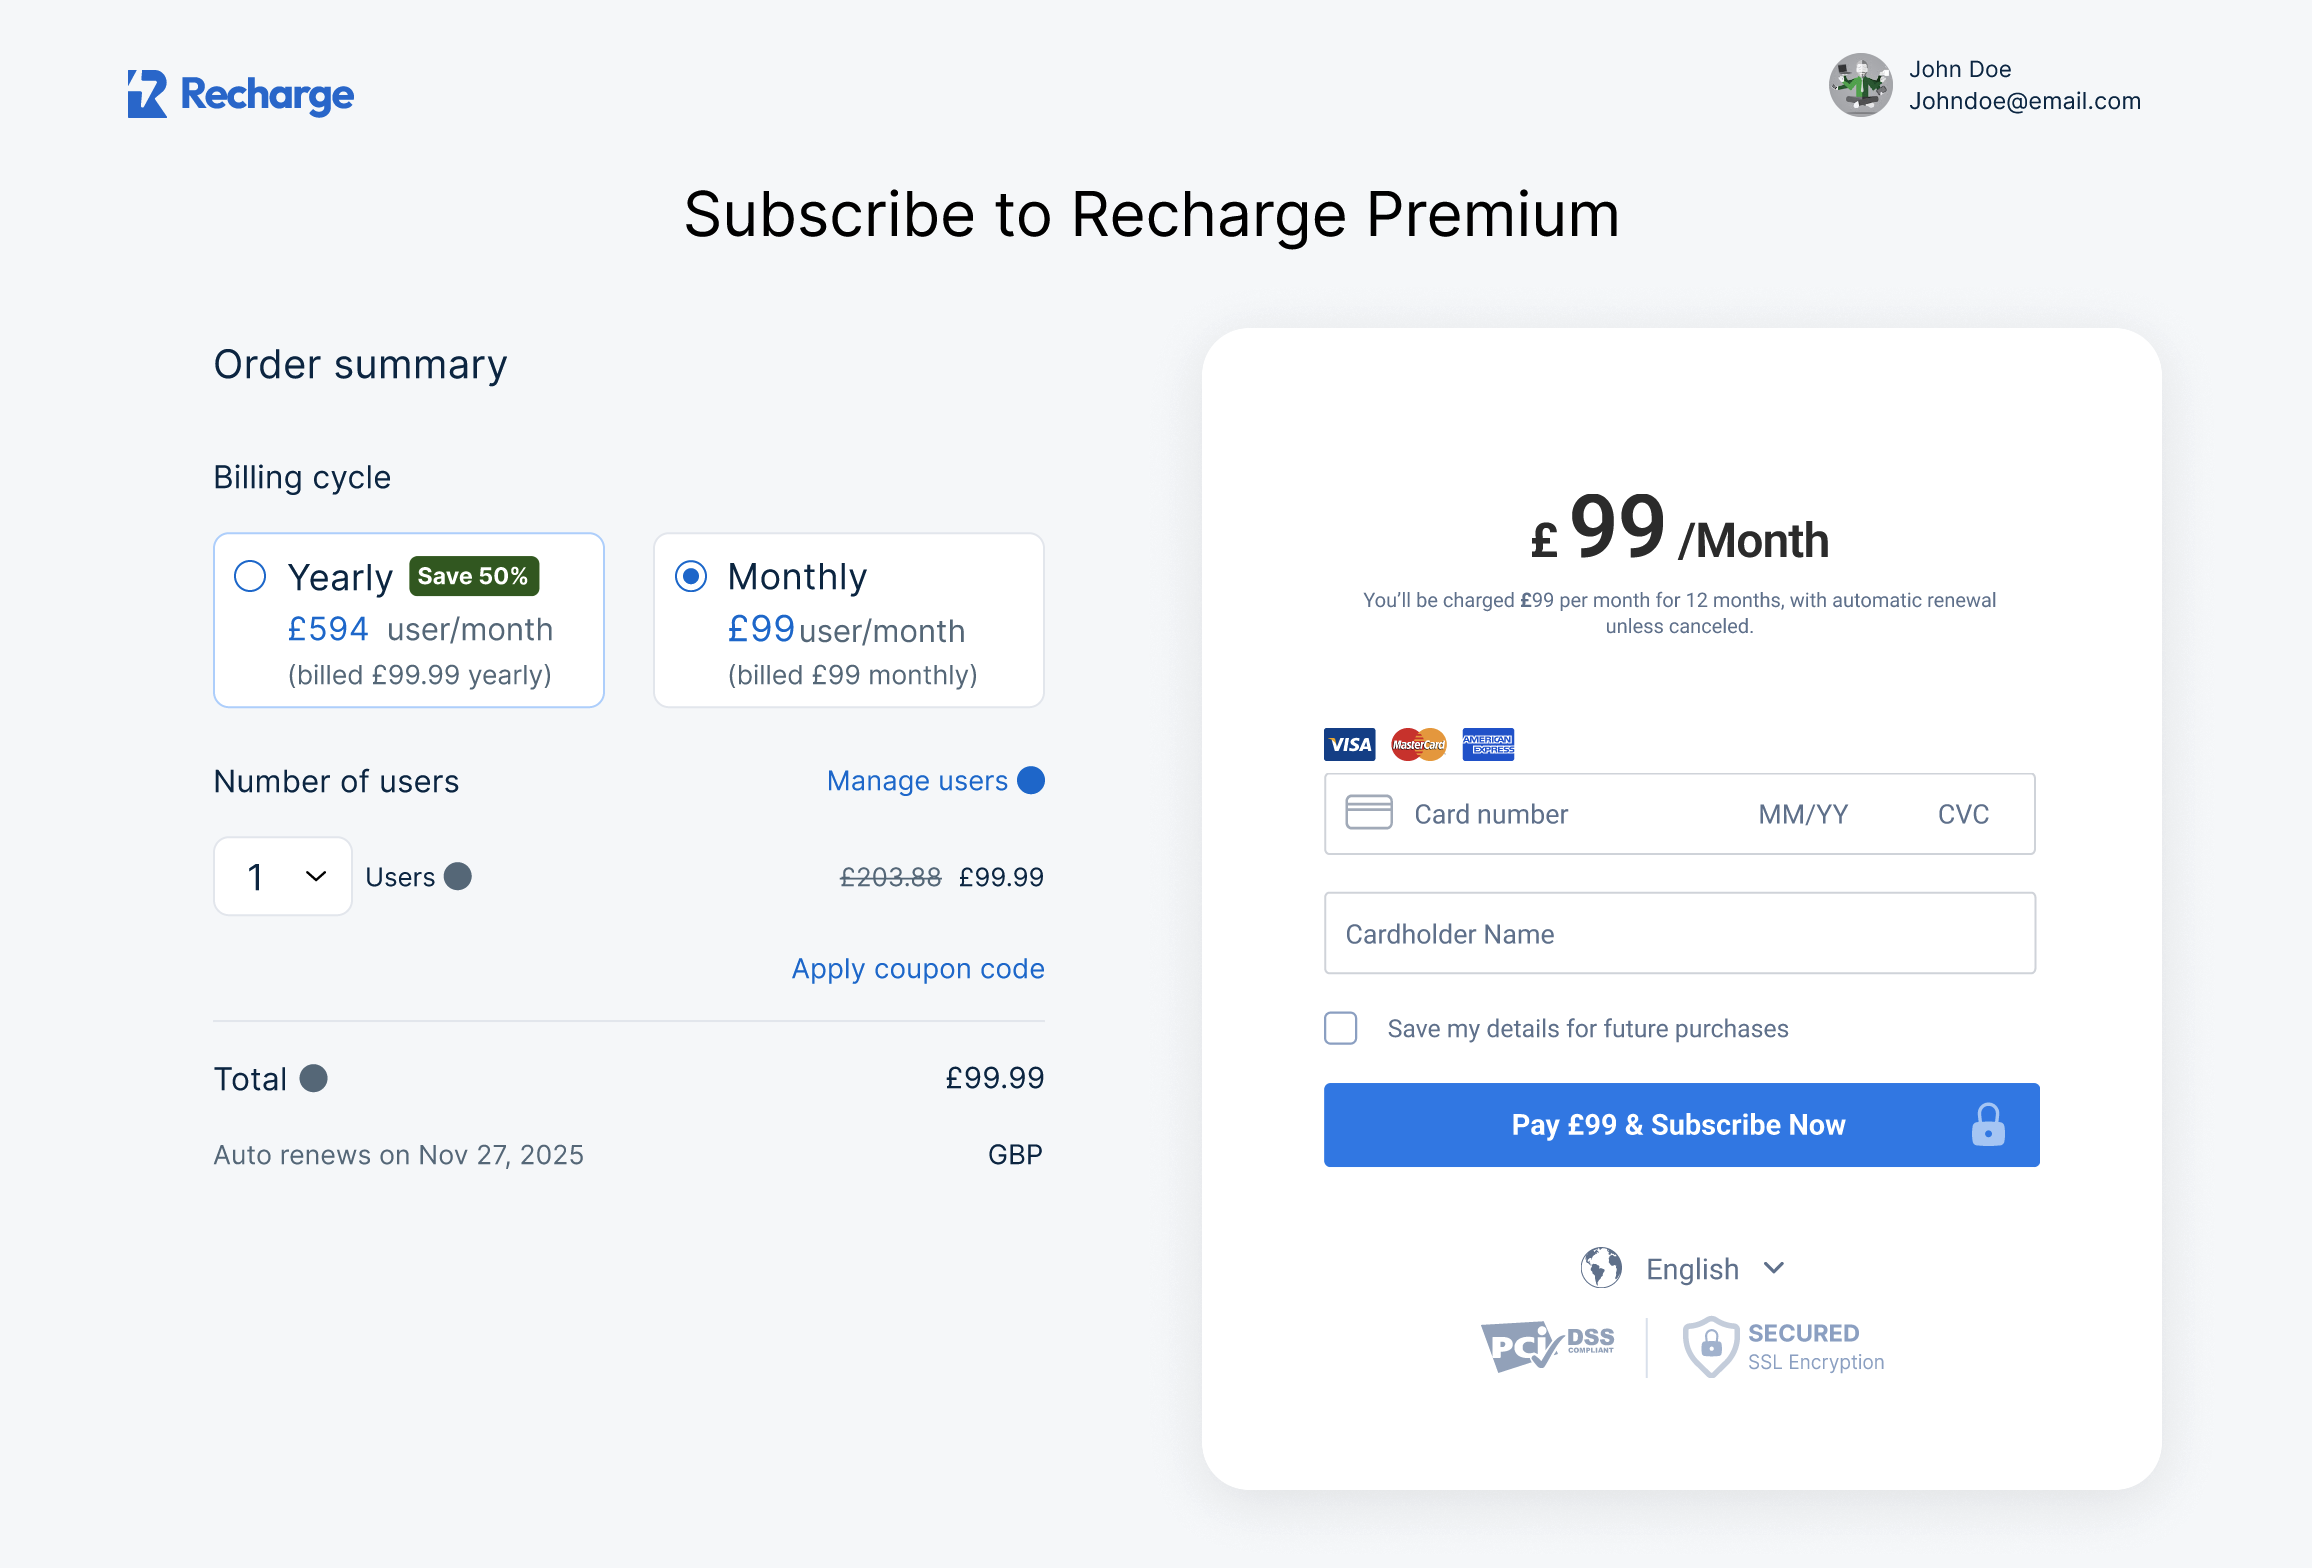
# 3. Implement Subscription Checkout Component on your webpage
[Section titled “3. Implement Subscription Checkout Component on your webpage”](#3-implement-subscription-checkout-component-on-your-webpage)
The Embedded Subscription Checkout UI Web-Embed enables platforms to seamlessly integrate a subscription checkout flow directly into their website. This white-labeled component is fully customisable, allowing you to offer subscription plans with personalised details and descriptions, all within your platform’s branding.\
By embedding this component, you can enhance user experience streamline the subscription process, and accelerate your platform’s recurring revenue offerings.
Note
Allocate the minimal space for the Subscription Checkout Page Component as follows:\
Width - 360 pixels
**Create a container**
Place the following `
` element in the desired location of your HTML page where you want the subscription checkout to appear. Ensure that you assign a unique ID to the container for identification.
* HTML
```html
```
**Create and mount an instance below the container**
Create an instance of it and mount it to the container DOM node in your page. This should be done after the previous div has finished loading.
* JavaScript
```javascript
const recurring= components.create("recurring");
recurring.mount("#recurring");
```
**Example checkout**
The subscription checkout component is embedded in the website’s checkout plan
**Hosted Checkout**
You can also outsource the page to Unipaas hosted checkout by using the “shortLink” URL provided in the response from `/pay-ins/checkout` request
***
### Direct Debit
[Section titled “Direct Debit”](#direct-debit)
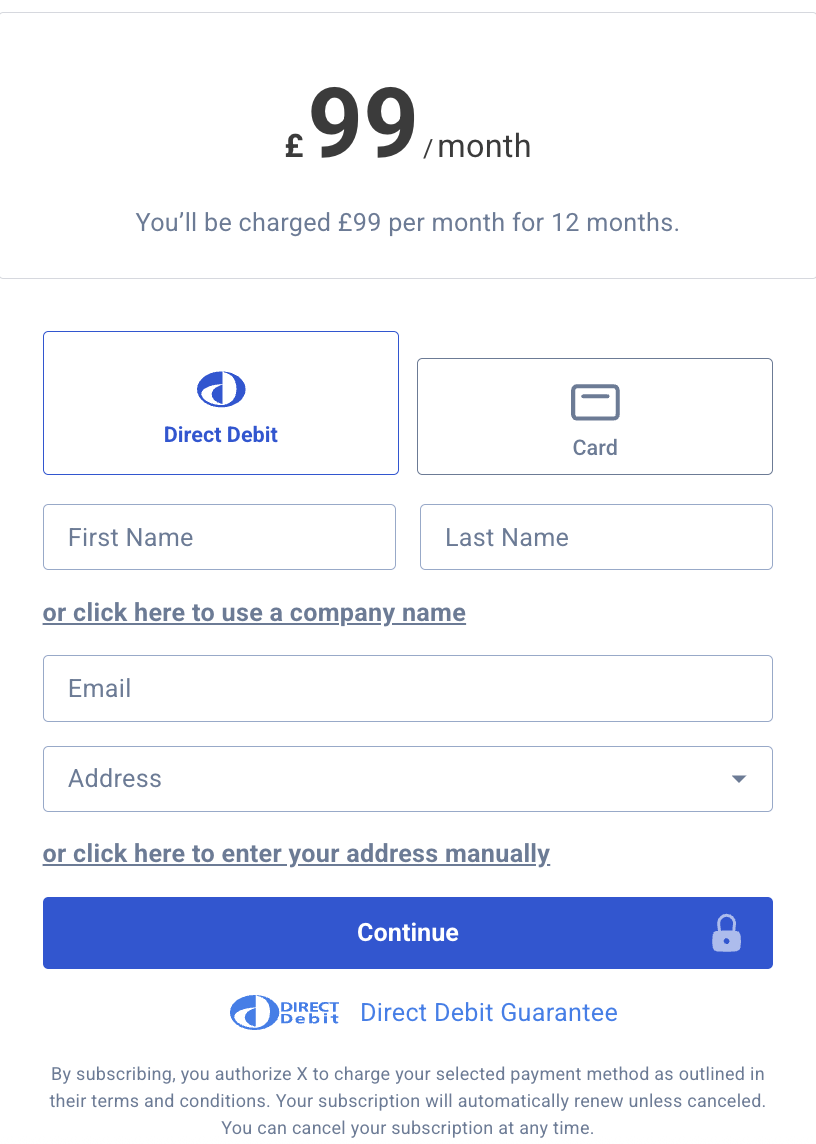
Unipaas Direct Debit solution allows you to request a mandate and present the collection details within the same checkout flow.
When the payment method is enabled within your account the paymentMethod object from the /pay-ins/checkout response will contain the allowed payment methods for the subscription checkout
“paymentMethods”: \[ “directDebit”, “creditCard” ],
The customer can complete the details in the form to sign the mandate and agree to the Direct Debit collection. Unipaas will then initiate the collection as per the plan that is setup.
For example, the set amount of £99 each month for 12 months.
See our documentation on Direct Debits to learn more: \[/docs/direct-debit/)
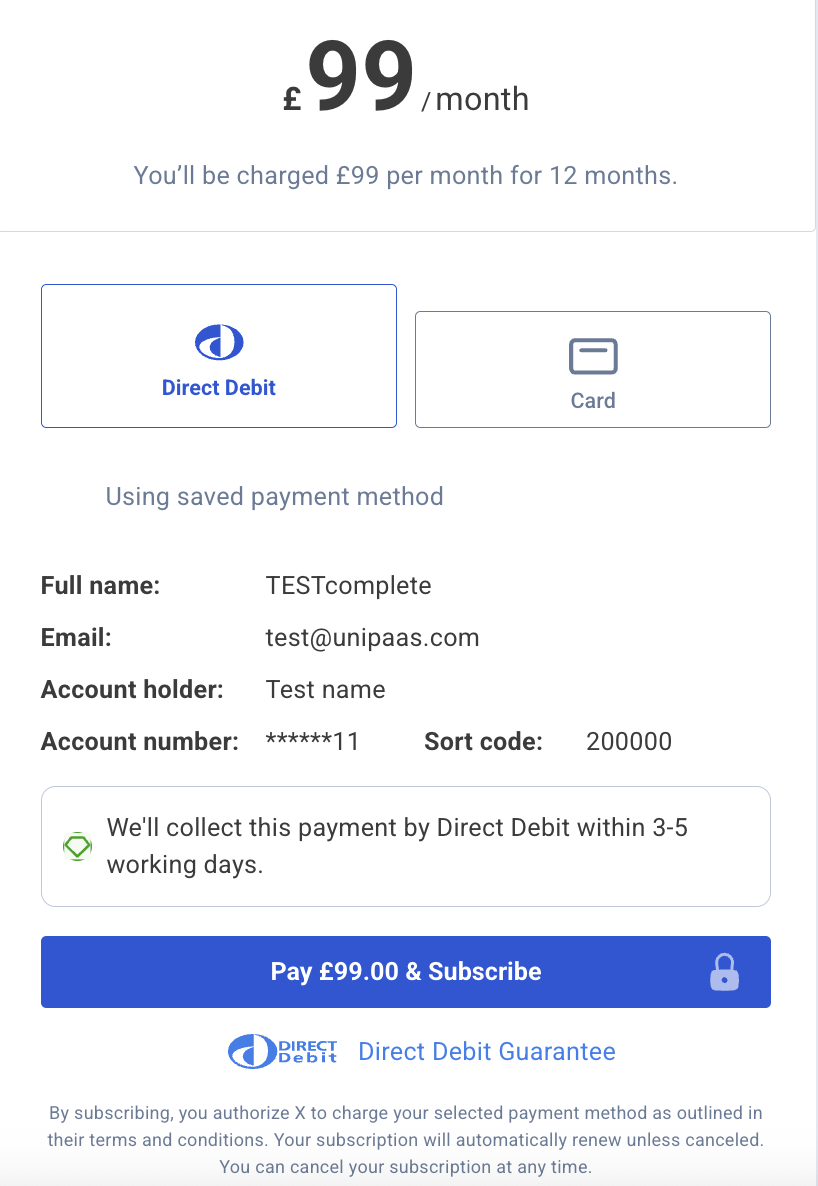
**Using an existing mandate**
You can also use an existing mandate if setup before the checkout. See our mandate guide to create a mandate outside of the subscription flow
\[/docs/mandate-form-implementation-guide/)
Once you have a mandate setup, use the corresponding consumer reference or consumerId passed into the checkout, to show the details that will be used to complete the Direct Debit.
***
# 4. DOM Event Listeners
[Section titled “4. DOM Event Listeners”](#4-dom-event-listeners)
The UI web-embeds generate DOM events to provide real-time updates on user activity and checkout status.
These events can be used to trigger custom actions and ensure a seamless user experience at platform’s end.
* JavaScript
```javascript
components.on("paymentSuccess", (e) => {
console.log("paymentSuccess", e.detail);
});
components.on("paymentError", (e) => {
console.log("paymentError", e.detail);
});
components.on("paymentSubmission", (e) => {
console.log("paymentSubmission", e.detail);
});
components.on("paymentCancel", (e) => {
console.log("paymentCancel", e.detail);
});
```
***
### Handle DOM events for Subscription Checkout Component
[Section titled “Handle DOM events for Subscription Checkout Component”](#handle-dom-events-for-subscription-checkout-component)
The Subscription Checkout Widget emits specific DOM events to provide real-time updates on the subscription process.
**Create DOM event listeners**
Place the following script tag element at the very bottom, below the closing `
` tag of your HTML page.\
Make sure to assign a unique ID to the container so that it can be easily identified and accessed.
* HTML
```html
```
**Create and mount an instance below the container**
Create an instance of it and mount it to the container DOM node in your page. This should be done after the previous div has finished loading.
* JavaScript
```javascript
const card = components.create("card");
cards.mount("#card");
```
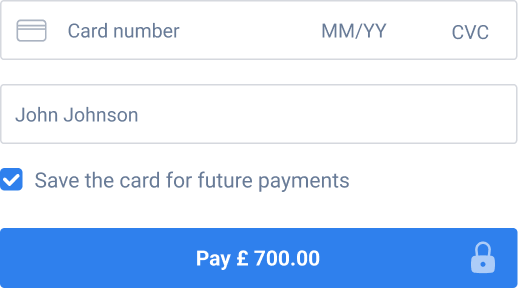 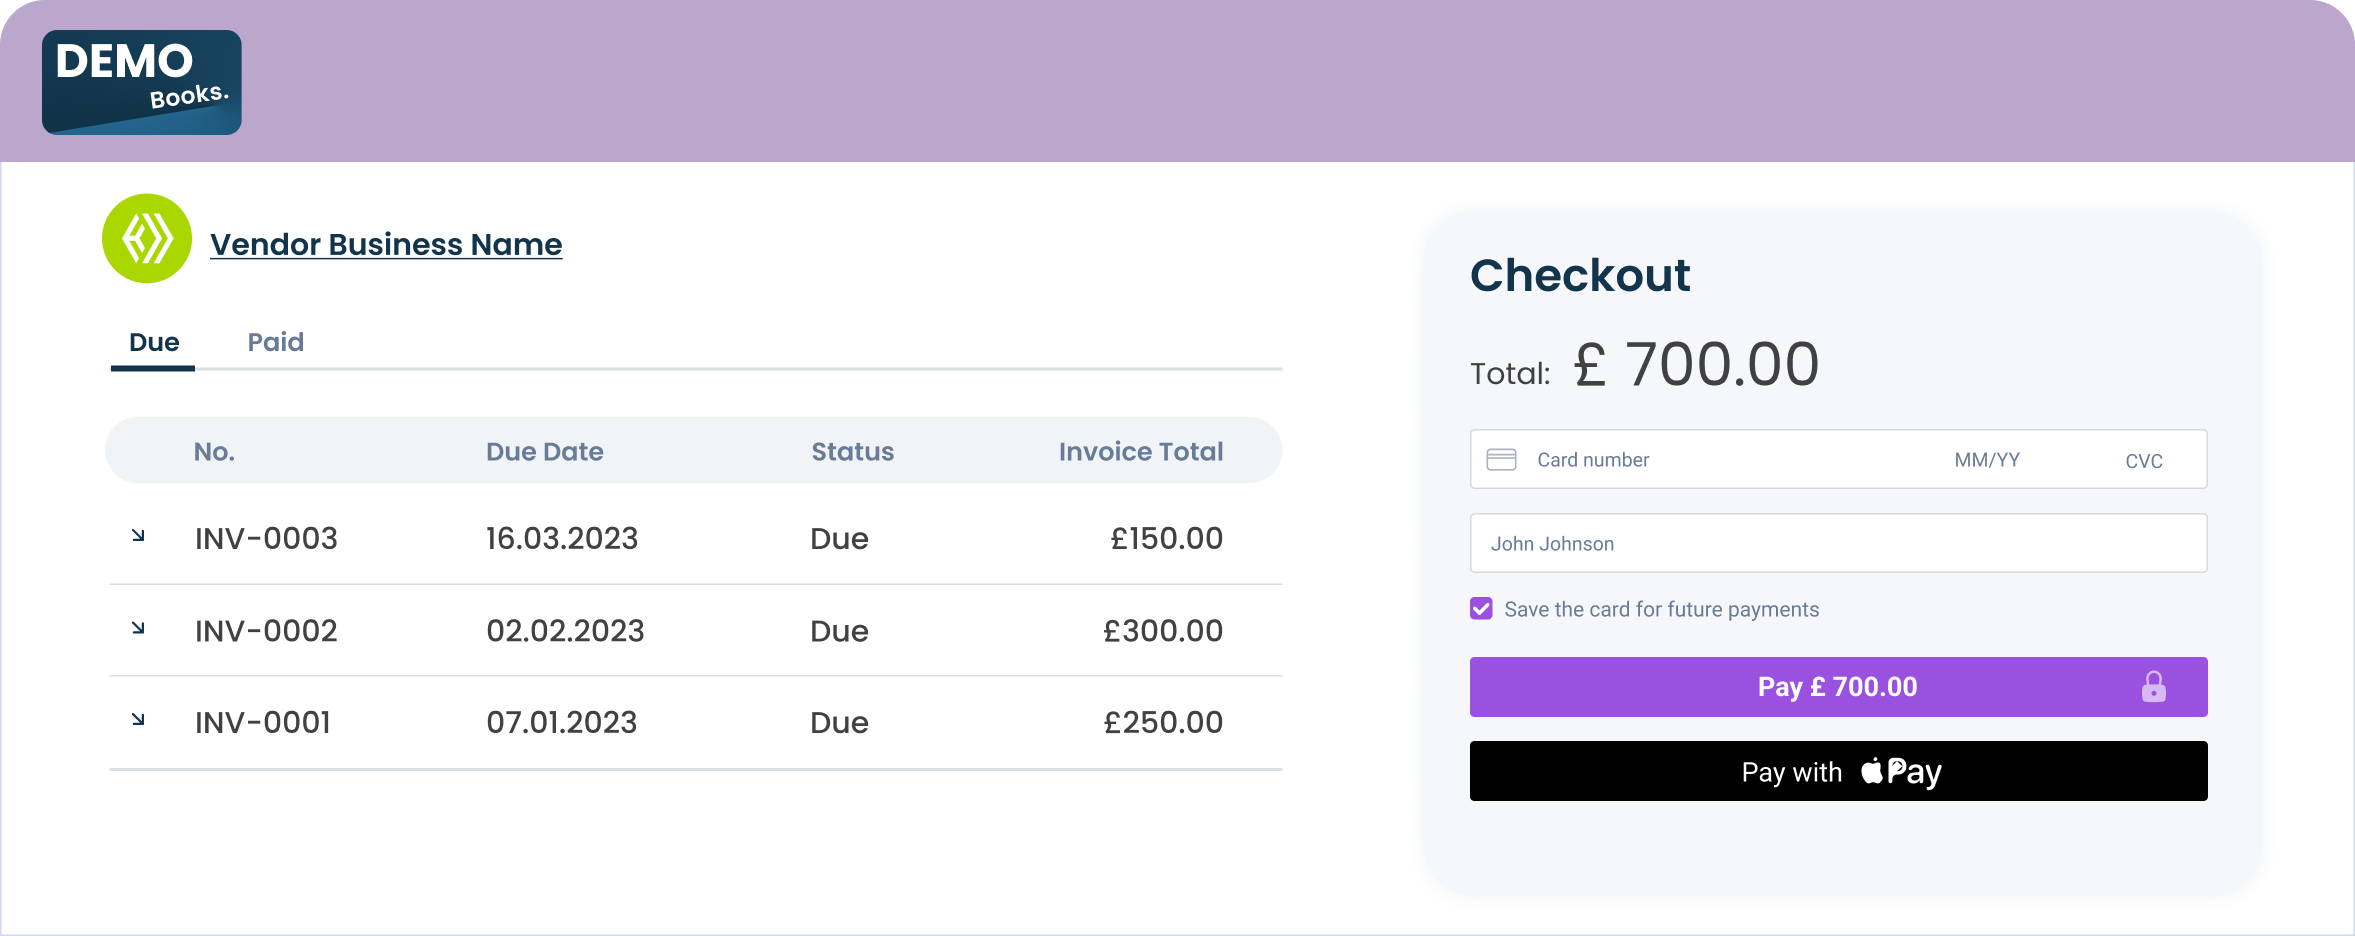
***
## Payment Method Selection UI Web-Embed
[Section titled “Payment Method Selection UI Web-Embed”](#payment-method-selection-ui-web-embed)
The Payment Method Selection UI Web-Embed will load with the payment methods configured for your platform and according to your checkout creation process, including relevant payment buttons to support various payment flows. However, this embed does not support displaying Apple Pay and Google Pay payment methods.
Note
Allocate the minimal space for the Payment Method Selection UI Web-Embedas follows:\
Width - 340 pixels
**Create a container**
Place the following script tag element below the closing `` tag of your HTML page.\
Make sure to assign a unique ID to the container so that it can be easily identified and accessed.
* HTML
```html
```
**Create and mount an instance below the container**
> ***can derive the payment methods from the checkout or actually write the checkout to it directly***
Create an instance of it and mount it to the container DOM node in your page. This should be done after the previous div has finished loading.
* JavaScript
```javascript
const paymentMethodsSelection = components.create("paymentMethodsSelection");
paymentMethodsSelection.mount("#payment_methods_selection");
```
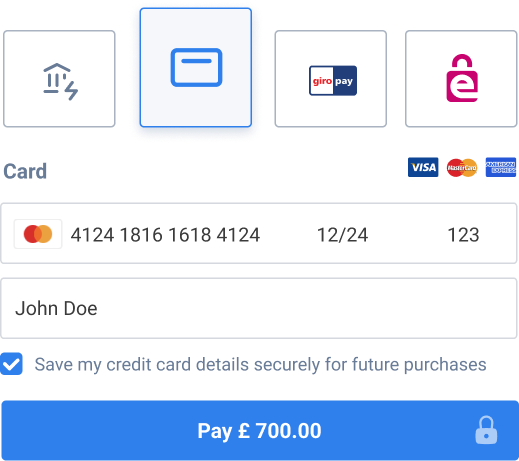
***
# 4. DOM Event Listeners and Callbacks
[Section titled “4. DOM Event Listeners and Callbacks”](#4-dom-event-listeners-and-callbacks)
The UI web-embeds generate DOM events to provide real-time updates on user activity and checkout status.
These events can be used to trigger custom actions and ensure a seamless user experience at platform’s end.
**Create DOM event listeners**
Place the following script tag element at the very bottom, below the closing `` tag of your HTML page.
* JavaScript
```javascript
components.on("paymentSuccess", (e) => {
console.log("paymentSuccess", e.detail);
});
components.on("paymentError", (e) => {
console.log("paymentError", e.detail);
});
components.on("paymentSubmission", (e) => {
console.log("paymentSubmission", e.detail);
});
components.on("paymentCancel", (e) => {
console.log("paymentCancel", e.detail);
});
```
### Handle DOM events for one-time checkout components
[Section titled “Handle DOM events for one-time checkout components”](#handle-dom-events-for-one-time-checkout-components)
| Event | Description | Action |
| :------------------ | :---------------------------------------------------------------------------------------------------------------------------------------------------------------------------------------- | :------------------------------------------------------------- |
| `paymentSuccess` | This event is triggered when a user successfully completes a transaction. It provides real-time information to the platform, indicating that the payment has been successfully processed. | Display the updated post-payment view |
| `paymentCancel` | This event is triggered when a user cancels a payment. | A relevant experience tailored to the platform can be created. |
| `paymentError` | This event is triggered when an error occurs during the payment. | A relevant experience tailored to the platform can be created. |
| `paymentSubmission` | This event is triggered when the user attempts to make a payment by pressing the payment button. | A relevant experience tailored to the platform can be created. |
### Checkout Callbacks
[Section titled “Checkout Callbacks”](#checkout-callbacks)
In addition to DOM event listeners, the checkout component also supports callbacks.
Callbacks are functions passed directly into the component configuration. They allow you to respond to specific events in the checkout lifecycle without needing to register additional event listeners on the DOM.
For example
* Code
```plaintext
const checkout = buyerComponents.create("checkout", {
onPaymentSuccess: () => {
console.log("Checkout completed");
},
accessToken: buyerToken,
});
```
**Available Callbacks**
| Event | Description | Action |
| :----------------- | :------------------------------------------------------------------------------------------------------------------------------------- | :------------------------------------------ |
| `onPaymentSuccess` | Triggered when the checkout flow completes successfully. You can use this to update your UI, send analytics, or trigger backend logic. | Run custom logic after a successful payment |
# Buyer UI: Subscription Checkout Component
> The Subscription Checkout Component will manage the UI logic, including displaying available payment methods, handling plan details, and determining the...
The Subscription Checkout Component will manage the UI logic, including displaying available payment methods, handling plan details, and determining the flow based on whether the user is new or returning.
# Implementation Steps
[Section titled “Implementation Steps”](#implementation-steps)
1. [Authorization](/docs/buyer-ui-embedded-checkout-implementation-guide/#1-authorization)
2. [Installation](/docs/buyer-ui-embedded-checkout-implementation-guide/#2-installation)
3. [Implement Subscription Checkout Component](/docs/buyer-ui-embedded-checkout-implementation-guide/)
4. [DOM EventListeners](/docs/buyer-ui-embedded-checkout-implementation-guide/)

Note
**Create a Plan**
The subscription checkout requires a planId to be passed in the request. Learn how to create the plan here: \[/docs/create-plans-and-subscriptions/)
# 1. Authorization
[Section titled “1. Authorization”](#1-authorization)
In order to load the Subscription Checkout Component in your platform, an authorized API call is needed in your backend.
## Generate an session token
[Section titled “Generate an session token”](#generate-an-session-token)
To obtain an session token, you need first create a checkout using [POST/pay-ins/checkout](/reference/#tag/payin/POST/pay-ins/checkout) endpoint.
[Learn more about payment creation](/docs/create-payment/)
Below is an example of the JSON payload for creating a checkout:
* JSON
```json
{
"country": "GB",
"email": "consumer_name@example.com",
"paymentMethods": ["creditCard"],
"reference": "Payment123",
"description": "Payment for service",
"consumer": {
"name": "consumer.name",
"reference": "CON-REF-123"
},
"plans": [
"673e057913866a9ece78c2b1"
]
}
```
In response to this API call, you will receive a session token along with other parameters:
* JSON
```json
"sessionToken": "eyJhbGciOiJIUzI1NiIsInR5cCI6IkpXVCJ9.eyJtZXJjaGFudElkIjoiNjEwNjZkYjA2MzBmNGUzNTlkYzA4NGU5IiwibWVyY2hhbnROYW1lIjoiQWxpY2UiLCJhbW91bnQiOjEwMCwiY3VycmVuY3kiOiJHQlAiLCJlbWFpbCI6InVzZXJAZXhhbXBsZS5jb20iLCJjb3VudHJ5IjoiR0IiLCJzZWxsZXJJZCI6IjY2NWVkMjEyZmNkZjBjZmVjM2M4N2UwMiIsInZlbmRvcklkIjoiNjY1ZWQyMTJmY2RmMGNmZWMzYzg3ZTAyIiwic2NvcGVzIjpbIndlYnNka19hY2Nlc3MiLCJkaXJlY3RfZGViaXRfcmVhZCJdLCJpc1JlY3VycmluZyI6ZmFsc2UsInBheW1lbnRMaW5rSWQiOiJMa1FUMTJnTC1VIiwiaWF0IjoxNzE4NjA0ODk3LCJleHAiOjE3MTg2MDY2OTd9.tfW5IUKOdes4Lb0g5laFCyFZzySzfwe0gHo6Ohi2pqI"
```
This session token is necessary for loading the Subscription Checkout Component.
# 2. Installation
[Section titled “2. Installation”](#2-installation)
**Script tag**
Start with placing the following script tag element inside of the ``of your HTML page:
* HTML
```html
```
This script tag loads the JavaScript code that provides the functionality for implementing Unipaas UI Web-Embeds on a webpage. When the script is loaded and executed, it will create an object in the memory that contains methods for instantiating and interacting with the UI Web-Embeds.
**General configuration**
Place the following script tag element below the closing `` tag of your HTML page.
* JavaScript
```javascript
components.on("subscriptionCreated", (e) => {
console.log("subscriptionCreated", e.detail);
// Handle successful subscription creation
// e.detail contains subscription details
});
components.on("subscriptionError", (e) => {
console.log("subscriptionError", e.detail);
// Handle subscription error
// e.detail contains error information
});
```
**Handle DOM events**
| Event | Description | Action |
| :-------------------- | :------------------------------------------------------------------------------------------------------------------- | :------------------------------------------------------------ |
| `subscriptionCreated` | This event is triggered when a subscription has been created, and the first payment has been processed successfully. | Display a confirmation message or redirect to a welcome page. |
| `subscriptionError` | This event is triggered when a subscription attempt encounters an error. | Handle errors appropriately and inform the user. |
# Checkout Page
> Unipaas checkout page allows merchants to accept digital payments on any device or channel.
Unipaas checkout page allows merchants to accept digital payments on any device or channel.
By using the checkout page you reduce the effort involved in PCI compliance, which is required from merchants handling sensitive credit card information. The checkout page fully supports Strong Customer Authentication (3DSecure 2). Please follow this step-by-step guide for quick integration.
## Checkout object properties
[Section titled “Checkout object properties”](#checkout-object-properties)
| Parameter | Type | Description | Required |
| --------------------------- | ---------------- | ------------------------------------------------------------------------------------------------- | -------- |
| `amount` | Number | The Amount of the payment | Yes |
| `currency` | String | The Currency of the payment | Yes |
| `orderId` | String | Unique ID from the merchant system | Yes |
| `email` | String | The buyer’s email address | Yes |
| `country` | String | The buyer’s country code. ISO 2 letters | Yes |
| `item` | Array of Objects | Used to split payments between multiple vendors or a vendor and the platform. | Yes |
| `successfulPaymentRedirect` | String | A url to redirect the user after a successful checkout. Example : `https://mywebsite.com/success` | No |
**The`item` object (for splitting payments)**
The items Object is part of the Checkout Object and describes the order item details per vendor. In this Object you can set the platform fee per vendor.
| Field | Description |
| ------------- | ---------------------------------------------------------------------------------------------------------------------------------------------------------------------------------------------------------------------------------------------------------------------------------------------------------------------------------------------------------------------------------------------------------------------------------------------------------------------------------------------------------------------------------------------------------------------------------------------------------------------------------------- |
| `name` | A description of the item |
| `amount` | The amount of the specific item.- Please note that the `itemAmount` field you are asked to send to Unipaas via this API call needs to be the final item’s amount - taking in consideration both line and subtotal discounts.For example: if a buyer uses a coupon and receives a 20GBP discount - we will ask you to send us a new post-discount amount for each item.**Numeric example:** Item 1 - 100 item 2 - 100 Subtotal - 200Discount - 20 Total - 180 **You need to send:** For item 1 - 90 For item 2 - 90\_The `itemAmount` total value must be equal to the Amount value (the total amount) sent in the Authorization Object |
| `vendorId` | The unique Id of the vendor provided by Unipaas during vendor Onboarding |
| `platformFee` | The fee percentage for a specific item |
## Open the link from your website
[Section titled “Open the link from your website”](#open-the-link-from-your-website)
Redirect your buyers to the hosted checkout page
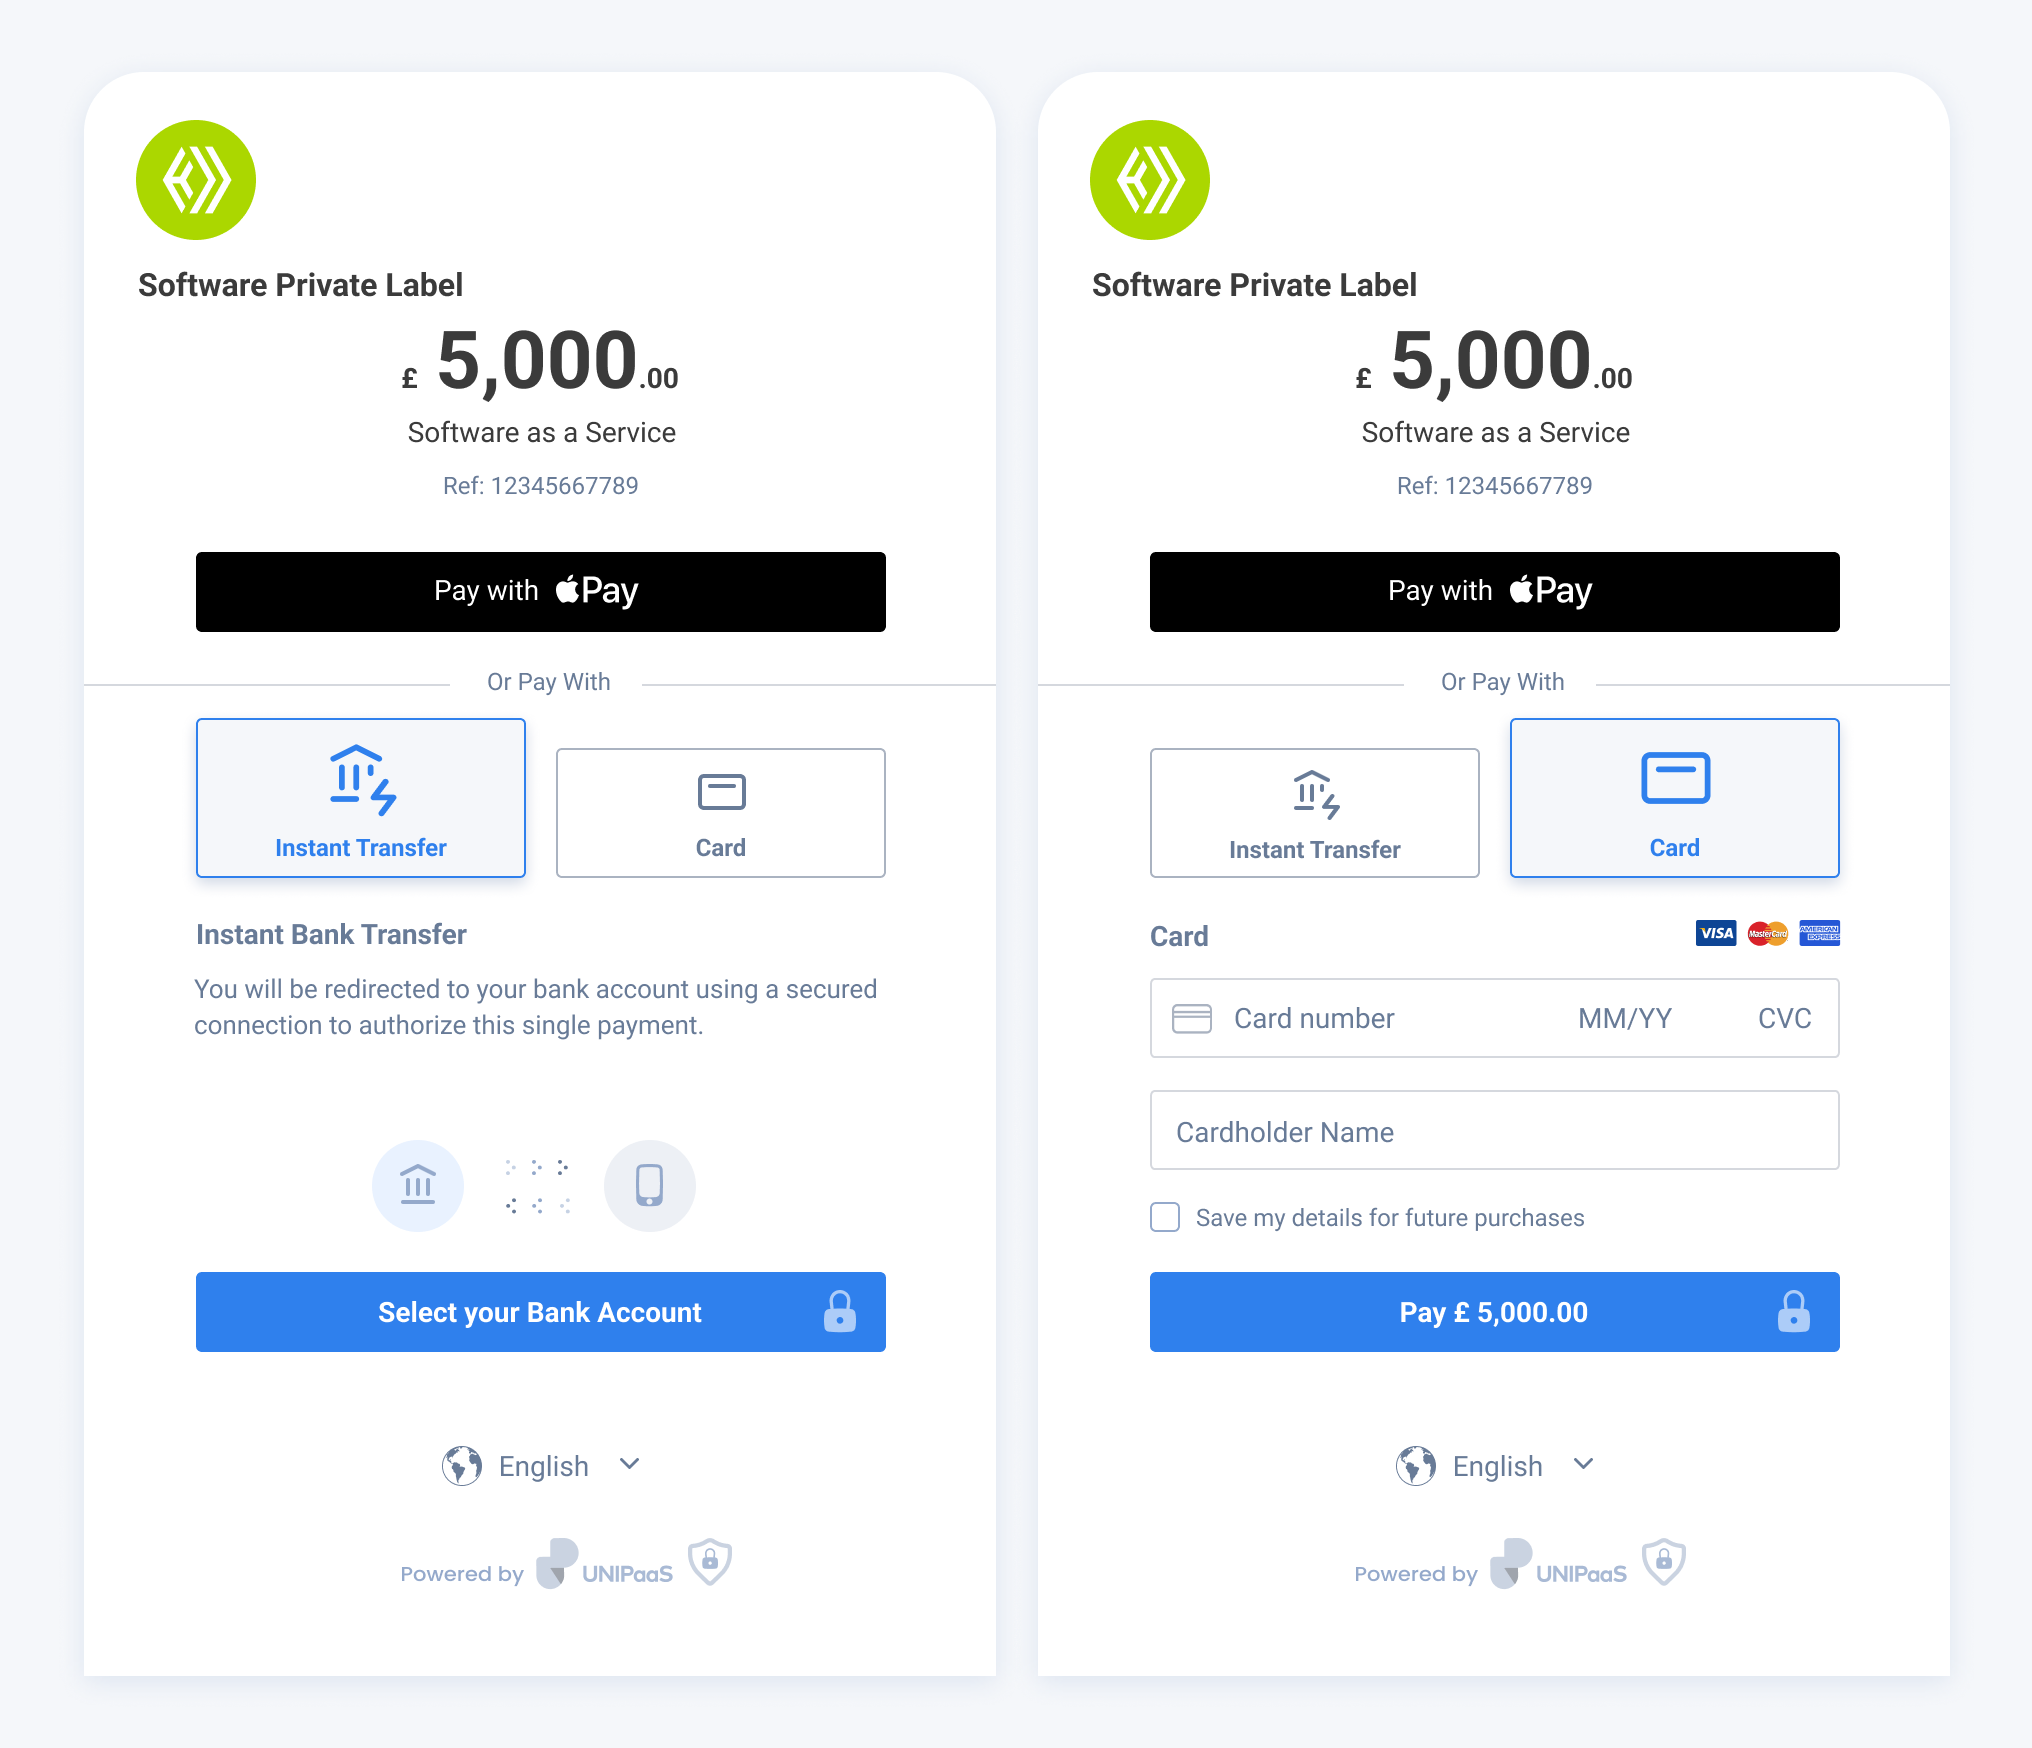
## Verify the Authorization status from your server side
[Section titled “Verify the Authorization status from your server side”](#verify-the-authorization-status-from-your-server-side)
When checkout is done and user is redirected to the `successfulPaymentRedirect` URL, the following parameters will appearAs a parameter in the URL and should be used for verification:
* Authorization ID
* Order ID
* Reference ID
Authorization verification is essential to ensure no manipulation occurred on the client-side.\
Make a [`GET /pay-ins/{authorizationId}`](/reference/) request:
* cURL
```curl
curl --location --request GET 'https://sandbox.unipaas.com/platform/pay-ins/{authorizationId}' \
--header 'Content-Type: application/json' \
--header 'Authorization: Bearer --PRIVATE_KEY--'
```
Authorization status must be `CAPTURED` for a successful Authorization.\
Check the [Authorization statuses](/docs/main-entities/#authorization-properties) options for more information.
Note
Please note: If you send a transaction without any vendor ID - the transaction will be entered to the platform’s account and will be listed as a platform transaction.
## Deactivate checkout page
[Section titled “Deactivate checkout page”](#deactivate-checkout-page)
You can deactivate the checkout page that is set for online payment methods such as cards, instant bank transfers, or alternative payment methods (APMs). The deactivation feature is unavailable for checkouts set to offline payment methods like Direct Debit.
Note
Please note: This action is irreversible, and once checkout page is deactivated, it will not be possible to reactivate it again.
To deactivate your checkout page and make it unavailable, use the following endpoint:
`POST /pay-ins/checkout/{signedLinkId}/expire`
The request should not include a body.
**Possible response:**
| Status Code | Description | Response |
| ----------- | -------------- | --------------------------------------------------------------------------------------------------------------------------------------------------------------------------------------------------------------------------------------------------------------------------------------- |
| 201 | OK | The checkout object |
| 401 | Not Authorized | |
| 404 | Not Found | “Checkout does not exist” |
| 405 | Not Allowed | “Checkout expired and can not be edited” - in case you are trying to deactivate an expired checkout.Or“This checkout is for offline payment method. Can not be expired” - in case you’re trying to deactivate a checkout that is set to Direct Debit (which is offline payment method). |
## Test your integration
[Section titled “Test your integration”](#test-your-integration)
Use our [test scenarios](/docs/test-cards/) test your integration
# Commit or Cancel Payout
Requesting a payout consists of 2 steps
1. Create
2. **Commit / Cancel** <--- in this page
After payout creation, you need to either commit or cancel the payout.
## Commit Payout
[Section titled “Commit Payout”](#commit-payout)
Make a [`POST /payouts/{payoutId}/commit`](/reference/#tag/payout/POST/payouts/%7BpayoutId%7D/commit)\
request:
* cURL
```curl
curl --request POST \
--url 'https://sandbox.unipaas.com/platform/payouts/{payoutId}/commit' \
--header 'Accept: application/json' \
--header 'Content-Type: application/json' \
--header 'Authorization: Bearer '
```
in the response, you’ll get the commited [`Payout object`](/docs/pay-out-funds-overview/#the-payout-object).
## Commit Vendor Payout
[Section titled “Commit Vendor Payout”](#commit-vendor-payout)
Make a [`POST /vendors/{vendorId}/payouts/{payoutId}/commit`](/reference/#tag/payout/POST/payouts/%7BpayoutId%7D/commit) request:
* cURL
```curl
curl --request POST \
--url 'https://sandbox.unipaas.com/platform/vendors/{vendorId}/payouts/{payoutId}/commit' \
--header 'Accept: application/json' \
--header 'Content-Type: application/json' \
--header 'Authorization: Bearer '
```
in the response, you’ll get the commited [`Payout object`](/docs/pay-out-funds-overview/#the-payout-object).
## Cancel Payout
[Section titled “Cancel Payout”](#cancel-payout)
Make a [`POST /payouts/{payoutId}/cancel`](/reference/#tag/payout/POST/payouts/%7BpayoutId%7D/cancel) request:
* cURL
```curl
curl --request POST \
--url 'https://sandbox.unipaas.com/platform/payouts/{payoutId}/cancel' \
--header 'Accept: application/json' \
--header 'Content-Type: application/json' \
--header 'Authorization: Bearer '
```
in the response, you’ll get the cancelled [`Payout object`](/docs/pay-out-funds-overview/#the-payout-object).
## Cancel Vendor Payout
[Section titled “Cancel Vendor Payout”](#cancel-vendor-payout)
Make a [`POST /vendors/{vendorId}/payouts/{payoutId}/cancel`](/reference/#tag/payout/POST/payouts/%7BpayoutId%7D/cancel) request:
* cURL
```curl
curl --request POST \
--url 'https://sandbox.unipaas.com/platform/vendors/{vendorId}/payouts/{payoutId}/cancel' \
--header 'Accept: application/json' \
--header 'Content-Type: application/json' \
--header 'Authorization: Bearer '
```
in the response, you’ll get the cancelled [`Payout object`](/docs/pay-out-funds-overview/#the-payout-object).
# Create Payment
## Create Payment (Checkout)
[Section titled “Create Payment (Checkout)”](#create-payment-checkout)
Note
This call must be performed from your backend server!\
The Create-checkout-link call requires your **private\_key** (your secret password) which should not be exposed on the client-side.
Learn how to make a [Payment request](/reference/#tag/payin/POST/pay-ins/checkout).
## Example of a Request Payload for a SaaS Platform:
[Section titled “Example of a Request Payload for a SaaS Platform:”](#example-of-a-request-payload-for-a-saas-platform)
Note
For a SaaS platform, the payload should not include an items array, and the vendor ID must be sent directly as a separate parameter.
* JSON
```json
{
"amount": 100,
"currency": "GBP",
"vendorId": "66532df5d55926b2b12a874a",
"reference": "1000456",
"description": "Service June",
"email": "test@test.com", //consumer email
"country": "GB",
"invoiceUrl": "http://yourcompany.com/invoice.pdf",
"dueDate": "2020-12-13", //OPTIONAL
"vatAmount": 19, //OPTIONAL
"successfulPaymentRedirect": "http://yourcompany.com/redirect", //OPTIONAL
"paymentMethods": ["bankTransfer"], // creditCard, bankTransfer, directDebit, apm
"consumer": {
"name": "Raul Runte",
"reference": "CON-REF-123",
}
}
```
## Example of a Request Payload for a Marketplace Platform:
[Section titled “Example of a Request Payload for a Marketplace Platform:”](#example-of-a-request-payload-for-a-marketplace-platform)
Note
For a Marketplace Platform, the vendor ID is included within the items array, allowing for multiple items and vendors, with the payment being split accordingly.
* JSON
```json
{
"amount": 100,
"currency": "GBP",
"orderId": "1000456",
"description": "Iphone case",
"email": "test@test.com",
"phone": "+447911123456",
"country": "GB",
"reference": "100456",
"invoiceUrl": "http://yourcompany.com/invoice.pdf",
"dueDate": "2020-12-13", //OPTIONAL
"vatAmount": 19, //OPTIONAL
"successfulPaymentRedirect": "http://yourcompany.com/redirect", //OPTIONAL
"items": [
{
"name": "Iphone case",
"amount": 100,
"vendorId": "5ee8e655a65f08fcd71fe4d9",
"platformFee": 0,
"quantity": 1
}
],
"consumer": {
"name": "Raul Runte",
"reference": "CON-REF-123",
},
"billingAddress": {
"firstName": "string",
"lastName": "string",
"city": "London",
"country": "GB",
"line1": "64 New Cavendish Street",
"line2": "",
"postalCode": "W1G 8TB",
"state": ""
},
"shippingSameAsBilling": true,
"shippingAddress": {
"firstName": "string",
"lastName": "string",
"city": "London",
"country": "GB",
"line1": "64 New Cavendish Street",
"line2": "",
"postalCode": "W1G 8TB",
"state": ""
},
"metadata": {
"CustomerID": "457349"
}
}
```
In the response you will find the **shortLink** field, which contains the URL of the checkout page.
## Optional address fields
[Section titled “Optional address fields”](#optional-address-fields)
We highly recommend you pass information about the consumer’s address when creating a checkout. Passing the billing and shipping (for physical goods) addresses will increase the success rate of the transaction.
In case shipping address is not applicable (for non-physical goods), set the `shippingSameAsBilling` flag to `true`.
**Note:** Add a 2-letter ISO `state` code (for customers based in the US, Canada, and India only).
# Create Plans and Subscriptions
# Implementation
[Section titled “Implementation”](#implementation)
## Step 1: Create a plan:
[Section titled “Step 1: Create a plan:”](#step-1-create-a-plan)
During plan creation, determine who the plan owner will be.
Use cases:
* Create a plan for your platform e.g. to collect subscription fees from your users.
* Create a plan on behalf of your users e.g. where the user/vendor collects payments/subscription fees from the end customer/buyer.
Make a [POST/pay-ins/plans](/reference/#tag/recurring/POST/pay-ins/plans) request to create a new plan and establish pricing, billing cycles, and other details by passing in the following in the payload:
`name`: Name of the subscription plan.\
`periodUOM`and`period`: Define the billing frequency.\
`autoRenewal`: Whether the subscription renews automatically.\
`pricingModel`: Set as `fixed`for subscriptions which do not change over time or set as`ramp` for subscriptions which change after certain no. of cycles.
**Main plan fields:**
| Name | Type | Description |
| ------------------------- | ----------- | -------------------------------------------------------- |
| `name` | String | Plan name |
| `description` | String | Plan description |
| `price` | Decimal | Plan price amount |
| `currency` | String | Currency standard ISO 4217 |
| `periodUOM` | Enum string | Defines the billing cycle type (day, week, month, year) |
| `period` | Integer | The length of the plan in ‘PeriodUOM’ units |
| `trialUOM` (Optional) | Enum string | Defines trial period cycle type (day, week, month, year) |
| `trial Period` (Optional) | Integer | The length of the trial period in ‘PeriodUOM’ units |
| `status` | Enum string | Defines the status of the plan |
| `autoRenewal` | Boolean | Defines auto-renewal |
| `vendorId` | String | vendor ID of the user OR platform ID of the platform |
| `pricingModel` | String | Defines the model (ramp or fixed) |
*Key Parameters:*
* vendorId - Use `vendorId` of your user (from /vendor API) when creating a plan on behalf of your user\
OR `Platform ID` (Found in User profile > “Account Details” in the top right corner of the Portal)
**Example of a request payload**
* JSON
```json
{
"name": "Premium Plan for all",
"description": "Access to all premium features",
"group": "Group Name",
"country": "GB",
"currency": "GBP",
"period": 12,
"periodUOM": "month",
"autoRenewal": false,
"vendorId": "66d8869bdd0d32ab4e43c4ec",// This is the Platform ID or vendorId
"pricingModel": "ramp",
"rampIntervals": [
{
"unitAmount": 10,
"cycles": 3
},
{
"unitAmount": 20,
"cycles": 3
},
{
"unitAmount": 30,
"cycles": 6
}
],
"setupFee": 40
}
```
**Response**
* JSON
```json
{
"consent": "By subscribing, you authorize PlatformName to charge your selected payment method as outlined in their terms and conditions. You can cancel your subscription at any time.",
"setupFee": 40,
"rampIntervals": [
{
"unitAmount": 10,
"cycles": 3
},
{
"unitAmount": 20,
"cycles": 3
},
{
"unitAmount": 30,
"cycles": 6
}
],
"pricingModel": "ramp",
"autoRenewal": false,
"trialPeriod": 0,
"periodUom": "month",
"period": 12,
"currency": "GBP",
"group": "Group Name",
"description": "Access to all premium features",
"name": "Premium Plan for all",
"status": "active",
"vendorId": "66d8869bdd0d32ab4e43c4ec",// This is the Platform ID or vendorId
"merchantName": "PlatformName",
"merchantId": "PlatformId",
"id": "67891400cb2350877f51ca15",
"createdAt": "2025-01-16T14:13:20.311Z",
"updatedAt": "2025-01-16T14:13:20.311Z"
}
```
*Note:* Once the plan is created, the subsequent steps remain the same for both scenarios.
## Step 2: Create a Checkout for the Subscription
[Section titled “Step 2: Create a Checkout for the Subscription”](#step-2-create-a-checkout-for-the-subscription)
Once a plan is created, subscriptions can be attached to it. To proceed, initiate a Checkout Create request. This request generates a checkout UI (hosted or embedded), enabling the payer to either create a new payment method or select an existing one while providing their consent for the subscription. This ensures the subscription is successfully linked to the payer with an active payment method.
Make a [POST/pay-ins/checkout](/reference/#tag/payin/POST/pay-ins/checkout) request to create a checkout for the subscription.
*Key Parameters:*
| Name | Type | Required | Description |
| :-------------------------- | :----- | :------- | :------------------- |
| `plans` | Array | Yes | |
| `paymentMethods` | Array | No | |
| `consumer.reference` | String | Yes | |
| `consumer.name` | String | No | |
| `consumer.email` | String | No | |
| `successfulPaymentRedirect` | String | No | |
| `country` | String | Yes | ISO31661 Alpha2 code |
**Example of a request payload**
* JSON
```json
{
"country": "GB",
"email": "user@example.com",
"paymentMethods": ["card"],
"shippingSameAsBilling": true,
"reference": "1000456", // Platform order ID OR platform payment ID
"consumer": {
"reference": "45684r3453456513543546546", // Unique ID of the buyer on your system
"name": "John Doe",
"email": "email@email.com"
},
"plans": [
"6751e3c1f7180997ad5c0f9c" // This is the planId from Step 1
],
"successfulPaymentRedirect": "https://platform.com/redirect"
}
```
**Response**
* JSON
```json
{
"vendor": {
"name": "John Doe",
"email": "john.doe@example.com",
"country": "GB"
},
"status": "open",
"mode": "online",
"plans": [
{
"id": "6752d6ecf7180997ad5c107d"
}
],
"isMoto": false,
"id": "6752d71bca2ec7447f9c6d85",
"country": "GB",
"paymentMethods": [
"card"
],
"reference": "1000456",
"amount": 41,
"currency": "GBP",
"totalAmount": 90,
"totalPaid": 0,
"expiresAt": "2025-06-04T10:51:07.000Z",
"shortLink": "https://sandbox-checkout.unipaas.com/DRe0gsR9A-/",
"merchantId": "66d58bd06098898a5de10bdc",
"signedLinkId": "DRe0gsR9A-",
"items": [],
"createdAt": "2024-12-06T10:51:07.974Z",
"updatedAt": "2025-01-16T14:55:24.889Z",
"successfulPaymentRedirect": "https://platform.com/redirect",
"sessionToken": "eyJhbGciOiJIUzI1NiIsInR5cCI6IkpXVCJ9.eyJtZXJjaGFudElkIjoiNjZkNThiZDA2MDk4ODk4YTVkZTEwYmRjIiwibWVyY2hhbnROYW1lIjoiTmlja3kgRGhhbGl3YWwiLCJhbW91bnQiOjQxLCJjdXJyZW5jeSI6IkdCUCIsImVtYWlsIjoidXNlckBleGFtcGxlLmNvbSIsImNvdW50cnkiOiJHQiIsInNlbGxlcklkIjoiNjZkODg2OWJkZDBkMzJhYjRlNDNjNGVjIiwidmVuZG9ySWQiOiI2NmQ4ODY5YmRkMGQzMmFiNGU0M2M0ZWMiLCJ0b2tlbk9ubHkiOnRydWUsInNjb3BlcyI6WyJ3ZWJzZGtfYWNjZXNzIiwiZGlyZWN0X2RlYml0X3JlYWQiLCJkaXJlY3RfZGViaXRfd3JpdGUiXSwicGF5bWVudE1ldGhvZHMiOlsiY3JlZGl0Q2FyZCJdLCJpc1JlY3VycmluZyI6dHJ1ZSwicGxhbnMiOlsiNjc1MWUzYzFmNzE4MDk5N2FkNWMwZjljIl0sImNvbnN1bWVyIjp7InJlZmVyZW5jZSI6IjQ1Njg0cjM0NTM0NTY1MTM1NDM1NDY1NDYifSwiZW52Ijoic2FuZGJveCIsInBheW1lbnRMaW5rSWQiOiJEUmUwZ3NSOUEtIiwiaWF0IjoxNzM3MDM5MzI0LCJleHAiOjE3MzcxMjU3MjR9.Lx9x4zEETZ9ABq7-AimSnE6SBTVUKkodJ5EvKKKIC2M",
"qrPaymentLink": "https://sandbox.unipaas.com/platform/qr-code/generate?url=https://sandbox-checkout.unipaas.com/DRe0gsR9A-/",
"vendorId": "66d8869bdd0d32ab4e43c4ec",
"consumer": {
"email": "user@example.com",
"firstName": "",
"lastName": "",
"name": "",
"billingAddress": {
"country": "GB"
},
"shippingSameAsBilling": true,
"reference": "45684r3453456513543546546"
}
}
```
Store the following from the response:
* `shortLink` - This URL should be used if you want to using the Unipaas redirect the customer to the Hosted Checkout page.
* `sessionToken` - This session token should be used for authorization if you are implementing our Subscription Checkout UI web embeds.
## Step 3: Display the Checkout to the Customer
[Section titled “Step 3: Display the Checkout to the Customer”](#step-3-display-the-checkout-to-the-customer)
Unipaas offers 2 options to show the checkout to the customer:
### Hosted checkout page
[Section titled “Hosted checkout page”](#hosted-checkout-page)
To use our hosted checkout, save the`shortLink` from Step 2 and share it directly with payers. The hosted checkout will handle the UI logic, including displaying available payment methods, plan details, trial period and determining the flow based on whether the user is new or returning.\
For more information: [Checkout Page](/docs/checkout-page/)
### Subscription Checkout UI Web Embed
[Section titled “Subscription Checkout UI Web Embed”](#subscription-checkout-ui-web-embed)
To use our checkout UI web embed, refer to the [following documentation](/docs/buyer-ui-subscription-checkout-ui-web-embed/). The checkout UI web embed will manage the UI logic, including displaying available payment methods, handling plan details, and determining the flow based on whether the user is new or returning.
## Step 4: Handle the Authorization/Update Webhook
[Section titled “Step 4: Handle the Authorization/Update Webhook”](#step-4-handle-the-authorizationupdate-webhook)
After successful checkout completion, Unipaas sends an `authorization/update` webhook to your server with crucial payment authorization details.
To ensure your platform reflects the updated status of the transaction:
1. *Verify Capture status:* Check if`authorizationStatus: "Captured"` then mark the payment as successful in your database . This status confirms the payment has been successfully captured.
2. *Save Subscription ID:* Save `subscriptionId` field from the initial transaction. Use this to track subsequent transactions on your system and to update/cancel the subscription for the end customer.
3. *Extract and use`orderid`* to associate the the checkout with the Unique order ID / payment ID on your system.
Webhook Example Payload:
* JSON
```json
{
"authorizationId": "6752d768383576f170cb898f",
"transactionId": "6752d768383576f170cb89a4",
"vendorId": "66d8869bdd0d32ab4e43c4ec",
"authorizationStatus": "Captured",
"paymentOption": {
"cardAccount": {
"brand": "VISA",
"bin": "400002",
"last4Digits": "5032",
"issuerCountry": "GB"
},
"id": "6752d762c31925ed37c11738" // This is the token of the saved card
},
"currency": "GBP",
"amount": 50,
"orderid":"1000456", // This is the Platform order ID OR platform payment ID(reference) in Step 2
"checkoutId": "DRe0gsR9A-",
"items": [],
"planId": "6752d6ecf7180997ad5c107d",
"subscriptionId": "6752d768f7180997ad5c108c",
"metadata": {},
"paymentMethod": "creditCard",
"consumerId": "6752d761145ad6c0f8f5a317",
"consumerEmail": "user@example.com"
}
```
Refer to the Additional Webhooks Documentation for more information
**Next steps:**
[Update Plan](/docs/update-plan/)
[Update Subscription](/docs/update-subscription/)
**See also:**
[To use Tokens from Subscription for Unscheduled MITs](/docs/use-tokens-from-subscription-for-unscheduled-mits/)
# Create Vendor
> The first thing you should do when integration the vendor onboarding process is implement the Create vendor call below. Vendors can be created with or...
The first thing you should do when integration the vendor onboarding process is implement the Create vendor call below. Vendors can be created with or without pre-populating additional onboarding fields.
Pre populating onboarding fields makes the onboarding process easier for your vendors. Send some of the onboarding fields while creating the vendor (using same API call).\
In most cases, some of the information we require for the vendor onboarding is already collected by your platform.
## Create vendor without pre-populating any onboarding fields
[Section titled “Create vendor without pre-populating any onboarding fields”](#create-vendor-without-pre-populating-any-onboarding-fields)
Make a [`POST /vendors`](/reference/#tag/vendor/POST/vendors) request to create a new vendor, provide the information you have and the rest will be collected later on in the onboarding process:
* cURL
```curl
curl --location --request POST 'https://sandbox.unipaas.com/platform/vendors' \
--header 'accept: application/json' \
--header 'Authorization: Bearer ' \
--header 'Content-Type: application/json' \
--data-raw '{
"businessName": "Better Delivery",
"type": "company",
"firstName": "John",
"lastName": "Doe",
"email": "john.doe@example.com",
"country": "GB",
"reference" : "Qiuysdxv5shs", // The unique user id on your system
"createOnboardingLink": true
}'
```
In the response, you’ll get the created vendor object, as shown in the example below
* JSON
```json
{
"id": "61829cf9db1fb65b94f1acf8",
"businessName": "Better Delivery",
"email": "john.doe@example.com",
"createdAt": "2021-11-03T14:30:17.120Z",
"updatedAt": "2021-11-03T14:30:17.120Z",
"merchantId": "616d3e7faba71b9e13a2f7b7",
"acceptPayments": false,
"receivePayouts": false,
"onboardingLink": "https://sandbox-hosted.unipaas.com/vendors/6162aff7d7eb80d6982c18bf/I45f0ooz7CkuOsPJ7s4v"
}
```
## Create vendor and pre-populate onboarding fields
[Section titled “Create vendor and pre-populate onboarding fields”](#create-vendor-and-pre-populate-onboarding-fields)
Make a [`POST /vendors`](/reference/#tag/vendor/POST/vendors) request to create a new vendor, provide the information you have, and the rest will be collected later on in the onboarding process:
* cURL
```curl
curl --location --request POST 'https://sandbox.unipaas.com/platform/vendors' \
--header 'Accept: application/json' \
--header 'Content-Type: application/json' \
--header 'Authorization: Bearer ' \
--data-raw '{
"businessName": "Better Delivery",
"type": "company",
"firstName": "John",
"lastName": "Doe",
"email": "john.doe@example.com",
"country": "GB",
"url": "http://example.com",
"serviceDescription": "service description",
"birthDate": "1980-01-01",
"phone": "+447911123456",
"category": "CHILD_CARE_SERVICES",
"createOnboardingLink": true
}'
```
Onboarding type
The onboarding type defines if your vendor is an individual / sole trader (`individual`) or a registered company (`company`) or an association (`non-profit`) .
In the response, you’ll get the created vendor object.
* JSON
```json
{
"id": "61829cf9db1fb65b94f1acf8",
"businessName": "Better Delivery",
"email": "john.doe@example.com",
"createdAt": "2021-11-03T14:30:17.120Z",
"updatedAt": "2021-11-03T14:30:17.120Z",
"merchantId": "616d3e7faba71b9e13a2f7b7",
"acceptPayments": false,
"receivePayouts": false,
"onboardingLink": "https://sandbox-hosted.unipaas.com/vendors/6162aff7d7eb80d6982c18bf/I45f0ooz7CkuOsPJ7s4v"
}
```
Note that the create vendor response includes an onboarding link that you can send your vendor. This will allow your vendor to complete all remaining onboarding fields in a Unipaas hosted UI.
## Pre populated onboarding fields
[Section titled “Pre populated onboarding fields”](#pre-populated-onboarding-fields)
The following fields describe the onboarding data that can be, and should to be, pre filled upon vendor creation using a [POST /vendors/{vendorId}/onboarding](/reference/#tag/onboarding/POST/vendors/%7BvendorId%7D/onboarding) API call after a vendor has been created.\
Please mind that we strongly recommend you provide as much data as possible. It will save your vendor time and effort, and will increase conversion rates for the payment onboarding process.
Read Only fields
Some fields are ‘read only’: the vendor won’t be able to see/edit them.
## Onboarding fields
[Section titled “Onboarding fields”](#onboarding-fields)
| Field Name | Is Required | Type | Description | Read Only |
| ---------------------- | -------------------------------------- | ------------------------------ | --------------------------------------------------------------------------------------------------------------------------------------------------------------------------------------------- | --------- |
| `businessName` | Optional | String | Represents the name of the business (if applicable) for both individuals and companies.This field will also define how your business is identified in your customer’s credit card statements. | Yes |
| `firstName` | Required | String | For **Individual onboarding** this field represents the individual’s first name.For **Company onboarding** This field represents the company representative first name | No |
| `lastName` | Required | String | For **Individual onboarding** this field represents the individual’s last name.For **Company onboarding** This field represents the company representative last name | No |
| `birthDate` | Recommended | String | For **Individual onboarding** this field represents the individual’s date of birth.For **Company onboarding** This field represents the company representative date of birth | Yes |
| `phone` | Recommended | String | For **Individual onboarding** this field represents the individual’s phone numberFor **Company onboarding** This field represents the company representative phone number | Yes |
| `email` | Required | String | For **Individual onboarding** this field represents the individual’s email addressFor **Company onboarding** This field represents the company email address | Yes |
| `country` | Required | String ISO 3166-1 alpha-2 code | For **Individual onboarding** this field represents the individual’s countryFor **Company onboarding** This field represents the company corporate country | Yes |
| `type` | Recommended (for UI)Required (for API) | Enum | The three available types are: Company Individual Non-profit Each will present a different onboarding flow to your vendors | Yes |
| `subType` | Required (for type non-profit) | Enum | The three available types are: Associations Schools Charities | Yes |
| `url` | Recommended | String | **Individual onboarding** Profile URL (website, blog, social network profile)**Company onboarding** Official Website URL | No |
| `serviceDescription` | Recommended | String | **Individual onboarding** Description of the provided service | Yes |
| `category` | Recommended | Enum | **Individual and Company onboarding****MCC Enum**List of all [MCC codes](/docs/mcc-codes/) | Yes |
| `createOnboardingLink` | Recommended | boolean | **Individual and Company onboarding**True - you will receive an onboarding link in the API responseFalse - you will NOT receive an onboarding link in the API response | Yes |
Vendor invitation flows
In case your vendor creation flows include an invitation flow (e.g an vendor is being invited by an accountant) you should implement **[the referer flow](/docs/creating-vendors-by-referral/)** before moving forward to the next step.
Go Next[Launch Onboarding UI](/docs/onboarding-ui/)[Onboarding API](/docs/onboarding-api/)
# Creating vendors by referral
> In case your platform uses a referral flow to invite vendors to your payments product (for example: an accountant inviting their customers to accept...
In case your platform uses a referral flow to invite vendors to your payments product (for example: an accountant inviting their customers to accept payments via your platform), you should pass information about both the referrer and the referred parties to Unipaas upon creation.
## General referral flow
[Section titled “General referral flow”](#general-referral-flow)
The following describes a typical referral flow, with actions that must be taken on each step:
| User flow | Technical steps |
| ----------------------------------------------------------------------- | ---------------------------------------------------------------------------------------------------------------------------------------------------------------------------------------------------------------------------------------------------------------------------------------------------------------------------------------------------- |
| A **new** referrer invites a vendor to join your payments product | 1. Create a vendor for the referrer using a regular [`create vendor`](/reference/#tag/vendor/POST/vendors)’ API call.
2. Save the referrer’s `vendorid` for later
3. Create the vendor using a [`create vendor`](/reference/#tag/vendor/POST/vendors) API call, add the referrer’s `vendorid` to the `referrerVendorId` field. (see example below) |
| An **existing** referrer invites a vendor to join your payments product | 1) Create the vendor using a [`create vendor`](/reference/#tag/vendor/POST/vendors) API call, add the relevant referrer’s `vendorid` to the `referrerVendorId` field. (see example below) |
## Integration example
[Section titled “Integration example”](#integration-example)
The following example uses the [`create vendor`](/reference/#tag/vendor/POST/vendors) API call that is used to create all vendors in Unipaas.
**1. Creating a referrer**\
Creating a referrer (accountant) profile is exactly same as creating any other vendor:
* JSON
```json
{
"firstName": "John",
"lastName": "Doe",
"email": "john.doe@example.com",
"country": "GB",
"type": "individual"
}
```
The response will include the referrer’s `vendorid`, which will be used to link the vendors they invited:
* JSON
```json
{
"id": "63ea04cf6d3161e1ba997d52", // Used to connect to invited vendors
"name": "John Doe",
"email": "john.doe@example.com",
"createdAt": "2029-02-13T09:37:19.286Z",
"updatedAt": "2029-02-13T09:37:19.286Z",
"merchantId": "62c3ee08f396b3c46e240044"
}
```
**2. Linking an invited vendor to their referrer**
When creating a vendor that was referred by a referrer, use the `referrerVendorId` field to link the vendor with their referrer.
* JSON
```json
{
"businessName": "New Vendor",
"firstName": "John",
"lastName": "Doe2",
"email": "john.doe@example.com",
"country": "GB",
"phone": "+447911123456",
"birthDate": "1980-01-01",
"serviceDescription": "Fast delivery",
"url": "https://google.com",
"category": "FOOD_DELIVERY",
"type": "individual",
"referrerVendorId":"63ea04cf6d3161e1ba997d52", // Referrer's vendor id
"createOnboardingLink": true
}
```
# Balance Component
> Overview
## What is the Balance component?
[Section titled “What is the Balance component?”](#what-is-the-balance-component)
**Overview**
The Balance component offers users a clear and simple overview of their payment information within your platform. It is best placed in a prominent location such as the dashboard, where customers can get an overview into their payment-related status and adjust their payout settings.\
The Balance component serves as a summary of the user’s payment activity and offers a link to a more detailed view - [Pay Portal Component](/docs/pay-portal-component/).
**Why you should implement this component**
1. The Balance component provides a considerable value to your customers with minimal implementation effort, as it gives them a comprehensive view of their financial status on your platform.
2. Implementing the Balance component also saves your team a lot of integration effort, making it a valuable addition.


## What does the Balance component include?
[Section titled “What does the Balance component include?”](#what-does-the-balance-component-include)
**Balance**
The Balance shows your customer what funds they have in their account, as well as the status of these funds (payable/pending).
**Onboarding status**
This section shows your users what their onboarding status is. When relevant, it can redirect to the onboarding flow in order to complete it and add required documents, if these are necessary.
**Payout**
The Payout section shows your customer when their next payout is scheduled, as well as lets them configure payout scheduling.
## Component zero state
[Section titled “Component zero state”](#component-zero-state)
For platform users who have yet to sign up to your payments solution, the Balance component will show in a “zero state” view. This view’s goal is to emphasize your payment solution’s value and showcase its core features to potential users.
The “zero state” includes a prominent CTA and messages, incentivising your users to sign up to your payments solution. Additionally, it allows users learn more about it.
**Triggering the “zero state” view**\
The “zero state” will automatically trigger once an [access token](/docs/unipaas-components/#generate-the-unipaas-components-access-token-from-your-backend) is created without a vendor ID, meaning the user is not registered with Unipaas.
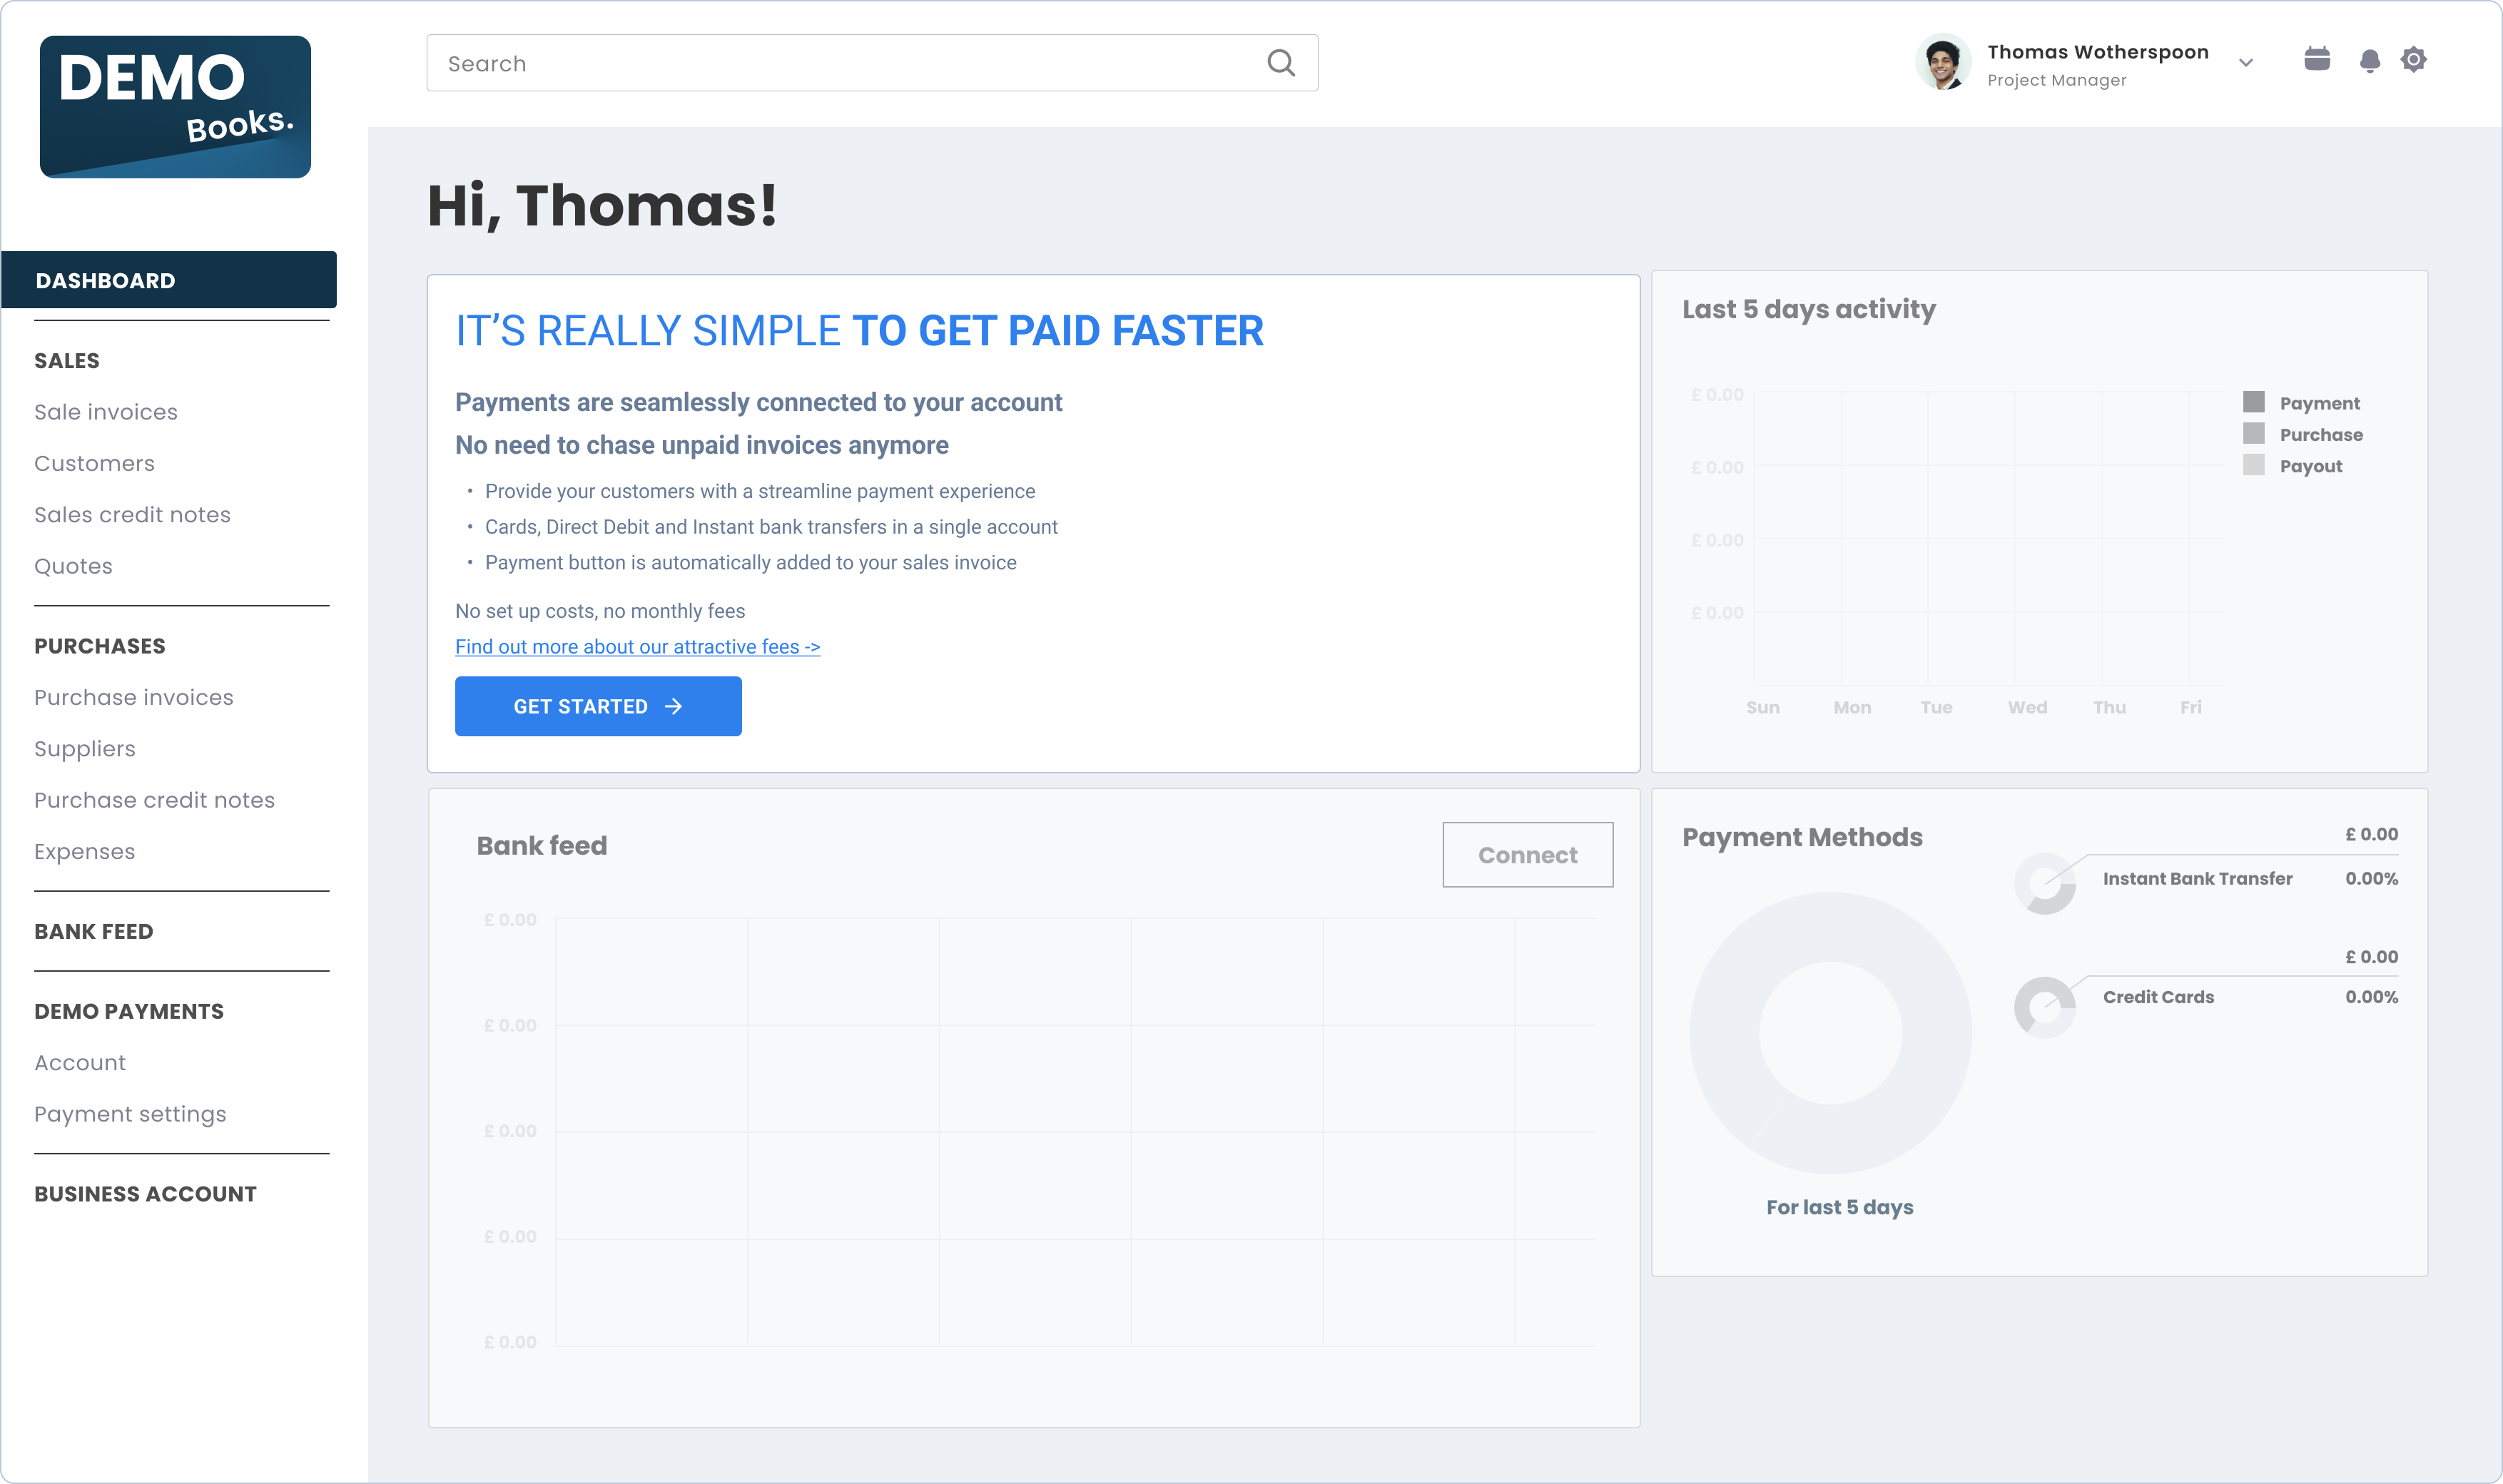
## Where should I implement this component in my product?
[Section titled “Where should I implement this component in my product?”](#where-should-i-implement-this-component-in-my-product)
The Balance component should be implemented as part of your platform’s dashboard/overview (if one exists). This is normally the high-level page where the user sees a preview of their status within your platform, and through which they can decide to dive into further details.
## Before you begin implementation
[Section titled “Before you begin implementation”](#before-you-begin-implementation)
1. If you have not set up Unipaas Components, please go to [the Unipaas Components page](/docs/unipaas-components/) before moving forward.
2. Required scopes for the access token:
* `ewallet_read`
* `payout_write`
3. Allocate the following minimal space for this component:
* Width - 490 pixels (minimum).
* Height - 420 pixels (minimum).
## How to implement this component?
[Section titled “How to implement this component?”](#how-to-implement-this-component)
To use the Balance component, you will need to create an empty DOM node (also known as a container) in your page and give it a unique ID. This will be the place where the Balance component will be mounted. Make sure to assign a unique ID to the container so that it can be easily identified and accessed.
* HTML
```html
```
To use the Balance component, you will need to create an instance of it and mount it to the container DOM node in your page. This should be done after the previous div has finished loading. To create an instance of the Balance and mount it to the container DOM node, you can use the following code:
* HTML
```html
```
The Balance component will dynamically render itself into the empty DOM element that you have provided. As the customer goes through the onboarding process, the Balance will retrieve the necessary data and update the relevant child components accordingly.
**Balance component events**:\
The Balance component should interact with events that are on the platform side. In order to make the Balance fully functional, please implement the following component events.
* `startOnboarding` - mandatory
* `completeOnboarding` - mandatory
* `sessionExpired` - optional
* `generalError` - optional
Use the following Javascript example snippet to listen and take appropriate action upon these events:
* JavaScript
```javascript
components.on("startOnboarding", (e) => {
console.log("startOnboarding event", e.detail);
});
```
[See the full list of events, which cover all Unipaas embedded components](/docs/unipaas-components/#unipaas-components-dom-events)
Go Next[Unipaas Components](/docs/unipaas-components/)
# Direct Debit
> This page is designed to provide a high-level understanding of what Direct Debit is and what it looks like when implemented with Unipaas. To go directly to...
# General
[Section titled “General”](#general)
This page is designed to provide a high-level understanding of what Direct Debit is and what it looks like when implemented with Unipaas. To go directly to implementation options, click [here](/docs/direct-debit/#implementation-options).
# What is Direct Debit?
[Section titled “What is Direct Debit?”](#what-is-direct-debit)
Direct Debit is a widely-used payment method in the UK that allows authorized vendors to collect funds directly from their customers’ bank accounts. It is commonly used for recurring payments such as bills, subscriptions, memberships, and more. However, it can also be used for one-off or ongoing ad hoc payments.
# Benefits of implementing Direct Debit
[Section titled “Benefits of implementing Direct Debit”](#benefits-of-implementing-direct-debit)
By incorporating Unipaas Direct Debit offering into your platform, you can unlock new opportunities with your vendors who may currently rely on third-party solutions for Direct Debit payments. Enabling Direct Debit within your payment solution brings significant benefits for both your platform and your users.
## Benefits for your platform:
[Section titled “Benefits for your platform:”](#benefits-for-your-platform)
* **New revenue stream**: Access transactions previously unavailable to your payment solution, with higher profit margins compared to other payment methods.
* **Minimal integration effort**: Implementing Direct Debit is straightforward and requires minimal development effort.
* **Enhanced payment experience**: Provide your users with a comprehensive payment experience within your platform, fostering loyalty and retention.
## Benefits for your vendors:
[Section titled “Benefits for your vendors:”](#benefits-for-your-vendors)
* **One-stop shop**: Enable your vendors to use Direct Debit within your platform without additional sign-ups or logins to third-party services.
* **Streamlined payments**: Automate payment collections, eliminating manual processes and reducing the risk of missed due dates.
* **Competitive transaction fees**: Offer your vendors highly competitive transaction fees for Direct Debit payments.
# How does Unipaas Direct Debit work?
[Section titled “How does Unipaas Direct Debit work?”](#how-does-unipaas-direct-debit-work)
* **Onboarding completion**: Direct Debit is only available to vendors who have completed their onboarding process. Until then, vendors can see the Direct Debit option but cannot utilize it. Once onboarding is complete, Direct Debit becomes accessible.
* **Requesting Direct Debit mandates**: Vendors must request Direct Debit mandates from their customers. This triggers an email containing instructions for the customer to provide the mandate.
* **Mandate flow**: Customers are directed to a mandate flow where they provide the required details and submit them for approval.
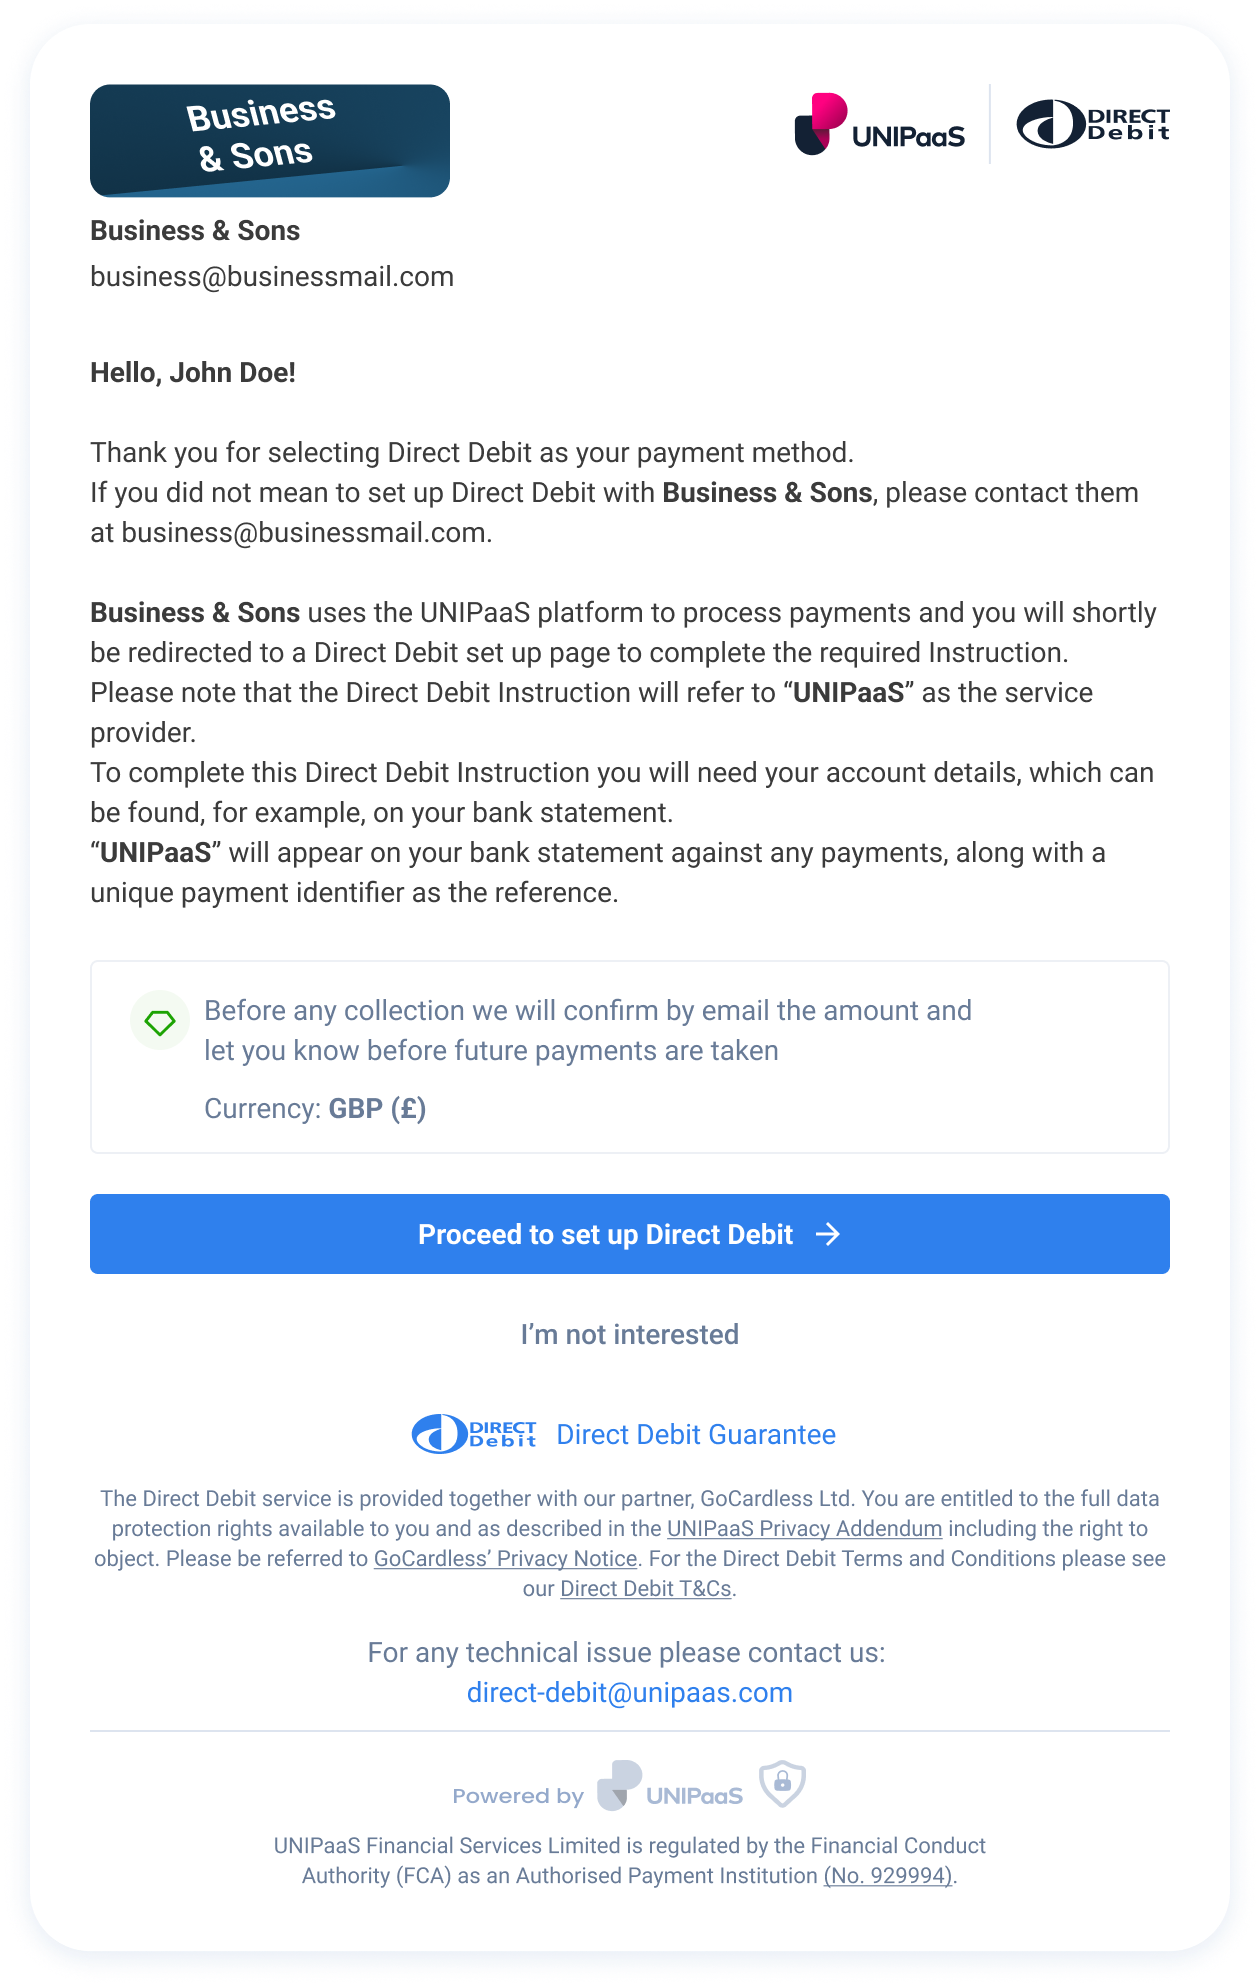
* **Collecting payments**: Once the mandate is set up, vendors can start collecting payments via Direct Debit.
Important
A payment can be made either by Direct Debit OR by other payment methods. While it is possible to switch between these options, simultaneous use is not possible.
* **Monitoring Direct Debit mandates**: Vendors can monitor and manage their Direct Debit mandates through the Pay Portal UI Web-Embed, specifically under the Direct Debit tab.
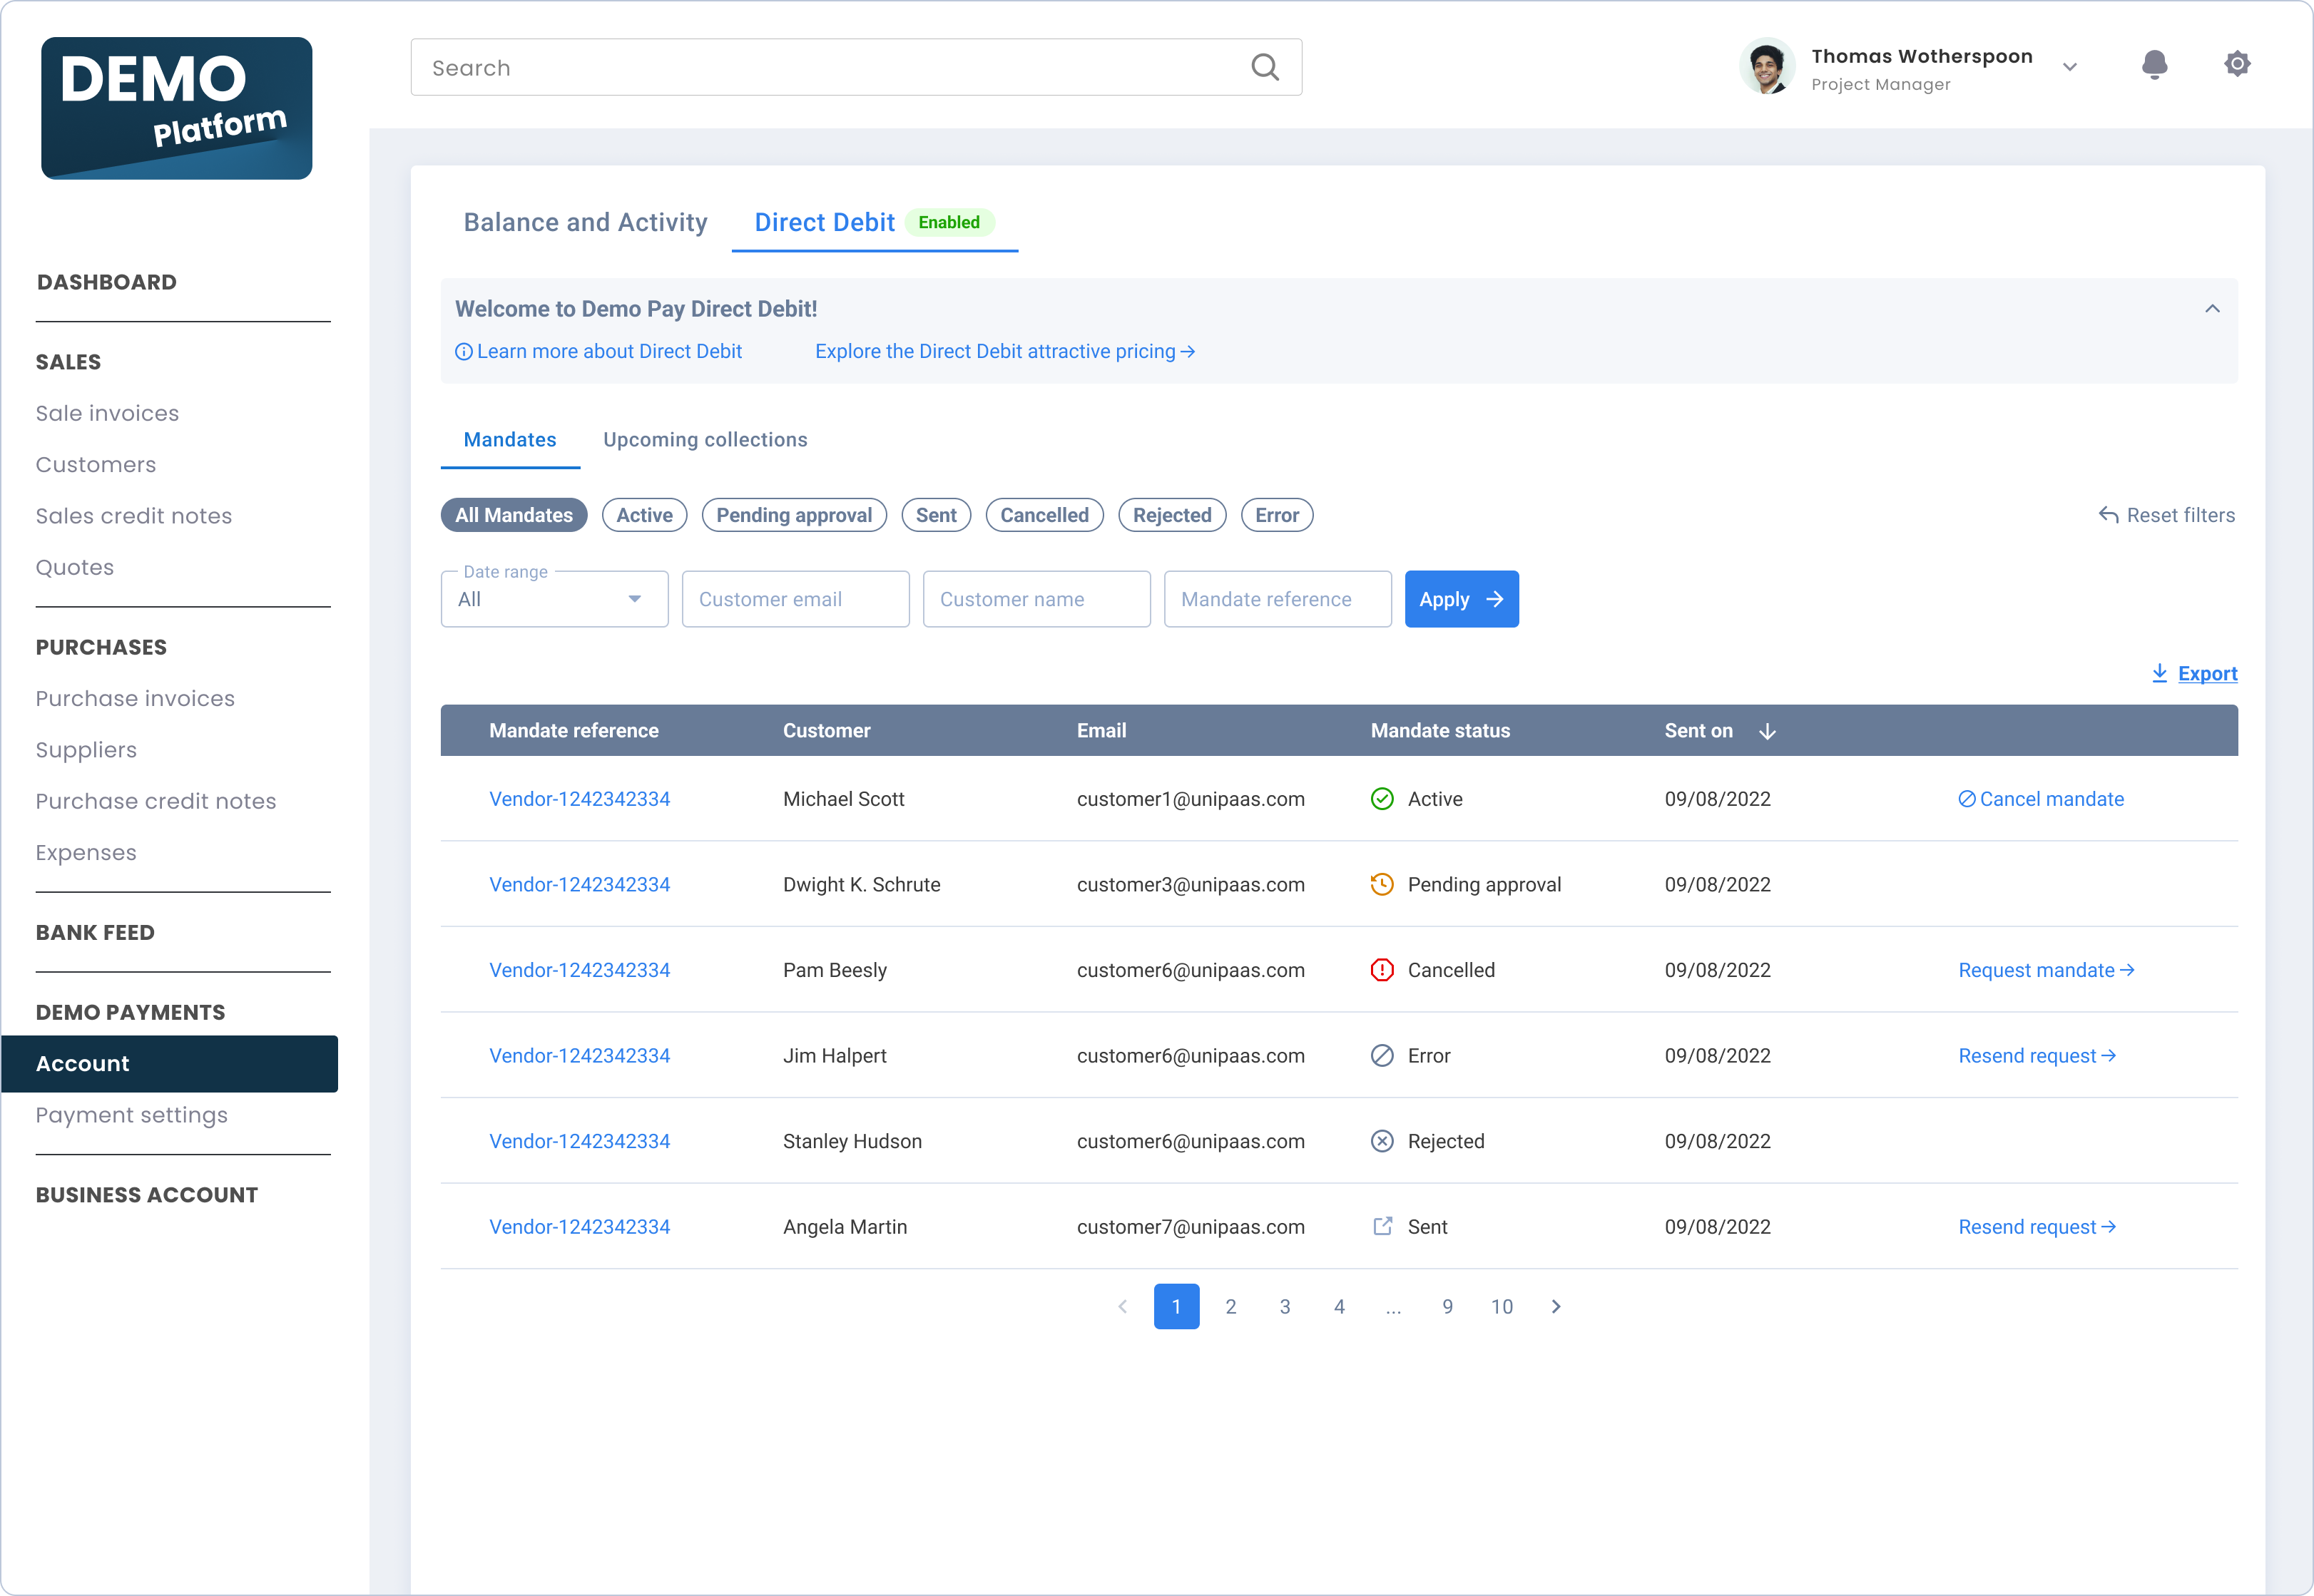
* **Monitoring Direct Debit collections**: Vendors can monitor and manage their Direct Debit collections through the Pay Portal UI Web-Embed, accessible under the Direct Debit tab.
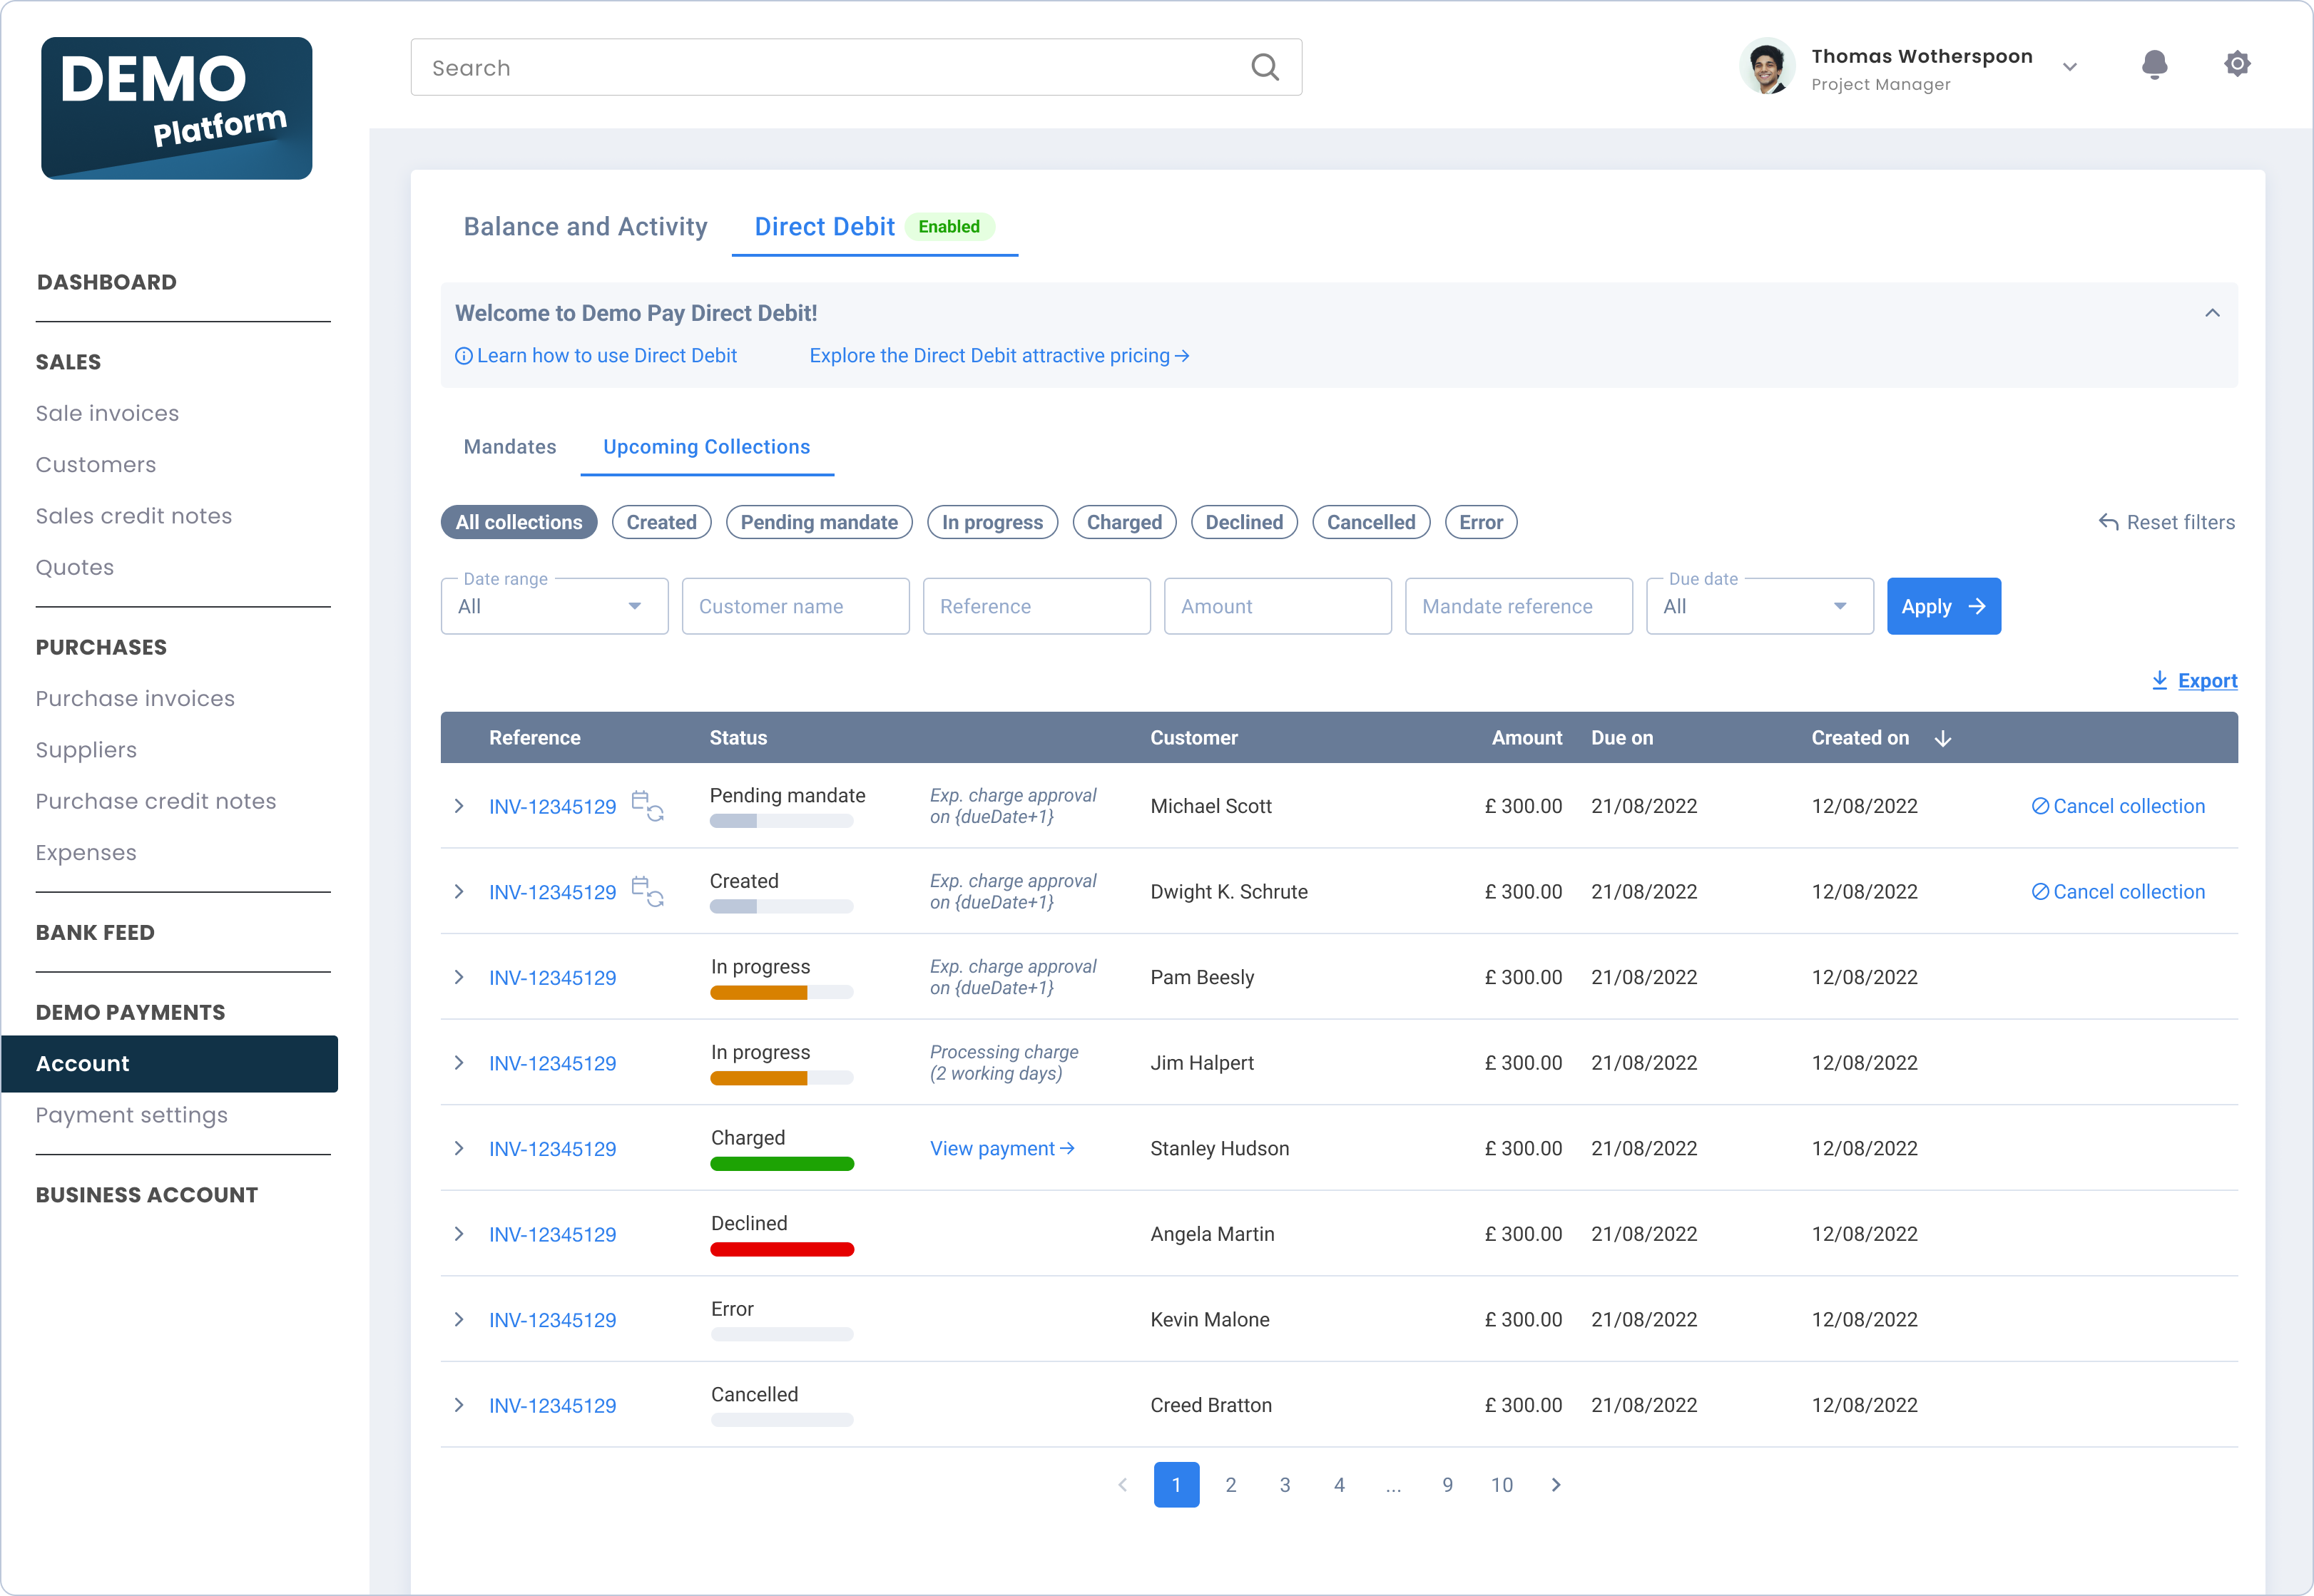
# Implementation options
[Section titled “Implementation options”](#implementation-options)
There are two primary methods to implement Direct Debit within your embedded payment solution:
* [Use the Unipaas UI Web-Embeds](/docs/implement-direct-debit-with-ui-web-embeds/): This method is **recommended** and provides an easy and seamless integration experience.
* [Create your own Direct Debit flows with our API](/docs/implement-direct-debit-via-api/): For more advanced use cases or custom requirements, you can build your own Direct Debit flows using our API.
# Testing your Direct Debit implementation
[Section titled “Testing your Direct Debit implementation”](#testing-your-direct-debit-implementation)
See [Direct Debit Test Scenarios](/docs/direct-debit-test-scenarios/)
# Direct Debit Status
> Mandate Status
**Mandate Status**
| Platform Portal | Vendor Pay Portal | Webhook/API | Description |
| :--------------- | :---------------- | :---------------- | :-------------------------------------------------------------------------------------------------------------------------------------------------------------------------------------------------------------------------------------------- |
| Sent | Sent | sent | A vendor has sent a mandate request to their customer |
| Declined | Error | | An unexpected error has occurred. In this case it is recommended to resend a mandate |
| Pending Approval | Pending approval | pending\_approval | The mandate has been submitted to the customer’s bank (via BACS) |
| Active | Active | active | The mandate has been successfully set up by the customer’s bank |
| Cancelled | Cancelled | cancelled | The mandate has been cancelled by either the customer or the vendor. In this case mandate request can be resent and mandate will be set up again |
| Rejected | Rejected | rejected | The mandate could not be created (BACS response). The most common case to get this status - is due to typo or incorrect details submitted. It is recommended to communicate this to a payer, resend a mandate request and try to set up again |
**Authorization (Collection) Status**
| Platform Portal | Vendor Pay Portal | Webhook/API | Description |
| :-------------- | :---------------- | :---------- | :------------------------------------------------------------------------------------------------------------------------------------- |
| Pending | Pending Mandate | | Pending customer’s mandate being submitted and activated |
| Scheduled | Created | Scheduled | The payment has been created, but not yet submitted to the banks |
| Submitted | In progress | Submitted | The payment has been submitted to the banks |
| Confirmed | In progress | | The payment has been confirmed as collected |
| Charged | Charged | Captured | The payment has been included in a payout |
| Declined | Declined | Declined | The payment failed to be processed. Note that payments can fail after being confirmed if the failure message is sent late by the banks |
| Cancelled | Cancelled | Voided | The payment has been cancelled |
# Direct Debit Test Scenarios
> To test your Direct Debit (DD) payment method within your embedded payments solution, you may use the following scenarios. Note that you must make sure that...
To test your Direct Debit (DD) payment method within your embedded payments solution, you may use the following scenarios. Note that you must make sure that the customer’s (payer) first name is as mentioned in the left column.
| Customer First Name | Description | What happens on mandate creation | What happens on Direct Debit collection creation |
| :------------------ | :----------------------------------------------------------------------------------------------------------------------- | :------------------------------- | :----------------------------------------------------------------------------- |
| Successful | The customer’s payment is collected successfully and paid out to you. | The mandate is **active**. | The payment will be **paid out**. |
| Penniless | The customer’s payment can’t be collected, for example, because they don’t have enough money in their account. | The mandate is **active**. | The payment will **fail**. |
| Fickle | The customer’s payment is collected successfully, but is then charged back by the customer disputing it with their bank. | The mandate is **active**. | The payment will be **paid out**, and will then be marked as **charged back**. |
| Invalid | The customer’s mandate can’t be set up because their bank details are rejected by the banks as invalid. | The mandate is **rejected**. | N/A |
To test your Mandate set up flow via UI, you can use the following details:
| Fields | Values | Result |
| ---------------- | ------------------------------------------ | ------------------------ |
| **Bank details** | Account number: 55779911 Sort code: 200000 | Will **pass** validation |
| | Account number: 12000000 Sort code: 000001 | Will **fail** |
| **Address** | 15 George Eliot, London WC2N 5DU, UK | Will **pass** validation |
| | Any address combination + NG11 6J90 | Will **fail** |
# Payout Options
> A payout option is a method of receiving funds from a vendor's account. We offer three options to receive funds: Card, Alternative, and Bank Account.
A payout option is a method of receiving funds from a vendor’s account. We offer three options to receive funds: Card, Alternative, and Bank Account.
Unipaas allows you to have more than one payout option in a single account. You can also have more than one bank account to receive funds, and open a bank account for each currency in which you plan to receive payments.
The bank account details you entered during the onboarding process is your default bank account.
## Get Platform Payout Options
[Section titled “Get Platform Payout Options”](#get-platform-payout-options)
Make a [`GET /payout-options`](/reference/#tag/payout-option/GET/payout-options) request:
* cURL
```curl
curl --request GET \
--url 'https://sandbox.unipaas.com/platform/payout-options' \
--header 'Accept: application/json' \
--header 'Content-Type: application/json' \
--header 'Authorization: Bearer ' \
```
In the response, you’ll get requested array of [`Payout option object`](/docs/pay-out-funds-overview/#the-payout-object).
## Get Vendor Payout Options
[Section titled “Get Vendor Payout Options”](#get-vendor-payout-options)
Make a [`GET vendors/{vendorId}/payout-options`](/reference/#tag/vendor/GET/vendors/%7BvendorId%7D/payout-options) request:
* cURL
```curl
curl --request GET \
--url 'https://sandbox.unipaas.com/platform/vendors/{vendorId}/payout-options' \
--header 'Accept: application/json' \
--header 'Content-Type: application/json' \
--header 'Authorization: Bearer '
```
In the response, you’ll get the requested array of [`Payout option object`](/docs/pay-out-funds-overview/#the-payout-object).
Go Next[Webhook Notifications](/docs/webhook-notifications-1/)
# Embedded Acquisition
> In-app acquisition stands as an effective approach for acquiring users within your primary platform and seamlessly converting them into active vendors...
In-app acquisition stands as an effective approach for acquiring users within your primary platform and seamlessly converting them into active vendors within your embedded payments ecosystem, thereby significantly boosting the adoption of your white-label payment solution.
At Unipaas, we recognize the transformative power of this strategy and have developed a sophisticated smart infrastructure - Embedded Acquisition - to facilitate this process. Our aim is to empower businesses to easily acquire users and employ innovative marketing strategies to ensure user adoption, enhance the value proposition of the platform, cultivate user loyalty and stickiness, and unlock the revenue potential inherent in users’ transactional activities.
# Benefits
[Section titled “Benefits”](#benefits)
Unipaas Embedded Acquisition provides a range of benefits for platforms looking to employ the innovative marketing strategies, based on ML, segmentation and personalization. These benefits include:
**Enhanced user acquisition:** Streamlined processes and targeted strategies result in more efficient acquisition of users, expanding the payment solution’s user base.
Leveraging personalized experiences, tailored marketing messages, and strategic segmentation enables platforms to unlock new revenue streams, maximize the value of each user, foster deeper connections with the platform, and drive business growth through higher conversion rates.
**Data-driven Insights:** Advanced analytics provide valuable insights into user behavior and preferences, enabling data-driven decision-making and continuous optimization of marketing strategies.
**Competitive advantage:** By implementing cutting-edge marketing technologies and strategies, platforms gain a competitive edge in the market, positioning themselves as leaders in user acquisition and engagement for embedded payment solution.
These benefits collectively contribute to the overall success and growth of platforms leveraging Unipaas Embedded Acquisition.
# Implementation
[Section titled “Implementation”](#implementation)
The primary interface for user engagement and marketing is Unipaas UI Web-Embeds. Prior to a vendor registering with your platform’s payment solution, they encounter the “Zero state” of the UI Web-Embeds, presenting personalized messages and highlighting the specific benefits for their business, tailored to their industry, payment history, monthly turnover, and other pertinent parameters.
Unipaas collaborates closely with your team, aligning UI design, language style, and marketing strategies with your platform’s vision and preferences. What distinguishes the Embedded Acquisition tool is its infrastructure, which gathers and analyzes user data, establishes segmentation and personalization, and facilitates simple integration with your platform, exponentially boosting adoption rates for payment products.
To implement the Embedded Acquisition tool, three main steps are involved:
**UI Web-Embeds implementation:**This step entails integrating Unipaas UI web embeds into your platform. These embeds serve as the primary interface for user engagement and marketing. To create a personalized experience for non-registered users who don’t have a vendor ID yet, Unipaas requires a user (vendor) reference on your platform to be passed, along with basic user data, each time embeds are loaded.
**Invoice data sharing and updating for non-registered users:**\
Dedicated endpoints are established to facilitate the sharing of invoice data with non-registered users who have not yet been assigned a vendor ID. The shared data serves as the foundation for crafting personalized messages tailored to each user’s preferences and potential benefits with your payment solution.
**New registered vendor creation with vendor reference:**\
Upon completion of the registration process, new vendors are created within the platform’s ecosystem. It is crucial to include a vendor reference during this step to establish a direct connection between pre-registration data sharing and post-registration integration. This ensures seamless continuity and enables businesses to leverage insights gathered during the pre-registration phase to enhance the vendor’s experience and drive adoption of the payment solution.
# UI Web-Embeds
[Section titled “UI Web-Embeds”](#ui-web-embeds)
## Authorization
[Section titled “Authorization”](#authorization)
To implement UI Web-Embeds, including Embedded Acquisition, into your platform, an authorized API call is required in your backend. This call should include a non registered vendor object, with a reference and user data, instead of vendor ID, to generate the Unipaas access token.
### Generate UI components access token
[Section titled “Generate UI components access token”](#generate-ui-components-access-token)
* cURL
```curl
curl -X POST "https://sandbox.unipaas.com/platform/authorize" \
-H "accept: application/json" \
-H "Authorization: Bearer " \
-H "Content-Type: application/json" \
--data-raw '{
"scopes": ["portal_read","portal_write","onboarding_write","invoice_read","invoice_write"],
"vendor": {
"reference": "uniq-id-1",
"email": "john.doe@example.com",
"name": "John Doe",
"type": "individual",
"category": "MISC_AND_RETAIL_STORES",
"categoryDescription": "Miscellaneous and Specialty Retail Stores"
}
}'
```
**Vendor’s object for non-registered users**
| Name | Type | Required | Description |
| --------------------- | ------ | -------- | --------------------------------------------------------------------------------------- |
| `reference` | String | YES | A unique user reference on your platform |
| `email` | String | NO | User’s email |
| `name` | String | YES | User’s contact name |
| `type` | Enum | YES | User’s business type: `company` `individual` |
| `category` | Enum | YES | User business’ industry (Please use this mapping: [/docs/mcc-codes/](/docs/mcc-codes/)) |
| `categoryDescription` | String | NO | Detailed user business’ industry description |
[Learn more about UI Web-Embeds implementation](/docs/ui-web-embeds-integration-guide/)
# Invoice data
[Section titled “Invoice data”](#invoice-data)
Dedicated endpoints have been specifically designed to facilitate the sharing of invoice data for non-registered users who have not yet been assigned a vendor ID.
## Post invoice
[Section titled “Post invoice”](#post-invoice)
POST/platform/vendors/reference/{vendorReference}/invoices
**The invoice object example**
* JSON
```json
{
"reference": "INV-1234",
"currency": "GBP",
"totalAmount": 81,
"vatAmount": 9.9,
"dueDate": "2022-12-12T08:42:52.933Z",
"paymentStatus": "unpaid",
"totalPaid": 0,
"vendor": {
"reference": "uniq-id-1",
"email": "john.doe@example.com",
"name": "John Doe",
"type": "individual",
"category": "MISC_AND_RETAIL_STORES",
"categoryDescription": "Miscellaneous and Specialty Retail Stores"
},
"customer": {
"reference": "customer-uniq-id-1"
},
"lineItems": [
{
"description": "line 1",
"unitPrice": 10.6,
"quantity": 4
},
{
"description": "line 2",
"unitPrice": 19.3,
"quantity": 2
}
],
"isRecurring": true,
"external":true,
"publicUrl": "http://yourcompany.com/invoice.pdf",
"invoiceObject": {}
}
```
[Learn more about invoice creation](/docs/invoices/#post-invoice)
## Update invoice
[Section titled “Update invoice”](#update-invoice)
PATCH/vendors/reference/{vendorReference}/invoices/{invoicesId}
**The invoice object example**
You may only update the values that have been changed.
In this example, the invoice was subject to a partial payment of 60 GBP, leading to a change in the payment status.
* JSON
```json
{
"id": "6391fd42a38e34b15b118d9b",
"totalPaid": 60.0,
"paymentStatus": "partially_paid"
}
```
[Learn more about invoice updates](/docs/invoices/#update-invoice)
# Newly registered vendors
[Section titled “Newly registered vendors”](#newly-registered-vendors)
To ensure seamless integration and continuity of data shared before and after a vendor’s registration with your payment solution, it is imperative to include a vendor reference in the initial POST/vendors call.
This step serves to close the loop and establish a direct connection between the pre-registration data sharing process and the subsequent registration and integration phases.
**Including vendor reference**
POST/vendors
* cURL
```curl
curl --location --request POST 'https://sandbox.unipaas.com/platform/vendors' \
--header 'accept: application/json' \
--header 'Authorization: Bearer ' \
--header 'Content-Type: application/json' \
--data-raw '{
"businessName": "Better Delivery",
"type": "company",
"firstName": "John",
"lastName": "Doe",
"email": "john.doe@example.com",
"country": "GB",
"reference" : "uniq-id-1",
"createOnboardingLink": true
}'
```
[Learn more about vendor creation](/docs/create-vendor/)
# Embedded Account UI
> Embedded account component is the fastest and easiest way to show vendor's account in a UI.
Embedded account component is the fastest and easiest way to show vendor’s account in a UI.
Using a single script, you can show the vendor’s account embedded within your platform, while Unipaas handle all of the account’s financial states with respect to the vendor’s balance and onboarding status.
The embedded account component will:
* Show the vendor’s balances
* Ask for verification documents and information when needed
* Communicate with the [onboarding UI component](/docs/onboarding-ui/)
* Handle payouts to the vendor’s bank account.
Embedding this component will save you the work of integrating both account and payout APIs! while giving you the flexibility to customize the design to fit your platform’s look & feel.
.svg")
## Generate Vendor Access Token
[Section titled “Generate Vendor Access Token”](#generate-vendor-access-token)
Make a [`POST /platform/authorize`](/reference/#tag/authentication/POST/authorize) request using `vendorId`. Get a temporary vendor access token, allowing the account UI to communicate with our servers in the context of that specific vendor:
* cURL
```curl
curl --location --request POST 'https://sandbox.unipaas.com/platform/authorize' \
--header 'Accept: application/json' \
--header 'Content-Type: application/json' \
--header 'Authorization: Bearer ' \
--data-raw '{
"scopes": ["ewallet_read", "payout_write"],
"vendorId": "{vendorId}"
}'
```
You should receive a response containing the access token, similar to the following:
* JSON
```json
{
"accessToken": "{{VENDOR_ACCESS_TOKEN}}",
"expiresIn": "3600",
"scopes": [
"ewallet_read"
],
"vendorId": "60c9a73bf51a8b4bd2034c13",
"merchantId": "60c9a73bce55c1202708e4cc"
}
```
## Embedding the account UI
[Section titled “Embedding the account UI”](#embedding-the-account-ui)
**Embed the Script & launch the account UI**\
To embed the drop-in UI, insert a script before `` as shown in the example below:
* HTML
```html
```
Add the following HTML element to your page. The UI will be injected into this element:
* HTML
```html
```
## Parameters object
[Section titled “Parameters object”](#parameters-object)
This script will load our account SDK and launch the account UI with the following parameters:
| Settings | Is Required | Type | Description |
| ------------- | ----------- | ---------------------------------------- | ---------------------------------------------------------------------------------------------------------------------------------------------------------------------------------------------------------------------------------------------- |
| `accessToken` | Yes | String | Temporary user access token allowing the interaction between the Onboarding UI and the Onboarding API in the context of a specific vendor. |
| `selector` | Yes | String | CSS selector where the Onboarding UI will be located. It’s recommended to use main application div. |
| `theme` | No | [Learn more](/docs/embedded-ewallet-ui/) | Use specific CSS style or override with your own, existing style. |
| callback | Yes | JS function | The callback function will run each time the component holds a request for the user to be routed to another page in the web app. The component will send a callback with the matching action payload. [Learn more](/docs/embedded-ewallet-ui/) |
## Changing account component style
[Section titled “Changing account component style”](#changing-account-component-style)
You can change the following css styles within the component script:
* JSON
```json
{
"theme":{
"fontFamily":"roboto",
"colors":{
"primary":"#888E99",
"secondary":"#F5F7FA",
"subHeader":"#687B97",
"disabled":"#AAB3C1",
"primaryTextColor":"#3B3B3B",
"secondaryTextColor":"#687B97",
"buttonColor":"#2F80ED",
"borderColor":"#BDC8DA",
"errorColor":"#E50000",
"success":"#F4FAF2",
"successTextColor":"#687B97",
"alert":"#FFFBED",
"alertTextColor":"#D88100"
},
"header":{
"fontSize":"14px"
},
"fontFamily":"inherit",
"boxShadow":"none"
}
}
```
- You can use your own css stylesheet to override the default style settings.
## Connecting account component with onboarding component
[Section titled “Connecting account component with onboarding component”](#connecting-account-component-with-onboarding-component)
When needed, the component will request to redirect vendors to another page in your web app,\
that holds the embedded onboarding UI, to complete verification process for the vendor. The image below presents this state, clicking on the “Complete Details” button should move the vendor to the embedded onboarding UI.\
The account component will send a callback with the matching action payload: { “action” : “onboarding” } so you know where to redirect the vendor.
.svg")
## Extra account component configurations
[Section titled “Extra account component configurations”](#extra-account-component-configurations)
**Handling vendor’s payout from account component**\
Showing the payout CTA’s is the default option for the component.\
You should use this option if you want your vendor to be able to:
* Configure their own payouts schedule - daily, weekly or monthly. Available funds will be moved to the vendor’s bank account.
* Withdraw all available funds on demand. This action will be enabled only if the account has available funds to withdraw.
If you wish to remove this line - send the [initial authorization scope](/docs/embedded-ewallet-ui/#generate-vendor-access-token) without “payout\_write”.\
You should set this option if you wish to control your vendor’s payouts for them.\
In this case, you will need to configure the payout scheduling for all vendors or for a single vendor. This option is available for you to configure inside the Unipaas portal.
.svg")
**Show pending and reserved balances**\
The account component will automatically show the reserved and pending balances, in the case reserved amount apply for your vendors.\
Note - reserved amount are configured based on the platform’s risk profile and platform business model type.
.svg")
# Embedded UI Server to Server Authentication
> Embedded UI components are the fastest and easiest way to integrate to Unipaas.
Embedded UI components are the fastest and easiest way to integrate to Unipaas.
Using a single script, you can show the vendor’s account / Onboarding flows and Payment actions embedded within your platform, while Unipaas handle all of the account’s financial states with respect to the vendor’s balance and onboarding status.
For a client application to communicate with Unipaas without compromising your private\_key, an OAuth 2.0 mechanism is used. This means before any API request from a client application; a temporary accessToken must be granted using the authorization API endpoint:
To summarize the Authentication is done with 2 steps :\
Step 1 : Server to Server ( Using your private key) - You will receive an Access token in the response\
Step 2 : Client Side - use the Access token to run the JavaScript code.
Example:**Vendor’s account component**\
Embedding this component will save you the work of integrating both account and payout APIs! while giving you the flexibility to customize the design to fit your platform’s look & feel.
.svg")
## Generate Vendor Access Token
[Section titled “Generate Vendor Access Token”](#generate-vendor-access-token)
Make a [`POST /platform/authorize`](/reference/#tag/authentication/POST/authorize) request using `vendorId`. Get a temporary vendor access token, allowing the account UI to communicate with our servers in the context of that specific vendor:
* cURL
```curl
curl --location --request POST 'https://sandbox.unipaas.com/platform/authorize' \
--header 'Accept: application/json' \
--header 'Content-Type: application/json' \
--header 'Authorization: Bearer ' \
--data-raw '{
"scopes": ["ewallet_read", "payout_write"],
"vendorId": "{vendorId}"
}'
```
You should receive a response containing the access token, similar to the following:
* JSON
```json
{
"accessToken": "{{VENDOR_ACCESS_TOKEN}}",
"expiresIn": "3600",
"scopes": [
"ewallet_read"
],
"vendorId": "60c9a73bf51a8b4bd2034c13",
"merchantId": "60c9a73bce55c1202708e4cc"
}
```
# Accounts in Unipaas Portal
> An account will be automatically created for each vendor, in each currency the vendor accepts payment in.\ An account is automatically created once a...
## Unipaas will manage accounts for you and your vendors
[Section titled “Unipaas will manage accounts for you and your vendors”](#unipaas-will-manage-accounts-for-you-and-your-vendors)
An account will be automatically created for each vendor, in each currency the vendor accepts payment in.\
An account is automatically created once a transaction is made.
You can view your own account and your vendors’ accounts on the Unipaas portal.\
As a platform, you can monitor the account activity (view your vendors’ transactions and troubleshoot issues) and completely control the money flows.
Later on, when you choose to, you can payout (or schedule payouts) to the vendor accounts.
# Overview
> An account is a virtual location where funds are collected and stored.
Accepted payments go into an account. You can withdraw or transfer funds from one account balance to another.
## What you can do with an account
[Section titled “What you can do with an account”](#what-you-can-do-with-an-account)
* **Split payment** - Divide and send funds from your account to your vendors’ accounts.
* **Real-time Balance** - See in real-time the amount of funds you and your vendors have.
* **Bank transfers** - Send money to bank accounts (Using [Payout](/docs/pay-out-funds-overview/) Object).

## Before You Begin
[Section titled “Before You Begin”](#before-you-begin)
* The account Object collects and stores money from shoppers’ PayIn. Please make sure that you have already completed the [Payin](http://google.com) integration.
* Please make sure you have the identity of the entity you want to attach to the account.
* Make sure to implement account webhooks so you will get notified about your vendors activity
Note
Account balances (both platform’s and platform vendors) are unique per vendor, per currency.\
For example: Only one USD account balance can be created for a platform. Multiple USD account balances can be created for platform’s vendors. As a platform, you can create a USD account balance for each vendor (but you can’t created 2 USD account balances for a specific vendor).
## The Account Object
[Section titled “The Account Object”](#the-account-object)
### Account Owner
[Section titled “Account Owner”](#account-owner)
An account is always linked to an account owner: a platform or a platform’s vendor.\
In the account object, vendorId will be defined when you’re dealing with your vendor’s accounts. Otherwise (when vendorId doesn’t exist), it’s your (platform) account.
### Account Currency
[Section titled “Account Currency”](#account-currency)
Account currency is one of the following: GBP, USD, EUR.
### Account Balances
[Section titled “Account Balances”](#account-balances)
In order to provide visibility into all of your (and your vendors) funds in real time, the account contains multiple balance types: pending, payable, and reserve.
### Account properties
[Section titled “Account properties”](#account-properties)
| Parameter | Type | Description |
| ----------------- | ------ | -------------------------------------------------------------- |
| `vendor_id` | String | Defined only for vendor’s accounts |
| `ewallet_id` | String | Unique id of an account |
| `currency` | Enum | Account currency: USD, EUR, GBP |
| `pending_balance` | Number | Funds that have been collected but have not yet been settled |
| `payable_balance` | Number | Available funds for immediate use |
| `reserve_balance` | Number | Required balance to cover chargebacks, returns, and other fees |
## The Account Transaction Object
[Section titled “The Account Transaction Object”](#the-account-transaction-object)
| | | |
| ------------------------ | ------ | -------------------------------------------------------------- |
| `ewallet_transaction_id` | String | Unique id of an account transaction |
| `ewallet_id` | String | Unique id of an account |
| `pending_amount` | Number | Funds that have been collected but have not yet been settled |
| `payable_amount` | Number | Available funds for immediate use |
| `reserve_amount` | Number | Required balance to cover chargebacks, returns, and other fees |
# ewalletTransaction/create webhook notification
> The Unipaas system will update your platform of each transaction via the ewalletTransaction/create webhook. Including incoming and outgoing transactions. In...
The Unipaas system will update your platform of each transaction via the `ewalletTransaction/create` webhook. Including incoming and outgoing transactions. In most cases, you will receive more than one webhook notification for each transaction, as separate notifications will be fired for fees and splitted payments.
## ewalletTransaction/create webhook
[Section titled “ewalletTransaction/create webhook”](#ewallettransactioncreate-webhook)
Use the `ewalletTransaction/create` webhook to keep your platform updated about every transaction that goes into or out of your vendor’s eWallets, including fees and statuses.
**Webhook fields and examples**
The following is an example for the `EwalletTransaction/create`, for an incoming transaction (a vendor on your platform has received a payment)
* JSON
```json
{
"merchantId": "634801efbf65c800ef3e66df",
"vendorId": "634803b8e81da8def11e4329",
"id": "152309",
"amount": 10,
"currency": "GBP",
"reference": "INV-0063",
"fees": 0,
"type": "Charge",
"transactionId": "639ed03d1258510111196a9e",
"authorizationId": "639ed03d1258517389196a98",
"transactionType": "Sale",
"transactionResult": "Approved",
"paymentMethod": "card",
"payoutId": null,
"brand": "visa",
"issuerCountry": "GB",
"reconciled": "false",
"eWalletId": "105228",
"netAmount": 10,
"pendingAmount": 10,
"payableAmount": 0,
"reservedAmount": 0,
"payableBalance": 49.95,
"reservedBalance": 0,
"identificationReference": "2535",
"feeDesription": null,
"hint": "",
"metadata": {
"accountCode": "090",
"clientId": "18F8E1942DD04BB3B5E5A9551AB161C1",
"clientSecret": "NL6CtohuGBtbW5jS55UrnDqO5GwS2sANcLLddUE-eFHzL9Qz"
},
"createdAt": "2022-12-18T08:33:04.763Z"
}
```
Multiple webhook notifications for each transaction
You will receive multiple `ewalletTransaction/create` webhook notifications for most transactions. Each webhook notifications will represent a different aspect of a transaction, such as fees, authorization, etc.
## Filtering out notifications
[Section titled “Filtering out notifications”](#filtering-out-notifications)
Some webhook notifications should be used by your platform to update the invoice status and account ledger. The following table will help you listen only to the relevant notifications.
We recommend you filter out all `ewalletTransaction/create` webhook notifications, except the following:
| Description | `transactionType`value | `transactionResult`value | `reconciled`value | Action | |
| -------------------------------------------- | ---------------------- | ------------------------ | ----------------- | ------------------------------------------------------------------------- | -------- |
| A payment was received | Sale | Approved | false | Update the invoice with PAID statusUpdate the account ledger | Required |
| A payment was refunded | Refund | Approved | false | Update the invoice with REFUNDED statusUpdate the account ledger | Required |
| A payout was made to a vendor’s bank account | Payout | Approved | irrelevant | Update the invoice PAID INTO BANK ACCOUNT statusUpdate the account ledger | Required |
| A payment was settled (funds are available) | Sale | Approved | true | | Optional |
Payment attribution
Every webhook notification will contain a `vendorId` field which is used to attribute a transaction to a specific user on your platform.
Some transactions are attributed to your platform, these transactions will have the same ID in both `vendorId` and ‘merchantId\` fields
## Object fields
[Section titled “Object fields”](#object-fields)
The following table describes the most important `ewalletTransaction/create` object fields:
| Field | Description |
| ------------------------- | -------------------------------------------------------------------------------------------------------------------------------------------------------------------------------------------------------------------------------------------------------------------------------------------------------------------------------------------------------------------------------------------------------------------------------------------------------------------------- |
| `vendorId` | The unique id of the vendor this transaction is relevant for |
| `merchantId` | The unique id of the merchant this transaction is relevant for |
| `id` | The unique id of the record |
| `amount` | Transaction amount |
| `currency` | Transaction currency |
| `reference` | * Invoice number or reference number for incoming payments
* `null` for outgoing payments |
| `fees` | - The sum amount of fees deducted for this transaction |
| `type` | * Transaction type (it’s better to use transactionType field) |
| `transactionId` | - Identifier of this specific transaction |
| `authorizationId` | * identifier of the authorization (refunds and chargebacks will have the same `authorizationId` as the original transaction) |
| `transactionType` | - Represents the type of the transaction (Use this field to filter notifications) |
| `transactionResult` | `Approved` - Incoming transaction was successfully executed `Declined` - An incoming transaction attempt was declined `Pending` - An incoming transaction is still processing `Error` - There was an error with the transaction `Created` - An outgoing transaction was successfully executed. `Cancelled` - An outgoing transaction was cancelled- Some `transactionResult` values are relevant to specific `transactionType` values. These are shown in the table below. |
| `paymentMethod` | Indicates the payment method that was used to take the payment. |
| `payoutId` | A unique ID of an outgoing payment transaction. |
| `brand` | The card/bank brand that was used to take the payment. |
| `issuerCountry` | Issuer country of the credit card that used during the payment |
| `reconciled` | * Indicates if an incoming transaction was reconciled
* Not relevant for outgoing transactions |
| `eWalletId` | - The ID of the eWallet that the transaction webhook is relevant for |
| `netAmount` | * The transaction amount after deductions |
| `pendingAmount` | - The transaction amount that is still not reconciled |
| `payableAmount` | * The transaction amount that is available for payout after reconciliation |
| `reservedAmount` | - The transaction amount that is reserved for risk purposes |
| `payableBalance` | * The ewallet balance that is available for payout |
| `reservedBalance` | - The ewallet balance that is reserved for risk purposes |
| `consumerEmail` | * Email of the consumer that made the payment |
| `consumerName` | - Name of the consumer that made the payment |
| `consumerReference` | * Reference of the consumer that made the payment |
| `identificationReference` | - Identification reference for payment method that has been used for the payment |
| `feeDesription` | * Explanation about fees that has been charged for the payment |
| `hint` | - Some hint related to fees |
| `metadata` | * Field for custom data that has been used during checkout creation (useful for passing some internal properties) |
| `checkoutId` | - A unique ID of the checkout used for this payment |
| `createdAt` | * Timestamp for ewallet transaction entity |
# Create Account
> As a platform, you can create an account for yourself or your platform's vendors.
As a platform, you can create an account for yourself or your platform’s vendors.
### A vendor account can be created in 3 different ways
[Section titled “A vendor account can be created in 3 different ways”](#a-vendor-account-can-be-created-in-3-different-ways)
* Automatically, by accepting a payment via the Platform Portal.
* Via API (Server-to-Server call).
* Automatically in the first Payin of a new currency.
An account Object will be created automatically for your vendors by Unipaas in the first Payin transaction (per vendor per currency) to keep your integration simple.
We recommend you let Unipaas manage the account creation automatically, but if you want to bring more control and flexibility into your system, you can use the below methods.
## Create a Platform Account
[Section titled “Create a Platform Account”](#create-a-platform-account)
As a platform, you can create an account balance for yourself.
Make a [`POST /ewallets`](/reference/) request to create a new account balance:
* cURL
```curl
curl --request POST \
--url 'https://sandbox.unipaas.com/platform/ewallets' \
--header 'Accept: application/json' \
--header 'Content-Type: application/json' \
--header 'Authorization: Bearer ' \
--data-raw '{
"currency": "USD",
"name": "my usd eWallet"
}'
```
In the response, you’ll get the created [`eWallet object`](/docs/ewallets-overview/).
eWallet.vendorId won’t be defined, as this method creates a platform account.
## Create Platform’s Vendor account
[Section titled “Create Platform’s Vendor account”](#create-platforms-vendor-account)
As a platform, you can create an account for your vendor.
Make a [`POST /vendors/{vendorId}/ewallets`](/reference/#tag/vendor/POST/vendors/%7BvendorId%7D/ewallets) request to create a new eWallet:
* cURL
```curl
curl --request POST \
--url 'https://sandbox.unipaas.com/platform/vendors/{vendorId}/ewallets' \
--header 'Accept: application/json' \
--header 'Content-Type: application/json' \
--header 'Authorization: Bearer ' \
--data-raw '{
"currency": "USD",
"name": "my vendor\'s usd eWallet"
}'
```
In the response you’ll get the created vendor [`eWallet object`](/docs/ewallets-overview/).
eWallet.vendorId will be defined, as this method creates a platform’s vendor account.
# Get Account Transactions
> Make a GET /ewallets/{eWalletId}/transactions request:
## Get Platform Account Transactions
[Section titled “Get Platform Account Transactions”](#get-platform-account-transactions)
Make a [`GET /ewallets/{eWalletId}/transactions`](/reference/#tag/ewallet/GET/ewallets/%7BewalletId%7D/transactions) request:
* cURL
```curl
curl --request GET \
--url 'https://sandbox.unipaas.com/platform/ewallets/{eWalletId}/transactions' \
--header 'Accept: application/json' \
--header 'Content-Type: application/json' \
--header 'Authorization: Bearer '
```
The response will be an array of [`eWallet transactions object`](/docs/ewallets-overview/).
## Get Vendor Account Transactions
[Section titled “Get Vendor Account Transactions”](#get-vendor-account-transactions)
Make a [`GET /vendors/{vendorId}/ewallets/{eWalletId}/transactions`](/reference/#tag/vendor/GET/vendors/%7BvendorId%7D/ewallets/%7BewalletId%7D/transactions) request:
* cURL
```curl
curl --request GET \
--url 'https://sandbox.unipaas.com/platform/vendors/{vendorId}/ewallets/{eWalletId}/transactions' \
--header 'Accept: application/json' \
--header 'Content-Type: application/json' \
--header 'Authorization: Bearer '
```
The response will be an array of [`eWallet transactions object`](/docs/ewallets-overview/).
# Get Payouts
> Make a GET /payouts request:
## Get Platform Payouts
[Section titled “Get Platform Payouts”](#get-platform-payouts)
Make a [`GET /payouts`](/reference/#tag/payout/GET/payouts) request:
* cURL
```curl
curl --request GET \
--url 'https://sandbox.unipaas.com/platform/payouts' \
--header 'Accept: application/json' \
--header 'Content-Type: application/json' \
--header 'Authorization: Bearer ' \
```
In the response, you’ll get requested array of [`Payout object`](/docs/pay-out-funds-overview/#the-payout-object).
## Get Vendor Payouts
[Section titled “Get Vendor Payouts”](#get-vendor-payouts)
Make a [`GET /vendors/{vendorId}/payouts`](/reference/#tag/vendor/GET/vendors/%7BvendorId%7D/payouts) request:
* cURL
```curl
curl --request GET \
--url 'https://sandbox.unipaas.com/platform/vendors/{vendorId}/payouts' \
--header 'Accept: application/json' \
--header 'Content-Type: application/json' \
--header 'Authorization: Bearer ' \
```
In the response, you’ll get the requested array of [`Payout object`](/docs/pay-out-funds-overview/#the-payout-object).
# Get Accounts
> Make a GET /ewallets request:
## Get Platform Accounts
[Section titled “Get Platform Accounts”](#get-platform-accounts)
Make a [`GET /ewallets`](/reference/#tag/ewallet/GET/ewallets) request:
* cURL
```curl
curl --request GET \
--url 'https://sandbox.unipaas.com/platform/ewallets' \
--header 'Accept: application/json' \
--header 'Content-Type: application/json' \
--header 'Authorization: Bearer '
```
The response will be an array of [`eWallet object`](/docs/ewallets-overview/).
## Get Vendor Accounts
[Section titled “Get Vendor Accounts”](#get-vendor-accounts)
Make a [`GET /vendors/{vendorId}/ewallets`](/reference/#tag/vendor/GET/vendors/%7BvendorId%7D/ewallets) request request:
* cURL
```curl
curl --request GET \
--url 'https://sandbox.unipaas.com/platform/vendors/{vendorId}/ewallets' \
--header 'Accept: application/json' \
--header 'Content-Type: application/json' \
--header 'Authorization: Bearer '
```
The response will be an array of [`eWallet object`](/docs/ewallets-overview/).
Go Next[Get eWallet Transaction](/docs/get-merchant-ewallet-transaction-1/)
# Webhook Notifications
> Subscribe to the eWallet/create webhook to get notifications when an account was created or disabled for one of your vendors. An account will be created via...
## Account notifications
[Section titled “Account notifications”](#account-notifications)
Subscribe to the `eWallet/create` webhook to get notifications when an account was created or disabled for one of your vendors. An account will be created via an API call, or automatically, when your vendor receives a payment for the first time.
**The body will include the following object:**
| Parameter | Always Available | Type | Description |
| ------------ | ---------------- | ------ | ------------------- |
| `id` | Yes | String | Your account ID |
| `merchantId` | Yes | String | Your Merchant ID |
| `vendorId` | No | String | Your Vendor ID |
| `currency` | Yes | Enum | ‘GBP’, ‘USD’, ‘EUR’ |
| `status` | Yes | Enum | ‘created’ |
## Account transactions notifications
[Section titled “Account transactions notifications”](#account-transactions-notifications)
Subscribe to the `eWalletTransaction/create` webhook to get notifications when an account transaction associated with one of your vendors is created.
**The body will include the following object:**
| Paramater | Always Available | Type | Description |
| ---------------- | ---------------- | ------ | ---------------------------------------------------------------------- |
| `id` | Yes | String | Your account transaction ID |
| `merchantId` | Yes | String | Your Merchant ID |
| `vendorId` | Yes | String | Your Vendor ID |
| `fees` | Yes | Number | The fees taken in this transaction |
| `amount` | Yes | Number | The transaction’s total amount |
| `netAmount` | Yes | Number | The transaction’s net amount |
| `pendingAmount` | Yes | Number | The amount that was not yet reconciled |
| `payableAmount` | Yes | Number | The amount that is ready to be paid out |
| `reservedAmount` | Yes | Number | The amount that was reserved by Unipaas |
| `payableBalance` | Yes | Number | The payable balance at the time of the transaction |
| `brand` | No | String | Name of bank, APM or credit card company. |
| `currency` | Yes | Enum | ‘GBP’, ‘USD’, ‘EUR’ |
| `reference` | Yes | String | The transaction’s reference number. This can be used to store order ID |
| `paymentMethod` | Yes | Enum | ‘bankTransfer’, ‘card’, ‘alternative’ |
| `payoutId` | No | String | If the transaction is a payout, it’s ID will be here |
| `ewalletId` | Yes | String | The transaction’s account ID |
| `createdAt` | Yes | Date | When the transaction occured |
## Account transactions - indicate paid out transactions
[Section titled “Account transactions - indicate paid out transactions”](#account-transactions---indicate-paid-out-transactions)
Use [Payout Drill Through](/docs/payout-drill-through/#vendor-payout-drill-through) to indicate if a specific transaction was paid out to the vendor’s bank account.
# Getting Started With Our API
Open a sandbox test account with Unipaas
You can create a test account in 1 min!
[Create your account](https://portal.unipaas.com/signup)
The test account gives you a free unlimited account with all features and capabilities - including payouts, vendor account management, and a fully functional portal you can use to train your team.
The test account will always be available, even after opening your live account. You can switch back to test mode using this toggle.

## Endpoints
[Section titled “Endpoints”](#endpoints)
We provide two different URLs for making API calls: Test **Sandbox** or **Live** environments. These two environments are separate and share no information.
The API credentials are completely different between environments.\
For testing, please use the Sandbox URL. When you’re ready to process live transactions, use the Live URL.
Sandbox URL: \
Live URL:
## API Idempotency
[Section titled “API Idempotency”](#api-idempotency)
To make sure an API request is not executed multiple times due to internal or any other error, our API supports idempotent requests. This means that the same request can be applied multiple times without changing the result beyond the initial request.\
For example: Sending the same transaction request multiple times will create a single transaction, and will not result in multiple transactions.
To be able to use the idempotency mechanism, add **requestId**: <*id*> to POST request header.\
All request ids will be valid during 24 hours.
## Find API keys in the Portal
[Section titled “Find API keys in the Portal”](#find-api-keys-in-the-portal)
Once you have opened a Sandbox account you can find your keys here:\
Note that you currently need to use the Private Key only.

Now that you’re all set and have a sandbox account. you can choose your preferred way to integrate with Unipaas. We invite you to review our [All in one flexible solution](/docs/all-in-one-flexible-solution/)\
If you are not sure which way to go, you can always contact our support team at:
Go Next[All in one flexible solution](/docs/all-in-one-flexible-solution/)
# Glossary
> \authorization - an aggregation of multiple transactions for a single order.
## List of related terms
[Section titled “List of related terms”](#list-of-related-terms)
\**authorization* - an aggregation of multiple transactions for a single order.
**APMs** - Alternative Payment Methods such as Apple Pay, Google Pay, and other local accounts can be integrated into your checkout to increase conversion rates.
**Buyer** - A buyer is a party on the platform that acquires products or services from the vendor. Buyers can be businesses or consumers.
**Embedded** - A type of integration in which a Unipaas product or feature is integrated into your admin and systems.
**Account** - An account is a virtual location where funds are collected and stored. You can pay into an account, withdraw funds from it, or transfer funds from one account to another.
**Hosted Solution** - A solution managed by Unipaas inside a dedicated portal interface.
**Managed Solution** - A product suite equipped with all features that Unipaas manages. Little to no integration efforts are required from the merchant side.
**Payable Balance** - This is the amount a vendor or a platform can withdraw from their account.
**Payment Processing Fee** - A fee collected by Unipaas for each transaction to cover fees along the money flow process.
**Pay by Bank**- A payment method in which a buyer can pay directly from their bank account, with an easy to use flow and low costs. This method is part of the open banking network.
**Pay-in** - Payment acceptance, insert money to an account.
**Payouts** - Settle, take money out of the account.
**Platform/Digital Platform** - An online platform on which businesses or individuals sell products or services to third parties.
**Platform Fee** - A fee is a designated amount of money determined by the platform collected from vendors. This fee can be configured per vendor and taken at checkout - from Pay-in flow, Payout flow, or both.
**Recurring** - A transaction made as part of a sequence, a subscription.
**Reserved Balance** - A small percentage of your account balance set aside to cover potential disputes
**Unipaas Portal** - A descriptive name for the Unipaas admin panel on which you can manage your marketplace and vendors, view reports, account, and perform payouts.
**Vendor** - A vendor is a seller on a platform that sells products or services. Vendors are also commonly referred to as sub-merchants.
# Handling DOM Events
> Handling Continuity via DOM Events
**Handling Continuity via DOM Events**
When a user interacts with the embedded components specific DOM events are dispatched to notify your platform that the user needs to perform an action. These can be found [here](/docs/ui-web-embeds-integration-guide/#handle-dom-events)
***Example***
For onboarding, the completeOnboarding event indicates that a vendor has an incomplete application.
Below are two technical approaches to handling this event.
1. Hosted Redirect Use this method if you want to redirect the user to a standalone, Unipaas-hosted onboarding page. When the event is triggered, call the Unipaas API from your backend to generate a secure link.
***Technical Steps:***
Listen for the completeOnboarding event on the component’s parent container.
Trigger a request to your backend to call the POST `/platform/vendors/{"vendor Id"}/links` endpoint. [Docs](https://sandbox.unipaas.com/platform/docs/#/Vendor/VendorLinkController_createLink)
Open the resulting URL in a new tab or redirect the current window.
* JavaScript
```javascript
// 1. Initialize the Pay Portal
const payPortal = components.create("payPortal");
const container = document.getElementById("pay-portal-container");
payPortal.mount("#pay-portal-container");
// 2. Listen for the completion event
container.addEventListener("completeOnboarding", async (e) => {
// Call your backend to generate the link
const response = await fetch(`/api/generate-onboarding-link?vendorId=${vendorId}`, { method: 'POST' });
const { url } = await response.json();
// Redirect the user
window.open(url, '_blank');
});
```
2. Embedded Flow
Use this method to load the onboarding UI directly into a designated area of your application without leaving the page. This provides the most seamless user experience.
***Technical Steps:***
Ensure your container (e.g., ``) is present in the DOM.
On the completeOnboarding event, initialize the onboarding component.
Mount the component to your specific container.
* JavaScript
```javascript
const portalDiv = document.getElementById("payportal");
portalDiv.addEventListener("completeOnboarding", () => {
// 1. Initialize the onboarding component
// Note: Ensure your initial Access Token includes the 'onboarding_write' scope
const onboarding = components.create("onboarding");
// 2. Mount to the dedicated container
onboarding.mount("#onboarding");
// Optional: Scroll the user to the onboarding section
document.getElementById("onboarding").scrollIntoView({ behavior: 'smooth' });
});
```
**Comparison**
| Feature | Hosted | Embedded |
| ---------------- | -------------------------------------------- | ---------------------------------------------- |
| User Experience | Simpler to implement | Seamless transition within your own UI |
| API Requirements | Requires call to /platform/vendors/ id/links | Requires onboarding\_write scope in Auth token |
| UI | Browser handles window management | Requires container with min-width of 450px |
# Implement Direct Debit Via API
> If you are unfamiliar with Direct Debit and how it works in Unipaas, please refer to this article first.
# Introduction
[Section titled “Introduction”](#introduction)
If you are unfamiliar with Direct Debit and how it works in Unipaas, please refer to [this article](/docs/direct-debit/) first.
If you are planning to or have implemented the Unipaas UI Web-Embeds, please refer to [this article](/docs/implement-direct-debit-with-ui-web-embeds/), which addresses implementing Direct Debit with UI Web-Embeds (**highly recommended**).
In this section, you will be guided through the steps necessary to create a custom Direct Debit flow within your platform’s embedded payment solution.
In addition, please refer to the [Direct Debit webhooks](/docs/webhooks-and-notifications/) you should subscribe to in order to make the most of the offering to vendors.
Finally, once you’ve completed your integration, you can test it using the [Direct Debit test scenarios](/docs/direct-debit-test-scenarios/).
# Direct Debit Flows
[Section titled “Direct Debit Flows”](#direct-debit-flows)
In order to use Direct Debit and implement its flows, there are several [API endpoints](/docs/implement-direct-debit-via-api/#get-a-customers-mandate) you should use along the way. We will describe these flows as well as which API endpoints you should use in each step.
## Set up a Direct Debit mandate
[Section titled “Set up a Direct Debit mandate”](#set-up-a-direct-debit-mandate)
**Description**: A vendor wishes to set up a Direct Debit mandate with their customer to start collecting payments from them with Direct Debit.
Note
Within the Direct Debit context, “Collect”, “Collection” or “Collecting” refer to a Direct Debit payment (authorization).
**Steps**:
1. Once a customer is selected, use the “[Get mandate](/docs/implement-direct-debit-via-api/#get-a-customers-mandate)” endpoint to check if this customer has a mandate set up or not. These are the possible statuses for mandates:
* `sent` - A vendor has sent a mandate request to their customer.
* `pending_approval` - The mandate has not yet been submitted to the customer’s bank OR the mandate has been submitted to the customer’s bank but has not been processed yet.
* `active` - The mandate has been successfully set up by the customer’s bank.
* `declined` - A technical error has occurred when trying to submit the mandate.
* `rejected` - The mandate could not be created (rejected by Bacs).
* `cancelled` - The mandate has been cancelled.
2. If there is no mandate at all for this customer, you will need to create a flow that lets your vendor request a mandate from their customer. Use our [Mandate Request UI Web-Embed](/docs/ui-web-embeds-integration-guide/#mandate-request) (**recommended**) or the “[Request mandate from customer](/docs/implement-direct-debit-via-api/#create-a-mandate-and-send-it-to-the-customer)” endpoint to trigger a request to this customer. This will send an email with a link to the mandate flow for the customer to complete.
3. In case a significant time has passed and the customer has not submitted their mandate, you can create a “resend” flow to let the vendor send an additional reminder to their customer to complete their mandate.\
To do this, use the “[Resend mandate request](/docs/implement-direct-debit-via-api/#resend-a-mandate-to-the-customer)” endpoint to trigger a resend to this customer. This will send an email with the same original link to the mandate flow for the customer to complete.
Important
Direct Debit collections can only be made if there is a mandate in place and it is in one of the following statuses: `sent`, `pending_approval` or `active`.
For `sent` and `pending_approval`, the collection will be pending until the mandate has been activated (`active` status).
For `active`, the collection will be made.
Tip
We strongly recommend implementing a mandate set up flow from your vendors’ customer list.
## Collect payments with Direct Debit
[Section titled “Collect payments with Direct Debit”](#collect-payments-with-direct-debit)
**Description**: A vendor wishes to collect payments (either one-offs or recurring) from their customer by Direct Debit.
**Steps**:
1. If the selected customer does not have a mandate set up yet, [first set one up](/docs/implement-direct-debit-via-api/#set-up-a-direct-debit-mandate).
2. Once the mandate has been set up, you have the following options to collect a payment with Direct Debit:
* For an invoice in your system, use the “[Invoice Endpoint](/docs/invoices/#invoice-endpoint)” to trigger a Direct Debit collection (payment).
Note
This should be triggered when the invoice is saved.
* For a payment that is does not have an invoice associated with it, you can collect the payment using the /pay-ins /checkout endpoint to trigger a Direct Debit collection (payment), following your own billing/recurring logic.
‘POST’ ‘’
Request example:
* JSON
```json
{
"country": "GB",
"amount": 21,
"currency": "GBP",
"email": "email@email.com",
"vendorId": "680b81e88f595625dc584e6d",
"consumerReference": "test001",
"shippingSameAsBilling": true,
"items": [],
"dueDate": "2025-10-10",
"offlinePayment": true,
"paymentMethods": ["directDebit"]
}
```
Response example
* JSON
```json
{
"status": "open",
"mode": "offline",
"plans": [],
"isMoto": false,
"id": "69aebfc03b64c429eaf72fc9",
"country": "GB",
"amount": 21,
"currency": "GBP",
"reference": "test001",
"items": [],
"dueDate": "2025-11-05T00:00:00.000Z",
"paymentMethods": [
"directDebit"
],
"vendor": {
"name": "Unipaas",
"email": "test.test@example.com",
"country": "GB"
},
"totalAmount": 21,
"totalPaid": 0,
"expiresAt": "2025-11-05T00:00:00.000Z",
"shortLink": "https://sandbox-checkout.unipaas.com/CUb45tcmWX/",
"merchantId": "6808db2fd8d8f56be334bd4a",
"signedLinkId": "CUb45tcmWX",
"consumerId": "69a5725633870dc148b98c8f",
"createdAt": "2025-10-09T12:40:32.314Z",
"updatedAt": "2025-10-09T12:40:32.314Z",
"sessionToken": "eyJhbGciOiJIUzI1NiIsInR5cCI6IkpXVCJ9.eyJtZXJjaGFudElkIjoiNjgwOGRiMmZkOGQ4ZjU2YmUzMzRiZDRhIiwibWVyY2hhbnROYW1lIjoiU3RydWR3aWNrTHRkIiwiYW1vdW50IjoyMSwib3JpZ2luYWxBbW91bnQiOjIxLCJjdXJyZW5jeSI6IkdCUCIsImVtYWlsIjoiYW1pdC5tZWxpY2hlc0B1bmlwYWFzLmNvbSIsImNvdW50cnkiOiJHQiIsInNlbGxlcklkIjoiNjgwYjgxZTg4ZjU5NTYyNWRjNTg0ZTZkIiwidmVuZG9ySWQiOiI2ODBiODFlODhmNTk1NjI1ZGM1ODRlNmQiLCJzY29wZXMiOlsid2Vic2RrX2FjY2VzcyIsImRpcmVjdF9kZWJpdF9yZWFkIiwiZGlyZWN0X2RlYml0X3dyaXRlIl0sInBheW1lbnRNZXRob2RzIjpbImRpcmVjdERlYml0Il0sImlzUmVjdXJyaW5nIjpmYWxzZSwiY29uc3VtZXJJZCI6IjY5YTU3MjU2MzM4NzBkYzE0OGI5OGM4ZiIsImNvbnN1bWVyIjp7InJlZmVyZW5jZSI6IlBlbm5pbGVzc190ZXN0MDAxIn0sImVudiI6InNhbmRib3giLCJwYXltZW50TGlua0lkIjoiQ1ViNDV0Y21XTyIsImR1ZURhdGUiOiIyMDI2LTAzLTA5IiwiaWF0IjoxNzczMDYwMDMzLCJleHAiOjE3NzMxNDY0MzN9.zGJjW_MTXCVmtK9TD4YrdHOtTeLPy87sqgMH7vXVqIo",
"authorizationId": "69aebfc03b64c43f2cf72fcb",
"paymentOptions": [],
"qrPaymentLink": "https://sandbox.unipaas.com/platform/qr-code/generate?url=https://sandbox-checkout.unipaas.com/CUb45tcmWO/",
"vendorId": "680b81e88f595625dc584e6d",
"consumer": {
"reference": "test001",
"billingAddress": {
"line1": "41 Chalton Street, London NW1 1JD",
"city": "London",
"state": "England",
"postalCode": "NW1 1JD",
"country": "GB"
},
"email": "email@email.com",
"name": "Test",
"phone": "+44 07920 000000",
"shippingAddress": {
"line1": "41 Chalton Street, London NW1 1JD",
"city": "London",
"state": "England",
"postalCode": "NW1 1JD",
"country": "GB"
},
"shippingSameAsBilling": true
}
}
```
Note
Leverage the Mandate and Direct Debit statuses delivered via webhooks to keep track of the lifecycle of the mandate and direct debit flow.
Statuses: \[/docs/direct-debit-status/)
Webhooks: \[/docs/webhooks-and-notifications/)
## Cancel a collection
[Section titled “Cancel a collection”](#cancel-a-collection)
**Description**: A vendor wishes to cancel a Direct Debit collection.
Important
Direct Debit collections can only be cancelled until they are submitted to Bacs.
In Unipaas, this is as long as they haven’t reached `Submitted` status. Once submitted, collections cannot be cancelled.
**Steps**:
1. Use the “[Cancel collection](/docs/implement-direct-debit-via-api/#cancel-a-direct-debit-collection)” endpoint to cancel the collection.
## Update a collection
[Section titled “Update a collection”](#update-a-collection)
**Description**: A vendor wishes to change a Direct Debit collection amount or due date.
Note
Currently, only payment amount or due date changes are supported.
Important
Direct Debit collections can only be updated until they are submitted to Bacs.
In Unipaas, this is as long as they haven’t reached `Submitted` status. Once submitted, collections cannot be updated.
**Steps**:
* For a Direct Debit collection that was created with the “[Invoice Endpoint](/docs/invoices/#update-invoice)”, update with “[PATCH Invoice Endpoint](/reference/#tag/vendor/PATCH/vendors/%7BvendorId%7D/invoices/%7BinvoicesId%7D)” to trigger a Direct Debit collection (payment).
* For a payment that was created with the “[Create Checkout](/docs/create-payment/)” endpoint, update with “PATCH Checkout” (**TBD**) endpoint.
Note
When a change is made to a Direct Debit payment, Unipaas will cancel the original collection, and immediately create a new one instead.
## Update a payment method
[Section titled “Update a payment method”](#update-a-payment-method)
**Description**: A vendor wishes to change a Direct Debit collection to a different payment method (e.g., card or Open Banking) or vise versa.
Important
The Direct Debit payment method can only be changed until the collections are submitted to Bacs.
In Unipaas, this is as long as they haven’t reached `Submitted` status. Once submitted, the payment method cannot be changed.
**Steps**:
* For a Direct Debit collection that was created with the “[Invoice Endpoint](/docs/invoices/#update-invoice)”, update with “[PATCH Invoice Endpoint](/reference/#tag/vendor/PATCH/vendors/%7BvendorId%7D/invoices/%7BinvoicesId%7D)” to trigger a Direct Debit collection (payment).
* For a payment that was created with the “[Create Checkout](/docs/create-payment/)” endpoint, update with “PATCH Checkout” (**TBD**) endpoint.
Note
When a payment is changed from the Direct Debit payment method, Unipaas will cancel the Direct Debit collection.
## Cancel a mandate
[Section titled “Cancel a mandate”](#cancel-a-mandate)
**Description**: A vendor wishes to cancel a Direct Debit mandate for their customer.
**Steps**:
1. Use the “[Cancel mandate](/docs/implement-direct-debit-via-api/#cancel-a-direct-debit-mandate)” endpoint to cancel that specific mandate.
️ Warning
When a mandate is cancelled, **ALL** outstanding Direct Debit collections that can be cancelled will be cancelled.
In addition, new collections will not be possible after a mandate is cancelled.
## Aggregate mandates and collections
[Section titled “Aggregate mandates and collections”](#aggregate-mandates-and-collections)
**Description**: Allow your vendors to see all their Direct Debit mandates and collections in one place in your platform (e.g., on the customer list).
**Steps**:
1. To get all the Direct Debit mandates for a vendor, use the “[Get all mandates](/docs/implement-direct-debit-via-api/#get-all-mandates-for-a-vendor)” endpoint.
2. To get all the Direct Debit collections for a vendor, use the “Get all collections” (**TBD**) endpoint.
## Drill through a mandate or collection
[Section titled “Drill through a mandate or collection”](#drill-through-a-mandate-or-collection)
**Description**: Get additional information about a specific Direct Debit mandate or collection.
**Steps**:
1. To get the details of a Direct Debit mandate, use the “[Get mandate](/docs/implement-direct-debit-via-api/#get-a-customers-mandate)” endpoint.
2. To get the details of a Direct Debit collection, use the “Get collection” (**TBD**) endpoint.
If you have any questions or require further assistance during the implementation process, please don’t hesitate to contact our team.
# Test your Direct Debit integration
[Section titled “Test your Direct Debit integration”](#test-your-direct-debit-integration)
See [Direct Debit Test Scenarios](/docs/direct-debit-test-scenarios/).
# Direct Debit API Endpoints
[Section titled “Direct Debit API Endpoints”](#direct-debit-api-endpoints)
### Get a customer’s mandate
[Section titled “Get a customer’s mandate”](#get-a-customers-mandate)
Use the following GET request:
[{unipaas\_host}}/platform/vendors/{{vendor\_id}}/consumers/reference/{{consumer\_reference}}/mandates](/reference/#tag/vendor/GET/vendors/%7BvendorId%7D/consumers/%7BconsumerId%7D/mandates)
Response example:
* JSON
```json
{
"id": "64c74e2eb7d492861897cb41",
"vendor": {
"id": "64b6a89e5dcbc5de96ff8ebc",
"name": "Dunder Mifflin",
"email": "jan.levinson.gould@dundermifflin.com"
},
"merchant": {
"id": "633a93e2599b587a1781d41e",
"name": "UNIPAAS FINANCIAL SERVICES LIMITED"
},
"status": "active",
"consumer": {
"id": "64c257d27f58cc0138ef06e7",
"name": "Pam Beesly",
"reference": "pam-1",
"email": "pam.beesly@dundermifflin.com",
"firstName": "Pam",
"lastName": "Beesly"
},
"mandateCreationFormLink": "1BTE1FHTgDJQCCxu14F5S",
"createdAt": "2023-07-27T11:41:06.721Z",
"updatedAt": "2023-07-27T11:42:22.988Z",
"v": 0,
"bankAccount": {
"iban": "GB46BUKB20041538290008",
"name": "BARCLAYS BANK UK PLC",
"bankCode": "200415",
"holderName": "Pam Beesly",
"accountNumber": "38290008",
"country": "GB"
},
"processorReferenceId": "MD000V8YR5AQM5",
"reference": "59NKT5Q-dunder-mif",
"paymentOptionId": "64c2581e19c84a151aaaf87c"
}
```
### Create a mandate and send it to the customer
[Section titled “Create a mandate and send it to the customer”](#create-a-mandate-and-send-it-to-the-customer)
Use the following POST request:
[{{unipaas\_host}}/platform/vendors/{{vendor\_id}}/mandates](/reference/#tag/vendor/POST/vendors/%7BvendorId%7D/mandates)
Request example:
* JSON
```json
{
"consumer": {
"name": "Michael Scott",
"email": "michael.scott@dundermifflin.com",
"reference": "michael-1"
},
"createMandateLink": true,
"sendEmail": true,
"requestMandateEmailObject": {
"subject": "Mandate email subject",
"body": "Mandate email body"
}
}
```
| Name | Type | Required | Description |
| ----------------------------------- | ------ | -------- | -------------------------------------------------------------------------------------------------------------------------------------------------------------------------------------------------------------------------------------------------------------------------------------------------------------------------------------------------------------------------------------------------- |
| `consumer.name` | string | YES | The name of the customer who will receive the mandate request. |
| `consumer.email` | string | YES | The email to which the mandate request will be sent. |
| `consumer.reference` | string | YES | The consumer reference as was sent to Unipaas. |
| `createMandateLink` | string | YES | Must be set to `true`. |
| `sendEmail` | string | NO | true or false. Dictates if an email is sent to the consumer.email |
| `requestMandateEmailObject.subject` | string | NO | The subject that will appear in the email received by the customer. E.g.: “{{consumerName}}, Please Set Up A Direct Debit Mandate”. Required if sendEmail = true |
| `requestMandateEmailObject.body` | string | NO | The body that will appear in the email received by the customer. E.g.: “Hi {{consumerName}}, {{vendorName}} would like to set up a Direct Debit mandate with you in order to automatically collect payments for future invoices. Once this is set up, you won’t need to manually pay each invoice - {{vendorName}} can automatically collect from your bank account.” Required if sendEmail = true |
Response example:
* JSON
```json
{
"mandate": {
"id": "64c74e2eb7d492861897cb41",
"vendor": {
"id": "64b6a89e5dcbc5de96ff8ebc",
"name": "Dunder Mifflin",
"email": "jan.levinson.gould@dundermifflin.com"
},
"merchant": {
"id": "633a93e2599b587a1781d41e",
"name": "UNIPAAS FINANCIAL SERVICES LIMITED"
},
"status": "sent",
"consumer": {
"id": "64c74e2e7f58cc0138697910",
"name": "Michael Scott",
"reference": "michael-1",
"email": "michael.scott@dundermifflin.com"
},
"mandateCreationFormLink": "AQZ1kWYt58wSsEjF5qz7d",
"createdAt": "2023-07-31T06:01:18.732Z",
"updatedAt": "2023-07-31T06:01:18.732Z",
"v": 0
},
"link": {
"refreshToken": [],
"views": [
"direct_debit"
],
"vendorId": "64b6a89e5dcbc5de96ff8ebc",
"merchantId": "633a93e2599b587a1781d41e",
"consumerId": "64c74e2e7f58cc0138697910",
"email": "michael.scott@dundermifflin.com",
"id": "64c74e2e5dcbc574b4ff8f46",
"uniqueId": "AQZ1kWYt58wSsEjF5qz7d",
"expiresAt": "2023-08-14T06:01:18.711Z",
"status": "sent",
"supportEmail": null,
"createdAt": "2023-07-31T06:01:18.714Z",
"updatedAt": "2023-07-31T06:01:18.714Z",
"v": 0,
"url": "https://sandbox-hosted.unipaas.com/consumers/64c74e2e7f58cc0138697910/AQZ1kWYt58wSsEjF5qz7d/mandate"
}
}
```
### Resend a mandate to the customer
[Section titled “Resend a mandate to the customer”](#resend-a-mandate-to-the-customer)
Use the following POST request:
[{{unipaas\_host}}/platform/vendors/{{vendor\_id}}/mandates/{{mandate\_id}}/send](/reference/#tag/vendor/POST/vendors/%7BvendorId%7D/mandates/%7BmandateId%7D/send)
Request example:
* JSON
```json
{
"subject": "{{consumer_name}}, Please Set Up A Direct Debit Mandate",
"body": "Hi {{consumer_name}}, John Doe would like to set up a Direct Debit mandate with you in order to automatically collect payments for future invoices. Once this is set up, you won’t need to manually pay each invoice - John Doe can automatically collect from your bank account."
}
```
### Cancel a Direct Debit collection
[Section titled “Cancel a Direct Debit collection”](#cancel-a-direct-debit-collection)
Use the following POST request:
[{{unipaas\_host}}/platform/pay-ins/{{authorization\_id}}/void](/reference/#tag/payin/POST/pay-ins/%7BauthorizationId%7D/void)
### Cancel a Direct Debit mandate
[Section titled “Cancel a Direct Debit mandate”](#cancel-a-direct-debit-mandate)
Use the following POST request:
[{{unipaas\_host}}/platform/vendors/{{vendor\_id}}/mandates/{{mandate\_id}}/cancel](/reference/#tag/vendor/POST/vendors/%7BvendorId%7D/mandates/%7BmandateId%7D/cancel)
### Get all mandates for a vendor
[Section titled “Get all mandates for a vendor”](#get-all-mandates-for-a-vendor)
Use the following GET request:
[{{unipaas\_host}}/platform/vendors/{{vendor\_id}}/mandates](/reference/#tag/vendor/GET/vendors/%7BvendorId%7D/mandates)
Response example:
* JSON
```json
{
"items": [
{
"id": "64c207e7b7d4928c1a971d24",
"vendor": {
"id": "64b6a89e5dcbc5de96ff8ebc",
"name": "Dunder Mifflin",
"email": "jan.levinson.gould@dundermifflin.com"
},
"merchant": {
"id": "633a93e2599b587a1781d41e",
"name": "UNIPAAS FINANCIAL SERVICES LIMITED"
},
"status": "pending_approval",
"consumer": {
"id": "64c207e77f58cc0138e60251",
"name": "Michael Scott",
"reference": "michael-1",
"email": "michael.scott@dundermifflin.com",
"firstName": "Michael",
"lastName": "Scott"
},
"mandateCreationFormLink": "AQZ1kWYt58wSsEjF5qz7d",
"createdAt": "2023-07-27T06:00:07.859Z",
"updatedAt": "2023-07-27T08:59:21.611Z",
"v": 0,
"bankAccount": {
"id": "64c231e619c84a2312aaf808",
"iban": "GB46BUKB20041538290008",
"name": "BARCLAYS BANK UK PLC",
"bankCode": "200415",
"holderName": "Michael Scott",
"accountNumber": "38290008",
"country": "GB"
},
"processorReferenceId": "MD000V8W3HCR30",
"reference": "YVM9JP6-dunder-mif"
},
{
"id": "64c257d2b7d4927b4e9727a6",
"vendor": {
"id": "64b6a89e5dcbc5de96ff8ebc",
"name": "Dunder Mifflin",
"email": "jan.levinson.gould@dundermifflin.com"
},
"merchant": {
"id": "633a93e2599b587a1781d41e",
"name": "UNIPAAS FINANCIAL SERVICES LIMITED"
},
"status": "active",
"consumer": {
"id": "64c257d27f58cc0138ef06e7",
"name": "Pam Beesly",
"reference": "pam-1",
"email": "pam.beesly@dundermifflin.com",
"firstName": "Pam",
"lastName": "Beesly"
},
"mandateCreationFormLink": "1BTE1FHTgDJQCCxu14F5S",
"createdAt": "2023-07-27T11:41:06.721Z",
"updatedAt": "2023-07-27T11:42:22.988Z",
"v": 0,
"bankAccount": {
"id": "64c2580919c84a207eaaf874",
"iban": "GB46BUKB20041538290008",
"name": "BARCLAYS BANK UK PLC",
"bankCode": "200415",
"holderName": "Pam Beesly",
"accountNumber": "38290008",
"country": "GB"
},
"processorReferenceId": "MD000V8YR5AQM5",
"reference": "59NKT5Q-dunder-mif",
"paymentOptionId": "64c2581e19c84a151aaaf87c"
},
{
"id": "64c2c37db7d492bd609735bf",
"vendor": {
"id": "64b6a89e5dcbc5de96ff8ebc",
"name": "Dunder Mifflin",
"email": "jan.levinson.gould@dundermifflin.com"
},
"merchant": {
"id": "633a93e2599b587a1781d41e",
"name": "UNIPAAS FINANCIAL SERVICES LIMITED"
},
"status": "rejected",
"consumer": {
"id": "64c2c37d7f58cc0138f98c33",
"name": "Dwight Schrute",
"reference": "dwight-1",
"email": "dwight.k.schrute@dundermifflin.com",
"firstName": "Dwight",
"lastName": "Schrute"
},
"mandateCreationFormLink": "qRO6T5M2CoHgvk-w-se88",
"createdAt": "2023-07-27T19:20:29.048Z",
"updatedAt": "2023-07-27T19:22:39.535Z",
"v": 0,
"bankAccount": {
"id": "64c2c3f019c84a9872aaf968",
"iban": "GB46BUKB20041538290008",
"name": "BARCLAYS BANK UK PLC",
"bankCode": "200415",
"holderName": "Dwight Schrute",
"accountNumber": "38290008",
"country": "GB"
},
"processorReferenceId": "MD000V97QD8HND",
"reference": "8MKZR36-dunder-mif",
"processorErrorReason": "invalid_bank_details"
},
],
"totals": [
{
"count": 3
}
]
}
```
# Implement Direct Debit With UI Web-Embeds
> If you are unfamiliar with Direct Debit and how it works in Unipaas, please refer to this article first.
# General overview
[Section titled “General overview”](#general-overview)
If you are unfamiliar with Direct Debit and how it works in Unipaas, please refer to [this article](/docs/direct-debit/) first.
In this section, you will be guided through the steps necessary to implement the Direct Debit payment method within your embedded payments solution, by leveraging the Unipaas UI Web-Embeds. Applying these will significantly reduce the integration effort required by your team to add Direct Debit to your offering.
## The following UI Web-Embeds/services are required for Direct Debit to work:
[Section titled “The following UI Web-Embeds/services are required for Direct Debit to work:”](#the-following-ui-web-embedsservices-are-required-for-direct-debit-to-work)
* [Invoice end point](/docs/implement-direct-debit-with-ui-web-embeds/)
* [Invoice UI Web-Embed](/docs/implement-direct-debit-with-ui-web-embeds/#invoice)
* [Pay Portal UI Web-Embed](/docs/implement-direct-debit-with-ui-web-embeds/#pay-portal)
* [Notification UI Web-Embed **OR** notification/create webhooks](/docs/implement-direct-debit-with-ui-web-embeds/#notification)
* [Mandate Request UI Web-Embed](/docs/implement-direct-debit-with-ui-web-embeds/#mandate-request)(only for a mandate request flow outside of the Invoice UI Web-Embed)
## Sequence diagram for a Direct Debit collection flow:
[Section titled “Sequence diagram for a Direct Debit collection flow:”](#sequence-diagram-for-a-direct-debit-collection-flow)

# How to implement
[Section titled “How to implement”](#how-to-implement)
## Invoice endpoint
[Section titled “Invoice endpoint”](#invoice-endpoint)
* In order to trigger Direct Debit collections (both one-off and recurring), it is required to use the invoice endpoint. This provides us with the relevant information for a Direct Debit collection.
* Learn about this service and how to implement it [here](/docs/invoices/).
* Handling recurring invoices - see [here](/docs/invoices-endpoint/#handling-recurring-repeat-invoices).
* Unipaas will support changes made to invoices that are due to be collected via Direct Debit. We currently support changes in invoice amount or due date. You will need to inform us of these changes via the [update invoice](/docs/invoices/#update-invoice) method.
* Invoice endpoint attributes:
| Name | Is Required | Type | Description |
| ---------------- | ----------- | ----------- | ----------------------------------------------------------------------------------------------------------------------------------------------------------------------------------------------------------------------------------------------------------------------------------------------------------------------------------------------------------------------------------------------------------------------------------------------------------------------------------------------------------------------------------------------------------------------- |
| `currency` | Yes | ISO 4217 | The currency of the invoice |
| `totalAmount` | Yes | Number | The total invoice amount |
| `totalPaid` | No | Number | The total amount paid so far on this invoice. If not provided, will be set to 0 by default. |
| `reference` | Yes | String | The invoice number on your system. |
| `batchId` | No | String | The ID of the batch that this invoice was included in. |
| `vatAmount` | No | Number | The total VAT amount for the invoice (can be 0). If not provided, will be set to 0 by default. |
| `publicUrl` | No | String | A public URL to the invoice PDF version. |
| `dueDate` | Yes | Date | The invoice due date. |
| `lineItems` | Yes | Array | Line item object - see table below. |
| `Customer` | Yes | Object | Customer object - see table below. |
| `paymentStatus` | Yes | Enum | Current invoice payment status: Unpaid = `unpaid` Paid = `paid` Partially Paid = `partially_paid` Refunded = `refunded` PartiallyRefunded = `partially_refunded` |
| `paymentMethods` | No | Array, Enum | States which payment methods will be available for this specific invoice.* \*Note:\*\* If Direct Debit is selected, the invoice cannot be paid with Unipaas in any other method.Available Payment Methods: `creaditCard` `bankTransfer` `directDebit` `offlineBankTransfer` `paypal`Important - when the Invoice UI Web-Embed **is not implemented** (e.g., in the recurring payment flow), it is critical to send this parameter with `directDebit` for every recurring payment if Direct Debit is to be used to collect the payment.* Based on platform configuration |
| `invoiceObject` | No | Object | The invoice object in its original form as created on your platform. |
| `isRecurring` | Yes | Boolean | Indicates if this invoice is a recurring one. |
| `subscriptionId` | No | String | The recurring invoice subscription identifier. |
`lineItem` **attributes:**
| Name | Is Required | Type | Description |
| :------------ | :---------- | :----- | :---------------------------------------------- |
| `description` | Yes | String | A description for a specific line item |
| `amount` | Yes | Number | A price of a unit for a specific line item |
| `quantity` | Yes | Number | The quantity of a unit for a specific line item |
`customer` **attributes:**
| Name | Is Required | Type | Description |
| :---------- | :---------- | :----- | :---------------------------- |
| `reference` | Yes | String | Platform customer identifier. |
| `name` | Yes | String | The customer full name. |
| `id` | No | String | Unipaas customer identifier. |
| `email` | No | String | The customer’s email address. |
## Invoice
[Section titled “Invoice”](#invoice)
* Learn about this UI Web-Embed [here](/docs/ui-web-embeds/#invoice) and learn how to [install](/docs/ui-web-embeds-integration-guide/#2-installation) and implement it [here](/docs/ui-web-embeds-integration-guide/#invoice).
* Add invoice mode (`create` / `edit` / `view`), as described in the [implementation guide](/docs/ui-web-embeds-integration-guide/#invoice). Mandatory.
* Add invoice reference in all invoice modes that exist in your platform (`create`, `edit`, `view`). Mandatory.
* Add customer reference. This lets Unipaas know if the customer has a Direct Debit mandate set up with the vendor. Mandatory.
## Pay Portal
[Section titled “Pay Portal”](#pay-portal)
* Learn about this UI Web-Embed [here](/docs/ui-web-embeds/#pay-portal) and learn how to [install](/docs/ui-web-embeds-integration-guide/#2-installation) and implement it [here](/docs/ui-web-embeds-integration-guide/#pay-portal).
* There are no Direct Debit considerations for this implementation.
## Mandate Request
[Section titled “Mandate Request”](#mandate-request)
* Learn about this UI Web-Embed [here](/docs/ui-web-embeds/#mandate-request) and learn how to [install](/docs/ui-web-embeds-integration-guide/#2-installation) and implement it [here](/docs/ui-web-embeds-integration-guide/#mandate-request).
* Ensuring that Direct Debit is enabled for the vendor is highly important before presenting them with the Mandate Request UI Web-Embed. This verification can be achieved through the [GET/vendors/{vendorId}/payment-options/available](/reference/#tag/vendor/GET/vendors/%7BvendorId%7D/payment-options/available) endpoint.
## Notification
[Section titled “Notification”](#notification)
* Learn about this UI Web-Embed [here](/docs/ui-web-embeds/#notifications) and learn how to [install](/docs/ui-web-embeds-integration-guide/#2-installation) and implement it [here](/docs/ui-web-embeds-integration-guide/#notification).
* There are no Direct Debit considerations for this implementation.
Note
If you don’t implement the Notification UI Web-Embed, you will need to implement the notification/create webhook and implement it in the flow of your choice. See more on the notification/create service [here](/docs/vendor-notifications-webhook/).
Tip
We strongly recommend implementing a mandate set up flow from your vendors’ customer list. See [API implementation guide](/docs/implement-direct-debit-via-api/) for more details.
# Example of UI Web-Embeds implementation:
[Section titled “Example of UI Web-Embeds implementation:”](#example-of-ui-web-embeds-implementation)
* HTML
```html
Direct Debit